
We recently posted a blog about mastering and how that skill can improve your mixing technique. The staff at Sonarworks, who like many of you, are producers, engineers, and mixers, suggested an article to describe the modern situation, where mastering is an integral part of mixing. In this article, I would like to discuss the “top-down” technique of mastering while you mix. We have a post on top-down mixing techniques and also some in-depth mastering tips, so we won’t duplicate too much of that information here, but this will be an in-depth look at this process.
Mastering In a Nutshell
It is important that we keep in mind that traditional mastering provides these benefits:
- First, mastering should be a second opinion or reality check on a mix that we may be so close to that we lose perspective. Mastering, therefore, needs to take place in an environment with excellent monitoring conditions.
- Second, mastering is where we make sure our mix not only sounds the best it can, but also that it fits in with the other songs it will play with, be that a specific playlist, a specific genre, or just something like top-40 radio.
- Third, mastering is a chance to QC (quality control check) the song without creative judgment; listening for clicks, pops, distortions, and noises that we may have overlooked during the process of creation. This requires accurate monitoring and sometimes specialized noise-reduction software.
- Fourth, mastering provides an opportunity to focus on technical tasks, like embedding metadata and exporting to the proper format(s) (bit depth, sample rate, compression) for specific delivery platforms, CD manufacturing or vinyl cutting.
Since this article covers mastering your own material, we have to assume that you are prepared to risk the pitfalls of the first three items on the above list. You must trust that what you hear is what everyone else will experience. Be sure to dial in your monitoring, acoustics, and headphones, with the help of Sonarworks software and our blog articles!
By applying our tips in this and our other articles I want you to feel confident that you can accomplish the above results. You should strive to get to a place where you have the technical knowledge and trust in your ears, your listening environment, and your software so that you can create acceptable masters. A great mastering engineer may still beat your achievement, but that step is not always possible or practical for everyone.
Top-Down Approach
The idea of applying mix bus processing during the early stages of the mixing process has become a hot topic [as we covered in our top-down mixing blog post], but let’s take that idea one step further and start our mastering process during the mix.
My professional work is spread between mixing and mastering, and some production as well. I have been mastering for a long time, so I feel confident that I can switch mindsets between mixing and mastering during a mix. I consider my finished mixes as acceptable masters—at least sonically. The metadata, assembly and export processes occur in different software for me, but that is not the creative stuff we want to focus on here. For most projects, I still like to revisit my mix after a good night’s sleep and make any last-minute tweaks.
Workflow
Top-down mixing and mastering means you want to start your mix with some basic mastering processors inserted on your master bus. My master bus for mixing pop songs typically looks like figure 1. I always have an EQ in my chain, followed by some kind of harmonic processor, sometimes followed by a compressor, followed by an optional 2nd EQ, followed by a maximizer. I also always have an LUFS meter and usually a spectrum analyzer at the end of my chain. I may not use all of these in every project and I may add or substitute other processors, like stereo enhancement, de-essing or de-harshing as needed.
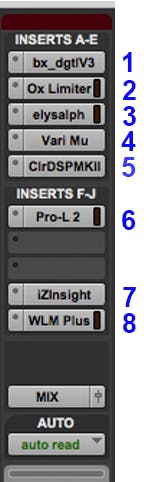
Above is a typical master fader plug-in chain for a mix session, including both mixing and mastering plugins. Here is a description of each plugin and this article will explain the purpose and when to activate each step.
- bx_digitalV3: Equalizer and stereo imager processor
- Oxford Limiter: used for harmonic enhancement
- Elysia Alpha Compressor: for glue compression and harmonics
- Variable Mu®: Glue compression and tone
- Clariphonic EQ: High-frequency equalizer
- Pro-L2: Mastering maximizer with dither
- Insight: real-time analyzer and stereoscope
- WLM Plus: LUFS meter
When and how to apply each processor is a technique that you will develop over time and it may even vary for different genres and mixing strategies. Let’s break down this style of working that has proven effective for myself and many other mixers.
Mixing Vs. Mastering Tools
Certain plugins help a mix come together quickly and can be used right from the start of the mix. Certain other processors should enter the picture towards the end of a mix, but we all know that adding processors late in a mix can substantially change our perspective. Fortunately, applying bus processing during a mix allows us to then tweak the individual mix elements to better fit the processing and we can go back-and-forth as needed.
Let’s take a deep look at each processor type and how and when to best apply them.
Compression
Compression, as it relates to full mixes and masters, is a tool that is often misunderstood as it’s effects can be subtle and even destructive if used improperly. I am a fan of compression during mixing to enhance the groove, glue the mix elements together, and control the overall density of a mix. For mastering, I first think of compressors for color and then for a subtle amount of glue and density. I rarely ever push a mastering compressor past 1 or 2dB of compression, while during mixing, I may pump my compressor to 4dB of gain reduction.
I typically use a lot of different subgroup compression during mixing and get into my master fader compressor later in the mastering stage. However, the top-down approach of mixing implies starting with mix compression during the early stages of a mix and probably not adding additional compression as a mastering processor. Both situations are valid and for me, the top-down approach works best for live band style music and the former approach works well for programmed music, like pop, r&b, hip-hop, and EDM.
Below are some settings that I find useful for mix bus vs master bus processing. Along with these suggested settings, be sure to try out any wet/dry mix controls, as well as saturation options and sidechain filter controls that your particular compressor provides.
Mixing Compressor and settings
Mix compression can be quite aggressive, especially as compared to mastering compression. The attack and release times are critical, as you want to control your mix without killing transients. You also want to enhance the groove, but too fast a release time can cause pumping or distortion.
SSL G Bus Comp – Set this compressor up when the drums and bass start feeling good. An initial setting for me: ratio 4:1, Atk 10 or 30msec, Rel 0.1 or Auto, and set the threshold to achieve 2 to 4dB of gain reduction. Be careful not to raise the drum volume too much after this compressor is set! Great for groove-heavy rock, pop, live band.
Manley Variable Mu® – Set this compressor for glue with Attack between 12 o’clock and 3 o’clock, Recovery to fast or one click slower, Sidechain HPF on, and threshold to achieve about 1dB of compression. Input and output start at 12 o’clock and I’ll play with those to achieve a clean or saturated tone. Great for subtle glue and making a mix more solid.
Suggested Mastering Compressors and Settings
I set my mastering compressors with a low enough threshold that there is almost always gain reduction happening, even in the soft parts of the mix. This ensures that the tone stays consistent and that you can’t hear the mix entering and leaving compression. If your compressor has the option, set the detector to RMS instead of Peak and use a soft knee.
A generic recipe for transparent compression: Set attack to 75 to 100 msec, release between 100 and 250 msec, ratio to 1.3:1 and during the verse of a song, lower the threshold to achieve about 1dB of gain reduction. During the loudest chorus, you may wind up with 2 to 4dB of compression, but the tone will stay even between the sections.
Manley Variable Mu® – Very similar to the above mix settings, with usually only 0.5dB to 1dB of gain reduction. Set this compressor for glue with ATK between 9 o’clock and 3 o’clock, Recovery to one or two clicks from fast, Sidechain HPF on and threshold to achieve less than 1dB of compression. Input and output start at 12 o’clock and I’ll play with those to achieve a clean or saturated tone. Great for subtle glue and providing low-mid harmonic interest.
Elysia Alpha Compressor – Start with ATK between 50 and 100ms, Release at 100 – 150 ms, Ratio at 1.3:1, and set the threshold for up to 2dB of constant gain reduction. Audition the Warm mode and also the Soft Clip setting for harmonic color options and transient control. This compressor is quite sensitive to the attack and release settings, so be sure to play around to find the best setting for your particular song.
Fairchild 660 or 670 – These fantastic compressors have no ratio control, and the attack and release are interconnected as “time constant” choices. For transparent mastering, turn the threshold to achieve 1 to 3dB of compression and then try different time constant settings to find the one that has the appropriate release time. The UAD version allows the knee to be adjusted, so be sure to try the OWR (Ocean Way Recording) setting as well as the stock setting.
Equalization
Try not to touch your master bus EQ until your mix really starts to gel—maybe 80% through your mix process. You don’t want to rely on the EQ as a crutch, but adding EQ to your whole mix can often help you achieve a nice balance without overprocessing individual tracks. For example, a slight wide-bell high-frequency boost (BAX style) can open up the high end of all your instruments and vocals in a more natural way than pushing the EQ on individual tracks. Conversely, a muddy mix can be cleared up with some judicious low-frequency bus EQ rather than thinning out the individual tracks.
The master bus almost always has an EQ as its first device, followed by a compressor, then possibly another EQ. As we have covered in other articles, try to use the first EQ to clean up any mud, harshness or overall frequency balance problems before your compressor and then use the EQ after the compressor to gently enhance the mix.
Suggested Mastering Equalizers and Settings
Pre Compression EQ – This EQ can be any EQ you are comfortable with. I often use the stock 7-band AVID EQ to correct any frequency problems because the EQ provides a wide range of filter shapes and lets you solo frequency bands as you work.
If you need to perform drastic EQ moves, consider fixing the elements of your mix that are creating the problem before applying bus EQ. Then consider using linear phase EQs, which we discussed in an earlier post.
Plugin Alliance bx_DigitalV3 – This EQ provides HP and LP Filters, along with 5 bands of EQ that can be easily soloed. This EQ works in stereo and mid-side modes and also provides a dynamic EQ section that works as a de-esser or resonance remover. Additionally, this EQ contains an effective stereo enhancer and a separate low-frequency mono-maker.
Sonnox Oxford EQ v3 – This EQ provides EQ curves from SSL G/E, Neve, and even GML equalizers. 5 bands plus filters are provided with ultra-low noise and distortion for mastering.
Manley Massive Passive – This feature-rich EQ represents one of many passive-style equalizers. I would typically use this type of EQ for gentle corrections or tonal shaping after my compressor. For a review on passive EQs, check out our previous blog post.
FabFilter ProQ3 – This EQ represents one of many equalizers that can be used in stereo or mid-side modes. Bands can be set to linear or minimum phase and can be soloed. A spectrum analyzer displays the song in real-time and a Match feature allows you to quickly set a useful starting point, based on a reference track.
Dynamic Equalizers – You may be tempted to apply dynamic EQ to your masters, but be careful with the power of these EQs. Dynamic EQs constantly adjust the tone of your mix, which, while useful for individual tracks, can sometimes cause unwanted tonal artifacts when used across an entire mix. Dynamic EQs can tame the occasional unruly bass drop or some intermittent harshness or sibilance, but try to avoid these for overall tone shaping.
BAX EQ – This underrepresented, simple wide-band high and low EQ provides musical tone shaping without introducing phase artifacts. Learn about these and other EQ types in our article about EQ shapes.
Harmonic Processing
Saturation and harmonic distortion can add life and dimension to your mixes. Whether you apply it during mixing or mastering depends on the type of harmonics you are going for and the style of the song. For example, an Arctic Monkeys or Leon Bridges song may allow for extreme master bus saturation, but most music will benefit from gentle harmonic processing on the master bus. Feel free, of course, to use extreme distortion on your individual tracks, subgroups, and parallel busses. Review some saturation techniques here.
I would suggest putting harmonic processing as the 2nd or 3rd processor in your master bus chain—usually before the compressor. I would also recommend holding off on processing your mix bus with any type of saturation until you are feeling like your mix is feeling pretty good—maybe 75% finished. The exceptions to this would be a tape simulator or console simulator, which you may want to mix through from the beginning. After your mix is sitting well, try out some saturation or exciters to enhance certain aspects of your mix and then adjust your individual mix tracks accordingly.
For instance, exciters applied to the upper midrange frequencies can bring out the attack of drums or the pluck of an acoustic guitar. This may also put unwanted edge on your vocals or cymbals, which could then be tamed in the mix. The exciter could also be inserted on a subgroup instead of the master fader. Recently I used the low-band of an exciter to add tube saturation to the kick and bass of a sparse urban mix, which added just the right amount of grit and bite to the bottom, without adding noticeable distortion—a lá One Republic.
Suggested Mixing and Mastering Harmonic Processors and Settings
Kazrog True Iron – This simple plugin models the saturation of six different transformers that shaped the sound of some legendary analog gear, including the LA2A, Fairchild, Neve 1073, and “Blue Stripe” 1176. This plugin adds convincing analog character to mixes and subgroups. Try the Boost setting with the Strength turned up to 3 o’clock to learn the tones and then adjust the mix control to dial in your desired amount of color. It can produce clean, dense tones or overdriven, harmonically-rich saturation effects.
Izotope Ozone Exciter – Multiband saturation with each band providing a handful of saturation modes and individual drive and mix controls. This plugin can be used in stereo or mid-side modes for even more control. This plugin is excellent for subtle to dirty effects on individual instruments and mix busses.
Ampex ATR-102 Tape Machine (UAD) – The ATR-102 is arguably the best-sounding 2-track tape machine ever made, and this plugin faithfully recreates all the original alignment and operation controls of the machine, including tape type and record levels, transformer bypass, over bias control, EQ controls, crosstalk, and even tape-delay controls. I often use the Ultralinear presets as a starting point to give my masters a slight bit of glue and roll off some of the high-frequency transients that can give some music a harsh “digital” sound.
Sonnox Oxford Limiter- This plugin is technically a limiter, but I tend to use it only for saturation by adjusting the Enhance slider. The Enhance control provides saturation and clipping for extra harmonic richness and works in two modes, Normal and Safe, each with a different effect. For pop music, this is truly my “make it better” plugin. This plugin sits 2nd or 3rd in my master fader chain and I engage it after I have all the elements of the mix working, but before I start polishing the mix. A little goes a long way!
Stereo Enhancing
During mixing, we often treat individual instruments and subgroups with stereo widening plugins, like shufflers, imagers and stereo enhancers. Once the mix is together, you may find that the overall effect still doesn’t provide the impression of width. Remember, if everything is wide, then nothing will really sound wide. A stereo enhancer on your mix bus may add the finishing touch to your wideness desires. For master fader use, I often opt for a multiband stereo imager, but sometimes a simpler widener works. Be careful to choose an imager that is suitable for stereo bus processing and doesn’t introduce phase problems that you may later regret.
We covered stereo image processing in a previous mastering article, and I’ll give you some of my useful tips below.
Suggested Mixing and Mastering Imager Processors and Settings
Brainworx bx_digitalV3 – Generally, I like to apply the stereo widener control on this EQ as the first processor in my master bus chain. This EQ provides an excellent stereo widener along with an effective mono-maker for the bass frequencies. I rarely go past 125% on a master bus. I don’t typically use the Mono-Maker for urban or synth-based music, but organic rock songs often benefit from making frequencies below 100 to 160Hz mono. This is especially effective for headphone listening. Additionally, this EQ can be used as a mid-side processor for even more stereo widening effects.
Ozone 9 Imager – This multiband stereo processor allows four independent bands of stereo adjustment from wide to mono, as well as a stereo synthesizer for mono tracks. This plugin also provides a vectorscope, phase correlation meter, as well as mono compatibility check.
Try keeping your bass frequencies a bit more narrow than your highs for a spacious effect. This plugin is also effective for gently enhancing rhythm guitars or background vocals in the mid frequencies.
Mid-side processing – Gentle mid-side processing with an EQ or compressor can help adjust the perceived stereo width and is very useful to help push a loud lead vocal back into a mix or enhance the ambience of a sparse mix.
Multiband Compression and Dynamic Equalizers
These processors are two sides of the same coin, in that they both control the amount of energy in specific frequency ranges. If these processors intrigue you, I would recommend that you spend quite a bit of time learning how to best use them. Because these processors have so many parameters and so much control over frequency content, they can be dangerous and require a gentle approach, especially on mix busses.
Let’s take a look at a few typical mix problems and how to effectively use these processors. The examples below are starting points, and you may find that where I mention a multiband compressor you would rather try a dynamic EQ. Go for it, as your instincts may be right for your situation.
Mixing with Multiband Compressors and Dynamic Equalizers
- Lead vocal with a few words or phrases that get boxy or boomy. Try a multiband compressor set to the frequencies between 150Hz and 400Hz, with a 3:1 ratio and fast attack and release. This will clamp down only on phrases that contain too much mid-bass, clearing out the mud. Great for pop music, but watch out for unnatural tonal effects.
- Acoustic guitar with occasional loud squeaks. Dynamic equalizer with a narrow notch set to the offending frequency—probably between 3.5kHz and 7kHz. Set the band for a few dB of cut with a fast attack and medium release. Adjust the attack and release for the most transparent gain reduction. Try a narrow or wide bandwidth depending on the range of problem frequencies, or try two different frequency bands.
- Synth bass buss in an EDM or pop song. A multiband compressor may be just the ticket to reign in a boomy sub-bass without losing any top-end clarity or mid-range punch.
- Snare drum with a pronounced ring at a specific frequency, usually between 500Hz and 1kHz. Try a dynamic EQ with a very tight bandwidth and several dB of cut. A very fast attack and quick release should work well.
Stereo Bus Processing with Multiband Compressors and Dynamic Equalizers
- Occasional Harsh high end in a mix. If your mix has one or two moments where there is a buildup of high-frequency energy from drums, guitars, and background vocals all playing together, try a dynamic EQ on your mix bus set to a moderate bandwidth and 1 to 3 dB of cut with a medium attack and medium release to soften those harsh moments. Adjust the attack and release for the most transparent action. An intelligent processor like Oeksound Soothe may also work well here.
- Out of control sub-bass on an otherwise good mix. I would recommend treating this at the source (in the mix) but on the master fader, you could apply a multiband compressor with the lowest frequency band set to catch and control the sub-bass. Avoid fast release times and listen for distortion on the bass tones. More about this in the mid-side section.
- Sibilance in a master. Again, a fix-in-the-mix situation, but if it’s too late for that, try a multiband compressor or a dynamic EQ with a very fast attack and release set to catch the frequencies between 4kHz and 8kHz. Try to narrow the frequency range as much as possible.
- A lead vocal is too loud or not properly compressed. Another fix-in-the-mix situation, but I have had excellent results with the following technique. Set a mid-side compressor to multiband, with only two bands. Bypass the side compressors and only use the mid settings. Set the crossover point to around 150Hz, so you barely hear any vocals in the low band. Bypass the low band compressor and then set a medium-fast attack and release, 1.5:1 ratio and set the threshold to achieve 2 to 3dB of compression. This should push the vocal (and possibly the snare) back into the mix in a very transparent way, without affecting the width or low-end power of the mix.
These applications may sometimes be drastic fixes, especially on a full mix, so choose where you place them in your processing chain based on how much work they need to do. The more work they need to do, the earlier in the chain they should be placed. In the case of the last example with the lead vocal too loud the multiband compressor should be first, before any other processors.
Mid-Side Processors
Mid-side processing, like multiband compression and dynamic EQ, can be dangerous to the overall mix, so be sure that your processing is improving the mix, rather than hurting it just to create a cool effect.
Mid side processors can solve tonal or volume problems that affect only center-panned instruments, like lead vocals or only wide-panned instruments, like rhythm guitar or keyboard pads. Mid-side processors can also alter the stereo width of a mix by adjusting the balance between the center-panned elements and the wide-panned elements.
Here are some examples of mid-side usage that may be helpful.
- Acoustic guitar track with too little ambience. Use a mid-side EQ to increase the high frequencies on the sides of the mix to enhance the reverbs without brightening up the guitar too much.
- Simple track with muddy reverb. Try a mid-side EQ to dip out the frequencies between 100Hz and 400Hz only in the sides. This will clear the mud from the ambience and maintain the power of the main tracks.
- Synths that are too dull sounding in and EDM track. On the keyboard subgroup, add mid-side EQ and boost the high-mids and highs in the side channel to add some width and excitement to the keyboard blend. Try also a mid-side exciter for this.
- Kick drum too loud. Use a mid-side multiband compressor and compress just the mid and only the low-band. A relatively fast attack and moderate release to catch the frequencies below 100Hz should subdue the kick without affecting much else in the mix.
There are many uses where mid-side can be effective, but be wary of changing the mix or subgroup in a way that hurts the overall effect of the mix. All of the above examples could be best handled with individual mix processors, but sometimes we paint ourselves into a corner and we try to work on the stereo bus in order to save the processing we have already committed to.
Maximizer on the Mix Bus
The last processor in our stereo bus chain is the Maximizer, or mastering limiter. Like many of the other processors, the maximizer should wait until the mix is coming together but can be applied once the main elements of the mix are in place. My thinking is that the maximizer affects the way elements glue together, much like a compressor, so once the maximizer is working you can make better mix decisions.
Don’t make your maximizer work too hard. For pop and rock mixes, once all the main elements of the mix are in, try applying 2 to 6dB of attenuation. Each time you add more loud mix elements, you may need to re-adjust your maximizer. If you are planning on also using a compressor on your mix, I would suggest setting the compressor to do a little work before you set the maximizer and then as the mix gets further along, you may need to readjust both the compressor and maximizer to compliment each other.
Listen for artifacts like the whole mix “fluttering,” distorting or losing clarity. If these artifacts show up, you are probably hitting the maximizer too hard! For more information on how loud to make your mix, check out our article about streaming services.
Most maximizers provide style settings that will affect the overall tone of the mix, so try to audition those settings early in your process, but don’t be afraid to reassess those settings towards the end of your mix. I must also let you in on a secret. Many times a second maximizer is used after the first one to achieve the final level for your master. Often times as you mix through a maximizer, you come to rely on the tone of that processor and changing settings at the end of your mix can affect the overall tone. Simply leave that maximizer alone, but bypass any dither, and insert another maximizer after it.
I am partial to the Fabfilter Pro-L2 as my maximizer, but I often utilize the Ozone 9 Maximizer or even the Waves L2 if those achieve the tone I’m after.
Dither
Remember to apply the correct dither settings on your maximizer. 16-bit is appropriate for masters that will be sent out for streaming. 24-bit is appropriate in the cases of HD streaming or iTunes Digital Masters. In any case, it’s a good idea to export your final master as both a 16-bit version and a 24-bit version for future needs. Keep your master at the same sample rate that you worked in unless you are asked to deliver a different sample rate.
Heads and Tails
It is important to mention at this point that your final master for delivery for streaming, CD or video use should have a bit of silence at the beginning and the end of the file. I would recommend 100 to 250 milliseconds of silence in your audio file before the music starts and 1 to 2 seconds of silence after your fade ends or the song is over. The bit of space at the head provides a buffer so that playback devices won’t accidentally cut off the top of your song or start with a digital click. The space at the end ensures that your song ends completely without a click or pop before the next song begins. Please do not start your audio file at the sample that music starts!
In Conclusion
The descriptions here are meant to provide a solid jumping-off point for those of you who wish to master your own mixes, especially when mastering is part of your mixing process. Be sure to check your results on several playback systems and don’t give up until you’ve created something you’re proud of. This extra layer of mastering during the mix is a complicated element to add at first, so give yourself several mixes before this becomes comfortable and second-nature.


