In this article, you’ll learn the most common steps to master a song. You don’t need to use all the steps every time and bear in mind that there’s much more to mastering than just learning how to use the tools. Mastering is a mindset that is different than production or mixing. Studying the art of mastering will improve your mixing technique because, through mastering, you will develop a deeper understanding of how a proper mix sounds and feels.
My goal is to give you a map—an outline of the skills you need to develop so you can start mastering music. First things first: do no harm. Make sure you keep listening back to the raw mix and asking yourself “Am I actually making the music sound better?” If it’s improving, proceed. If not, squash your ego and undo your last few moves. Simpler is often the better path in mastering.
The mastering process starts with listening to the song or collection of songs. As you listen, take notes on what you feel needs fixing. For example, maybe one song needs a bit more top end, or the vocal isn’t loud enough, or track 5 of the album is much darker than all the other tracks.
Keep in mind that we master for a specific context, be it an album, a compilation, or a top streaming service. In an album, the loudness of one song may depend on the song before and after it, whereas the loudness of a single should be competitive with other songs in that genre.
It’s very important to become familiar with and use great-sounding reference tracks. They’ll provide you with an idea as to how finished music sounds on your system. As you work, continually compare your master to commercial releases. For this purpose, I use ADPTR Audio’s MetricAB. It lets you open up 16 songs at once, as well as loudness-match them. The plugin also provides you with a few filters to listen to just the lows, just the mids or any section of the frequency spectrum of your reference track. David Glenn of TheMixAcademy uses this process to compare his mixes to other records. With MetricAB, it’s a breeze to check the low end of the disco-funk song I’m working on against Daft Punk’s Get Lucky.
Plugin Order
First, there is something to be said about the order of the EQ and compression plugins. A compressor reacts to the amount of energy that hits its threshold at any point in the song.
If you EQ before the compressor, you’re changing the level and frequency content of the audio that hits the compressor. This will result in the compressor reacting differently than if the EQ happens after the compressor. However, sometimes pushing an EQ into a compressor is great.
Engineers generally use an EQ before the compressor when they’re trying to fix problems with the frequency balance of a song. So try an EQ, a compressor and then another EQ after the compressor to further improve the sound or to clean up some coloration added by the compressor. A compressor, in general, will exaggerate frequency problems that exist in a mix.
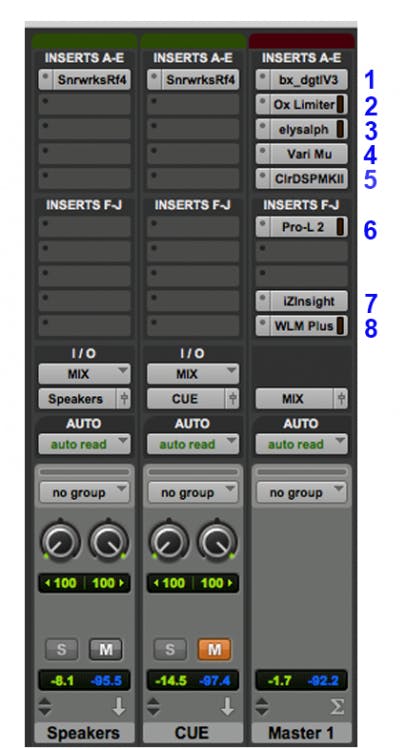
The Master fader on the right processes all the audio sent to the “MIX” bus. The leftmost Aux fader sends the MIX bus to my speakers and the middle fader sends it to my headphones. Each of those faders has the appropriate Sonarworks Reference plugin setting.
Here is a list of my plugins and what they are doing:
1. Brainworx bx_digital : EQ and stereo widener
2. Sonnox Oxford Limiter: Only for saturation
3. Plugin-Alliance Elysia Comp: slight compression and soft clipping
4. UAD Manley Vari Mu: Glue compression
5. Kush Clariphonic: EQ for silky top-end
6. Fabfilter Pro-L2: Maximizer and dither
7. Izotope Insight: Spectrum analyzer
8. Waves WLM Plus: LUFS meter
I also automated the Master Fader, which, in Pro Tools, changes the level before the plugins.
EQ
Mastering is all about making small changes that result in great results. Think in tiny increments, say 0.5dB or even 0.25dB. Listen carefully to how EQ changes impact the overall sound. Many veteran mastering engineers support the idea that if you have to EQ something more than 2-3dB, there’s a serious problem with the mix. Remember that when you EQ a master, you are effectively processing every track that made up the mix, so a small change will be powerful!
An oft-used equalizing technique is known as feathering. This method consists of doing small moves at frequencies neighboring the one you actually want to affect. The end result is a more transparent sound. Instead of adding 1.5dB at 150Hz, you add 1dB at 125Hz and 0.5dB at 175Hz. For more specific EQ tips, see our articles about types of equalizers, equalizer curves, and linear phase EQ.
Subtractive EQ
This is generally the best way to fix tonal problems. The end result of reducing the energy of a frequency band is much more pleasing to the ear than the artifacts of boosting. If you bring down the low end, for example, the result is just like if you would’ve boosted the mids and highs.
If you want your track to sound brighter, for example, a good way to do it is to use a low shelf EQ and bring down the lows. Reduce the low-frequency content until the song sounds brighter, without it having lost too much power. If needed, boost the EQ’s output by 0.5-1dB to compensate for the loss in volume that resulted from this subtractive EQ. The opposite also applies: if your track needs a bit more low end, first try using a high shelf to reduce the highs.
Here are a few commonly occurring issues and how to fix them.
- Rumble: Reduce 30-40Hz and below using a low shelf or gentle high-pass filter. Just be careful not to hurt your kick drum (especially 808 booms) or bass in the process.
- Boomy: Bring down lows at around 100-150 Hz with a wide bell.
- Boxy or muddy: Attenuate low mids in the 150-350 Hz area.
- Thin: Gentle boost in the 500-600 Hz range with a wide bell.
- Lack of presence: Very gentle boost at around 3-5 kHz.
- Brittle/harsh: Cut around 3-8 kHz. If that fails, boost the low frequencies a bit.
- Dull: Gentle high-frequency shelf boost. Pay attention to the cymbals and hi-hat, though. If they become too loud compared to the rest of the drum kit, or if they start sounding annoying, this may be a job for a harmonic exciter, which we will get to in a bit.
DYNAMIC EQ
This type of processor behaves somewhere in-between an EQ and a multiband compressor. While similar to a multiband compressor, the dynamic EQ replaces the multiple compressor bands with individual auto-adjusting EQ bands. Dynamic EQ bands raise or lower their gain when the level of a chosen frequency band crosses above or below a threshold defined by the user.
One job that calls for a dynamic EQ is when a song is missing brightness or shine (8kHz and over). You could use a static EQ, but an overall boost in this frequency range can make a mix sound harsh or fatiguing. With a dynamic EQ, the gain of the high boost will auto-adjust to maintain a consistent tone, raising when needed and remaining flat when not needed.
Start by using a gentle high shelf filter to boost the top end. Then, tweak the dynamic settings of threshold, attack, and release. Your goal is that the dynamic EQ backs off a bit when brighter elements appear, such as cymbals, horns or background vocals.
Mastering engineers usually opt for transparent EQ plugins/units. Some recommendations are:
- Sonnox Oxford EQ
- Brainworx bx_digital
- PSP Neon HR
- FabFilter Pro-Q3
- iZotope’s Ozone Equalizer
- Stock EQ plugins also work well
COMPRESSION
If you need a refresher on compression, follow this link: https://www.sonarworks.com/soundid-reference/blog/learn/how-to-hear-compression/
In mastering, compression is optional. Make your final decision with your ears, but if you’re not sure if you need compression, you probably don’t. Listen carefully for tonal changes that you might not like, like reduced clarity, muddy or thin low-end, or harsh highs. Every compressor has its own characteristic tone and you need to learn a few of your compressors well.
Compressors are for bringing up low-level details and adding density. Don’t use a compressor to turn down loud sections or to fix macro-dynamics issues. For example, if the verse is 10dBs quieter than the chorus, use volume automation and bring up the verse to close the gap.
Generally, mastering compression is applied pretty lightly. Most engineers use low ratios (almost always less than 2:1) and aim for around 1 or 2dB of gain reduction. Ideally, when you compress a song during mastering, the end result is felt, not heard. Ratios much above 2:1 will provide more audible and unnatural effects of compression—which may occasionally be appropriate.
The most important controls of a mastering compressor are the attack and release. The transients are affected by the attack control. The release can be though of as the time it takes for the gain to return to normal after the signal is compressed.
A fast attack setting will have the compressor react to the drums, making the gain duck on every beat. A very fast release setting will have the gain return to normal quickly, but this can make the song pump, flutter, or even distort. Therefore, keep your settings moderate.
Start with the attack time around 30-40ms, but go as slow as 100-150ms if you have to. Set it so the transients of the percussive elements of the song are not affected when is pushing 1-2dB of gain reduction. Too fast an attack can make your snare feel weak and farther back in the track. Note: You can only find the best attack time after you’ve set the release.
Too fast a release time will affect the sound in such a way that you’ll get pumping artifacts. On the other hand, if the release time is too slow the compressor will never release the audio, resulting in constant gain reduction. When it comes to getting the best release time, often the compressor’s auto-release setting is your friend.
There are three thoughts on setting your release time. A medium release time, say 100ms, will almost always be transparent. A slower release time will yield a fatter, glued-together feel. A tempo-based release, like an 8th or quarter note time value, can provide a more exaggerated rhythmic pulse that accentuates the groove.
Using multiple compressors in series (one after the other) may let you even out the level of a mix more transparently than relying on just one compressor. Go for very gentle settings and strive for transparency.
‘Transparency’ means that the problem is fixed, but there is nothing else noticeably added or removed.
It’s important to bear in mind that not all compressors are great mastering compressors.
Here are a few plugins that are excellent for mastering:
- Weiss DS1-MK3
- Waves SSL G-Master Buss Compressor
- Waves API 2500
- Shadow Hills Mastering Compressor
- FabFilter Pro-C 2
- PSP MasterComp
- PSP Xenon
- iZotope Ozone Vintage Compressor
- iZotope Ozone Dynamics
- Vertigo VSC-2
- Elysia Alpha Compressor
- SPL IRON Compressor
MULTIBAND COMPRESSION
Multiband compression requires a specialized type of compressor. The benefit of using such a tool is that it separates the frequency spectrum into multiple bands, enabling you to compress different frequency ranges as required. For example, you can tighten up the low end without affecting the rest of the track, or you can tame that terrible-sounding ride cymbal only during choruses.
Like Uncle Ben told Peter Parker (Spiderman): “With great power comes great responsibility.”
Make sure you don’t overuse multiband compression as it can negatively impact a song in a number of ways. Such a processor has to pass your track through multiple filters before it’s split into the different frequency bands, often adding distortions to your track. Using multiband compression on acoustic instruments can sometimes make them sound artificial or unnatural.
- iZotope Ozone’s Dynamics (can process up to 4 bands of dynamics)
- FabFilter Pro-MB
- Waves C6
- Blue Cat’s MB-5 Dynamix
- IK Multimedia Quad Comp
HARMONIC DISTORTION
Note: if you want to learn more about harmonic distortion, check out Brad Pack’s article on the topic.
Saturation is more than useful when it comes to warming up or brightening a mix. It can add sparkle to guitars and synths, thicken up your drums and give some life to dull, boring sounds. “Lo-fi” sounds are becoming more and more popular and even mainstream pop vocals are being treated with distortion more than ever.
The harmonic content of a sound constitutes what we call timbre. Timbre is what makes a voice sound different from any other instrument. Harmonic distortion adds new harmonics that are related to the original sound. The addition of these harmonics alters the timbre of the sound, the end result of which is usually a richer, more defined tone. Where equalizers can bring up or down the level of certain frequencies in a sound, harmonic processors, like exciters, create new frequencies that were not present or noticeable in the original sound.
Let’s say you’re trying to warm up a song, but EQ just doesn’t feel right. Tape saturation may add the low-frequency depth you’re looking for. If the material requires brightening, tube or transistor saturation may be the ticket.
The plugin I generally use for this task is iZotope’s Ozone Exciter. This processor lets you work in mid-side, but it also allows one to excite multiple frequency ranges independently, in parallel. Additionally, the gain match feature can help you decide whether the processing actually improves the material, or it just makes it louder.
Recommended plugins:
- Wavesfactory Spectre
- Waves Vitamin
- iZotope Ozone Exciter
- FabFilter Saturn
- Softube Tape
- Waves Abbey Road Saturator
- Waves J37 Tape
- PSP VintageWarmer2
- Kazrog True Iron
- Avid’s stock Lo-Fi plugin
- Airwindows’ PurestDrive
STEREO IMAGING
Not every song you work on needs a wider stereo image. It’s important you talk to the client about their needs and wants for the project. Panning, reverbs, and delays all contribute massively to the stereo image and they can best be handled during mixing. The dangers of over-using stereo enhancement in mastering include diminishing the song’s groove or weakening the bass foundation of a song. If you spread the groove elements too far apart, they’ll stop sounding and feeling connected to each other and the bass will typically feel less present. Stereo widening can also cause mono incompatibility, so be sure to check your masters in mono if that may be an issue.
Generically, stereo enhancers are referred to as imagers or shufflers. When using a tool such as iZotope’s Ozone Imager, try to mono-ize the low end (some engineers go as high as 60Hz). Widen more as the frequencies increase. Imagine the stereo field like a rose in bloom. Top-end can be widened much more than the mids. Since the most important elements of your track reside in the midrange, you might want to leave that 500-1000Hz range alone. In the end, it all depends on the song.
(When it comes to increasing width, using mid-side processors may also be effective—see more about those below.)
Important note: If you need to adjust the stereo imaging of the song you’re working on, do it as the first step in your chain, before you employ other processors. If the stereo image is okay, and all you want to do is widen it a bit, insert your stereo width plugin second-to-last, right before the limiter/maximizer.
Recommended plugins:
- Voxengo’s MSED (free!)
- iZotope Ozone Imager (a free Imager is also available from Izotope)
- Softube Weiss MM-1 on the “wide” setting
- UAD Precision K-Stereo (allows width and depth adjustments and ambience recovery)
- Boz Digital Mongoose
MID-SIDE PROCESSING
First things first: what is mid-side (M-S) processing? This type of processing is an effective way of adjusting either the center image or the sides of a mix. Remember that mono means the same signal in both speakers (appears in the middle), and the stereo means different elements in the left and right speakers. Mid and side are also sometimes referred to as sum and difference signals.
Mid signals typically include the kick, snare, bass, lead vocal, and other lead instruments. Side signals include reverb and effects, drum overheads, background vocals and any instruments that are panned to the left and/or right.
M-S processing is not a silver bullet. It does have its drawbacks. For example, if you use an M-S EQ on the lead vocal (mid), you may also affect a portion of the guitars and other instruments panned only partially to the sides. M-S processors must decode the stereo field to mid and side components and later rejoin the two back into a stereo signal. All this processing may cause unwanted artifacts, so listen carefully!
M-S Equalization Tips
If your mix sounds muddy, consider using a low shelf cut on the side channel to clear it up. You could use this to clean up stereo pad sounds without affecting the vocal, kick and bass in the center of the mix.
- If you want to widen your stereo image, gently boost the sides at around 8k using a high shelf.
- If you need to tighten up the low-end, try soloing the sides only to see if there is mud in the sides and then decide whether to EQ the mid or side to clean things up.
- You can add more clarity to vocals by cutting instruments that cover the vocal range, somewhere around 500-1000Hz. Cut these frequencies in the side channel.
M-S Compression Tips
Sometimes, applying standard stereo compression to your track folds in the stereo image a bit or pumps from the low-frequency content. The solution for this may be to use an M-S compressor. Apply the necessary amount of compression to the center and to the side, independently of each other.
One common use for M-S compression is to correct a mix where the lead vocal is too loud. Gently compressing the mid (perhaps with a high-pass sidechain EQ) can push the vocal slightly back into the mix while retaining a wide stereo image.
Another example would be to control the 808 in a trap record without squashing the whole mix. Again a mid compressor, maybe even only the low band of M-S multiband compressor would do the trick. Izotope’s Ozone Dynamics process provides multiband and mid-side processing at the same time.
M-S Saturation
This might be a new concept to you, but it works in certain cases. Say you’re working on a rock song. The guitars are double-tracked and hard-panned, and they sound great. The cymbals are nice and pleasantly bright. The lead vocal in the center, however, is a bit dull.
If using a mid-side EQ fails you, instantiate a mid-side saturator such as the Ozone Exciter. Switch it to mid-side mode and add that extra character to your vocal by saturating it.
AUTOMATION
In case the song you’re working on requires it, go ahead and use some creative volume or panning automation.
- I often make the song less wide during the verses. I restore the width to normal during choruses and bridges. I narrow the song to about 70-80% during the intro and first verse (if the structure allows for it.) If the song starts with a chorus, I’ll still make that one a tiny bit smaller, so that the first ‘proper’ chorus jumps out at you a bit more. I use Boz Digital Labs Width Knob to automate the mix’s width.
- Consider automating both a low and a high shelf (for example, 200Hz and 12kHz) to cut 1dB or so during the intro and verses. Return the EQ to 0 during the choruses for a nice payoff.
- Do the same with volume: bring it down by 1dB during the verses, and restore it to the initial volume during choruses.
- A more important use for volume automation is to add excitement to a track that’s not dynamic enough. Ride that fader and breathe some life into the song. For example, bring down the pre-chorus just a tad for two eight-notes before the chorus kicks in.
- Conversely, if the volume difference between the different sections of the song is too great, automate the volume to bring them closer together. While the artist may like dramatic dynamics, you should warn them that some streaming services penalize songs that have too much dynamic range—mainly Spotify which still measures loudness with ReplayGain and not simply integrated LUFS.
- Keep in mind where you are automating your levels if you want your volume automation before or after your compressor. Definitely before your Maximizer!
LIMITING & MAXIMIZING
Limiting is the very last step in your mastering chain. This is the song’s last chance to get “loud enough” for the medium you’re mastering for. Many people use the term limiter generically, but for mastering, we should use a maximizer. A limiter prevents peaks from getting past its ceiling, while a maximizer increases the volume of the song until it hits the ceiling and starts becoming limited. Additionally, maximizers typically have some tonal and transient controls as well as built-in dither functions.
Maximizers have near-instant attack times and extremely fast release times so that the processing is transparent. Many maximizers provide options for different release times in different frequency ranges, as in the Ozone Maximizer’s Intelligent Release Control modes. These options subtly affect the tonal balance of your master and should be auditioned. Other maximizers, like Fabfilter’s Pro-L2 provide style settings from transparent to aggressive.
To use a maximizer, lower the threshold and the song will get louder until it sounds right. Past a certain point, you will start noticing distortion and pumping artifacts. Each song has a sweet spot for loudness and ideally, you won’t have to surpass 3-4dB of limiting to get your loudness transparently. If you find you need more than 3-4dB of limiting, try a second maximizer after your initial one. Two in a row often sounds better than one maximizer working too hard. Remember to check how hard your maximizer is working during the loudest section of the song.
It’s a good idea to set your maximizer’s ceiling to -1dB TruePeak. The idea is that leaving a bit of headroom in your .wav file master will allow better sounding lossy conversions to mp3 and aac. Apple’s best practices for digital masters suggest 1dB of headroom as a safe amount for most music. You can audition your master as it will sound as an mp3 or aac by using Izotope’s Codec Preview function or Sonnox’s Codec Toolbox.
Streaming services level-match songs pretty well, but be sure to compare your master to a commercial song in your genre to achieve the same apparent loudness and impact. Inform your clients about the benefits of dynamic range! Either use the free Loudness Penalty website (or their $49 plugin) to check how your master’s loudness will match up to a particular reference track on various streaming platforms.
Recommended maximizer plugins:
- Weiss Compressor/Limiter
- iZotope Ozone’s Maximizer
- FabFilter Pro-L2
- PSP Xenon
- Sonnox Oxford Limiter
- IK Multimedia Stealth Limiter
- Airwindows ADClip
Clippers
Many mastering engineers have used analog clipping to increase the loudness of the song they’re working on. They used to do this by clipping the A/D converter itself, which shaves off the loudest transients and allows a louder average level with no digital ‘overs’. Today, we can use digital clipper plugins to achieve incredibly loud masters with almost no apparent distortion. A clipper would be placed before the maximizer and for genres like EDM and dubstep the clipper provides most of the loudness and the maximizer provides the final level.
Bear in mind that clipping can have its own sound, so try some different clipper plugins. My personal favorite is Airwindows’ PurestDrive as it’s virtually transparent. The JST Clip and Kazrog KClip3 plugins provide a range of clean to saturated clipping effects.
CONCLUSION
Now you know the basics of mastering.
As I mentioned in the introduction, my goal wasn’t to cover everything mastering-related in this article. Take what you learned here, master some practice tracks, master for a few buddies and hone your skills. Who knows, maybe you’ll end up loving it!
You can find practice tracks on Mike Senior’s multitrack library. These are for personal use only. It’s forbidden to use them as part of your portfolio. Download some tracks you want to practice mastering on by right-clicking “MP3” next to “full preview” and choose “Save”.
Enjoy.
BONUS FAQ
…for producers and mixers
“Why is it important to have my songs mastered by someone else, Tiki?”
I’m glad you asked, Victor.
One of the big reasons why having your song(s) mastered by someone else is that they’ll do the final check. As you’ve been involved with the song for quite some time now, you’ve probably grown accustomed to its character and even its flaws. An objective person (the mastering engineer) will uncover any clicks, mouth noises, guitar amp buzz or what-have-you that might’ve passed by you.
A second reason is how well the mix translates on different playback devices. Obviously, iPhone speakers won’t be able to play back your awesome 808-bass lines, but overall the mix needs to sound somewhat similar on all devices. The feel and all the important musical information needs to be consistent on all listening devices, without being too harsh or too bassy on any particular system.
The third reason to have an outside person master your music is that, as I already mentioned, you’re probably desensitized to, or can’t hear, the sonic flaws of the song. A good mastering engineer will have a fresh perspective on your work, incredible ears, and great sounding gear. This all allows him/her to clean up the frequency balance of your songs, even out the dynamics of your song, and enhance the depth and stereo image of the songs.
To continue learning more about mastering, read our other blog articles:


