We all know that compression is one of the most important skills you need as an engineer. Without having a good grasp on compression, you’ll be flying blind when tracking, mixing, and mastering. Don’t feel bad if you’re not comfortable with it yet; it’s the most difficult and usually last skill audio people master. It doesn’t help that compression is also the most abstract process.
In this article, you’ll learn how to hear compression, with a focus on compression artifacts.
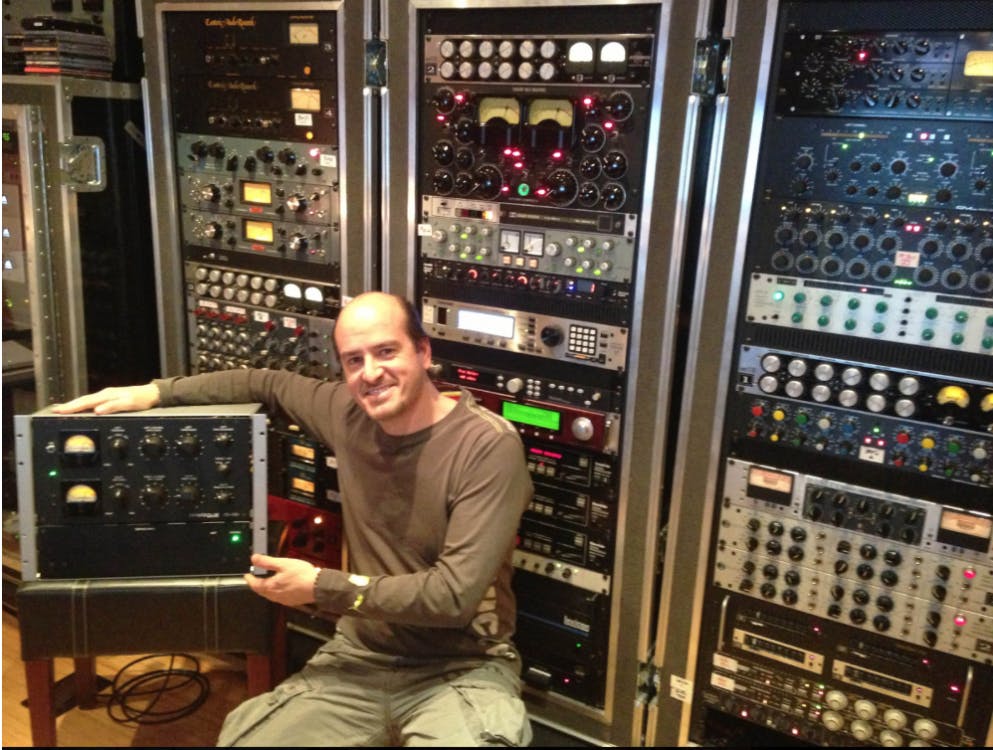
Engineer/producer Rafa Sardina shows off one of his dozens of outboard compressors
Once you know what improper compression sounds like, you’ll know how to tastefully set it and get the most out of it without ruining your sounds.
We all know that compression is one of the most important skills you need as an engineer. Without having a good grasp on compression, you’ll be flying blind when tracking, mixing, and mastering. Don’t feel bad if you’re not comfortable with it yet; it’s the most difficult and usually last skill audio people master. It doesn’t help that compression is also the most abstract process.
In this article, you’ll learn how to hear compression, with a focus on compression artifacts.
Once you know what improper compression sounds like, you’ll know how to tastefully set it and get the most out of it without ruining your sounds.
Characteristics of Compression
When first starting out, it’s easy to recognize when to use an EQ or a noise gate, but compression is different. The seemingly obvious use for compression is for controlling dynamics, but that is a great oversimplification. For simply leveling the inconsistent volume of an audio track, fader automation and clip gain should be your first set of tools. While it’s true that compressors control dynamics, many other characteristics of the sound can be manipulated with the creative application of compressors. To the seasoned engineer, compression serves three creative purposes.
One
Compression controls dynamics. We can either knock down the loud moments of a performance or put a slight downward pressure on the entire performance. The latter enhances musicality by adding density, loudness, and power and helps bring up the subtle details in a track. The former application simply keeps loud moments in check and should be used to control peak levels and avoid overloads.
Two
Compressors, via the nature of their electronic components, manipulate the tone, vibe or color of an instrument or voice. Some compressors, like the Manley Variable Mu®️, provide subtle to rich low-midrange harmonics that enhance the sense of depth and musical complexity. Other compressors, like the Universal Audio 1176 can add some mid-range and high-frequency harmonic distortion that makes a track sizzle or jump forward in a mix. These tonal colors are the reason why top mixers, even those who mix on huge analog consoles, have dozens of channels of different outboard compressors, but only a few channels of outboard EQ. Tubes, transformers, and transistors impart character to compressors that go beyond simple dynamic control.
Three
Since compression affects the envelope (attack, decay, sustain and release) of a sound, we can adjust compression to add sustain, bring out room tone and natural reverb, slow down the attack or add energy to the attack of a sound. These envelope-shaping effects can affect the way a performance feels in time with the other instruments. For instance, taking away the quick attack of a snare drum can make the playing slightly more relaxed—almost behind the beat. Adding a snappy attack to a bass can seemingly pull the bass forward in time and make the performance more aggressive. Envelope shaping with compressors can create the pumping drum room sound of so many classic rock records.
So, you see, compressors are much more than dynamic controllers and their transparency or their ability to change tone and shape the envelope of a sound are what lead us to choose one compressor over another.
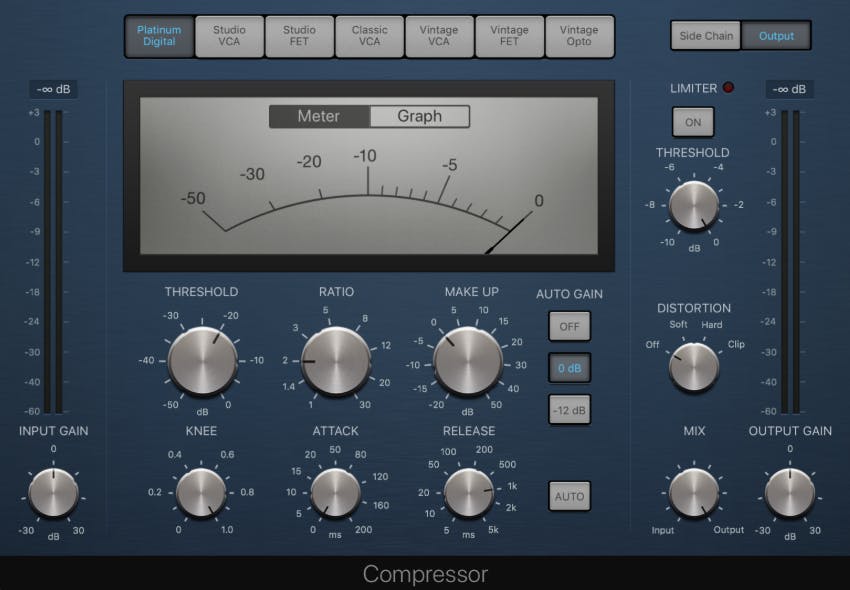
Let’s go over the main controls of a typical compressor.
- Threshold sets the amplitude at which the compressor starts working. This is the critical setting that sets how often the compressor jumps into action. A compressor can react to peaks only (high threshold) or gently compress everything (low threshold).
- Ratio indicates is how forcefully the compressor resists loud sounds. A ratio of 3:1 (three-to-one) means that once the threshold is reached, it takes an additional 3dB of input above the threshold to sound 1dB louder at the output. A high ratio compressor (at least 10:1) is usually called a limiter: nothing really gets louder than the threshold. A low ratio, say 2:1 allows the signal to get past the threshold but slightly dampens the dynamic range.
- Attack describes (in milliseconds) the time it takes for the compressor to go from no compression to approximately 67% (two-thirds) of the full amount of gain reduction. Put differently, the attack time is not a delay before the compressor starts working, but lets us know how quickly the compressor clamps down once it starts working.
- Release describes the time it takes your signal to return to its non-compressed level once it falls below the threshold. Release times are measured in milliseconds or even seconds.
- Knee: the knee relates to the threshold and can be thought of as a transition area between no compression and full compression. For a hard knee setting, when a signal crosses the threshold the compressor acts and the tone of the sound will noticeably change. A softer knee setting can smooth the transition from uncompressed to fully compressed, easing the sound in and out of compression and keeping the tone more consistent. Knee is typically described as hard or soft, while dBX refers to soft knee as “Overeasy®.”
- Optional controls found on many compressors:
- Auto Attack/Release mode sets a factory preset attack and release time, which usually locks out the user controls for attack and release.
- Makeup Gain (Auto Makeup Gain) provides a way to maintain a consistent volume when comparing processed to unprocessed signals.
- Mix allows the uncompressed signal to be mixed in with the compressed signal to control dynamic range while retaining the transients and clarity of the original signal.
- SideChain provides a way to control the behavior of a compressor based on an external signal or a filtered version of the original signal. For instance, a kick drum could be sent to the side-chain input of a bass compressor, so the bass gets reduced in volume (compressed) each time the kick plays.
Shape your sound by tweaking the attack and release controls
Let’s look at how attack and release settings change the shape of the sound.
A slow attack (~50ms and above) allows for a lot of the initial attack, or transient, to pass through unaffected. This provides a natural, punchy, lively and in-your-face sound.
One disadvantage of using slow attack settings is when mixing a song that features live players who are inconsistent with how they attack the drums/guitars/keys. A slow attack may let through and emphasize loud attacks instead of smoothing them out. A faster attack time can make their playing seem less sloppy and inconsistent.
Fast attack (~1ms and under) times soften or smear the transient of a sound, which can make sounds feel smoother and more processed. If you overdo it, though, you’ll end up making sounds appear more distant in the mix, sucking the life out of your track. You end up removing the punch and clarity of your source material.
Fast release (~100ms and under) times give you a more aggressive, a grittier sound. The sustain or room tone can be brought up, increasing the perceived loudness of the track. If overdone, you can get pumping artifacts and with extremely short release times, you can actually create useful or ugly distortion.
Slow release (~250ms and above) times make your sound smoother and more controlled. If the release settings are too slow, the compressor won’t be able to recover fully before the next big transient arrives. This means the transient will be quieter than it should, making your track sound less lively.
Threshold Settings
Keep in mind that the threshold setting interacts with the knee setting
A low threshold sets the compressor to react to quiet parts of a track. A low threshold combined with a low ratio (under 3:1), will continuously and consistently gently compress the signal. The result is that you can make your audio more even-sounding. This is thought of as RMS compression since we are compressing based on the average level of the audio. This type of compression adds density and reveals details in a track by reducing the dynamic range without imparting a noticeable tonal change.
With a high threshold setting, the compressor reacts to the peaks only. Combine a high threshold with a high ratio (6:1 or more) and you’ll start shaving off transients. As you may have already guessed, this is referred to as peak compression. This setting works well with percussive instruments but may be too intrusive for melodic instruments.
If you want a loud, exciting, bigger-than-life vocal/instrument track without killing its movement and punch, try this:
duplicate your track
compress the duplicate track with fast attack, fast release, low threshold, and a high ratio
Slowly bring up the volume of the duplicate track and balance it against the original track
Congratulations, you’ve just applied parallel compression!
How to Hear Compression
One of the best ways to learn to hear the difference between fast and slow attack/release times is to play with these parameters on your own.
For the following exercises, it’s important to use a compressor that has an automatic gain compensation feature, such as the free MeldaProductions MCompressor or the Izotope Ozone 9 Dynamics module. Auto gain spares you the hassle of matching the level of the compressed signal to the unprocessed track so you can focus on the sound- and tone-shaping that’s taking place when you’re tweaking the parameters. Otherwise, we can be fooled that the louder signal sounds better.
Exercise 1
- Take a live recording of a snare drum track, preferably in the context of the whole drum kit playing.
- Set the threshold low enough so you catch some of the transient and the ratio to 4:1.
- Go for the slowest attack setting with a medium release.
- Shorten the attack time and listen to how the punch of the snare changes. The effect becomes more obvious once you get below 30ms or so.
- Once you got to the fastest attack time setting, slowly increase the attack time again.
Exercise 2
- Set the attack to 20-25ms (slow enough for the track to be made punchier) and start with a long release time (1s).
- Listen to the first transient being louder than each subsequent hit.
- Shorten the release time until you’ll start hearing distortion, pumping and tearing.
- Increase the release time until you hear the sustain of the snare drum sounding even with the volume of the attack
Once you feel comfortable hearing the effects of the attack and release settings, switch your focus to the threshold control. Lowering the threshold should reveal more and more of the bleed of other sounds into the microphone, such as the kick, hat, and room reverb.
Now repeat the above exercise with a vocal track and bass track. It’s probably easiest to hear the effects of processing on a vocal since it’s the sound we’re most accustomed to hearing.
Overcompression: The Ugly Truth
Overcompressing a sound has negative effects on the timbre, size, and power of your track.
The timbre changes because of the difference in tone between the hills and valleys of your audio. This is especially noticeable with hard knee settings, high thresholds, and high ratios. Percussive sounds are more forgiving of these problems, but full mixes and melodic tracks suffer greatly from this type of compression.
Loss of power happens because bass and subharmonic frequencies sustain and produce a large amount of energy. Overcompression can weaken the lowest octave of your bass tone, which may tighten the low end, but may also take away the power. Overcompression with a quick release time often creates noticeable distortion in the low end of your track.
Overcompression can make the track you’re affecting sound small. Size is not the same as density. The more compact and dense your sound becomes, the more aggressive it sounds, but this density comes at the expense of size. To get natural size and impact, allow the track to move when compressed. Try gentle ratios, moderate attack and release times and find an appropriate threshold that keeps an even tone while compressing a little bit, most of the time.
Key Takeaways
Threshold and knee interact to find the sweet spot for the right amount of compression.
Ratio affects how transparent or obvious the compression is. Some vocals need gentle compression (RMS) while rock vocals can often handle high ratio slamming (Peak).
Attack helps you tweak how punchy or processed your program material feels.
Release affects pumping, distortion and the natural envelope of a track.
Auto-attack and release is usually a good starting point. Read the manual to find out the actual settings and use those as starting points when not using auto mode.
Auto MakeUp Gain helps hear the artifacts and benefits of compression without being fooled by the change in volume level that a compressor may cause.
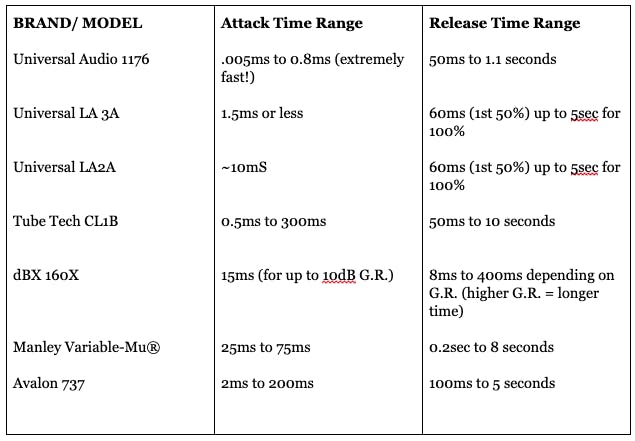
All Compressors are Not Equal
Things get a little complicated as each compressor uses different types of detector circuits, gain reduction elements and other electronic circuit elements that all combine to shape the compression effects and character of the compressor. An attack time that sounds like a fast attack on one brand or model compressor may not sound fast on another unit. The same goes for release times. Here is a table of attack and release times for some popular hardware compressors. Compressor plugins typically mimic these settings but may also include much more extreme settings.