If you are reading this article, you are undoubtedly already aware of the benefits of using Sonarworks SoundID Reference to compensate for the irregular or colored frequency responses inherent in most listening environments. If your goal is to create a mix that translates well to as many listening situations as possible, you need to have an accurate monitor system, whether it be a pair of headphones or studio monitors in a treated studio space. A flat and trustable frequency response is required by all audio engineers in professional studio spaces and home project studios alike. That is why the corrective equalization applied by SoundID Reference is essential and should be integrated into your workflow and setup.
Each DAW and your particular workflow requires a slightly different setup of SoundID Reference, so this article will cover some specific setup tips for a few different scenarios, like monitoring with SoundID Reference and tips for printing or bouncing your mixes.
Let’s assume that you are familiar with how Reference’s calibration works and that you have already configured correction profiles for your headphones and reference monitors. Remember that Sonarworks provides built-in profiles for hundreds of headphone models, but for monitor speakers, you must measure your room with SoundID Reference and the Sonarworks calibrated measurement microphone.
There are three issues that are crucial to remember when using the SoundID Reference plugin:
- Be sure that your mix and any reference tracks that you are comparing your mix against are all either routed through the SoundID Reference plugin or the app. If you’ve imported reference tracks into your DAW, there should be no problem. If you are playing reference tracks from another program on your computer through your interface, you will want to use the Reference app, which applies the necessary corrective equalization to the audio output of your computer, as opposed to your DAW output only. So your mix would go through the DAW plugin and your reference tracks (coming from your computer) would play through the Reference app.
- SoundID Reference should be the last plugin that the audio passes through before it’s sent to your monitors.
- Depending on your DAW and your routing setup, you may have to remember to bypass the SoundID Reference plugin before you bounce your mix. You do not want corrective equalization to be printed to the mix—the correction is only for your monitor system. Every DAW provides some good routing solutions, and some DAWs (like Cubase Pro) provide a dedicated monitor routing section for this exact reason.
Routing for Quick Comparison
If you are like me, you’ll want to listen to your mix through both your headphones and your reference monitors to get a broad perspective on your mix. Your perception of stereo imaging and mix balances will differ between headphones and speakers, so it is important to get a sense of how a mix sounds in both contexts. You may even have multiple sets of speakers for reference. Each of these scenarios requires a different corrective equalization curve from Reference.
Let’s take a look at some routing options for various DAWs that will allow you to quickly switch between monitor calibration profiles. It’s also nice to have a fool-proof workflow that does not necessitate bypassing the SoundID Reference plugin during the final bounce. Depending on your DAW, various routing schemes can optimize the signal flow with these concerns in mind.
Reference Plugin Routing in Pro Tools
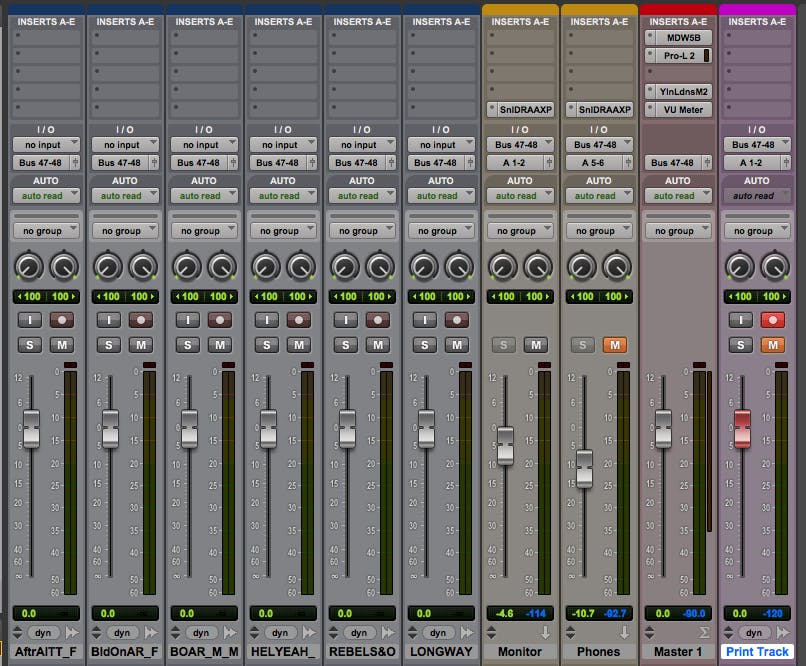
In Pro Tools sessions, I set up a stereo master fader and I want to be able to monitor with one set of studio speakers and one set of headphones. The speakers are fed from output A1-2 of my interface and my headphone amp is fed from output A5-6 of my interface. Don’t worry if your interface sends the same signal to both the speakers and headphone amp, there is an easy solution for that, too.
In my setup (see image below) the Aux channel called “Monitors” feeds my speakers with the appropriate SoundID Reference correction profile. The Aux channel called “Phones” feeds my headphones with the correct signal for them. I simply mute and unmute the Aux that you want to listen to when changing from headphones to monitor listening.
If you have more than one set of studio monitors that you would like to correct with SoundID Reference, you can solve that a few ways: 1. create more Auxes, 2. insert different instances of SoundID Reference on your Monitor Aux, 3. change the preset in your SoundID Reference plugin when you switch monitors. You can even map a MIDI controller to change presets in the SoundID Reference plugin (Read about that here).
Printing Your Mix In Pro Tools
There are two variations of this workflow, depending on if you would rather print your mix onto an audio track in your Pro Tools session or if you would prefer to bounce the final mix to disk. For the sake of organization and workflow, I always print my mixes onto a track in the session, but I’ll explain both workflows.
Using a Print Track
- Assign all the tracks in your session to a stereo bus, like Bus 1-2.
- Create a Master Fader and assign it to Bus 1-2.
- Create a stereo Aux Track and set its input to Bus 1-2 and its output to A 1-2. Solo safe this Aux Track (cmnd+click solo so it’s greyed out). This Aux is the speaker monitor control, so you can label this track “Monitors”
- Insert a SoundID Reference on this Monitors Aux track and load your monitor profile preset.
- Create a second stereo Aux Track and set its input to Bus 1-2 and its output to Out 3-4 and solo safe this track (cmnd+click solo). This is the headphone monitor control, so label this track “Phones.” If your headphones get the same signal as your speakers, set the output of this Aux Track to A 1-2.
- Insert a SoundID Reference on this “Phones” Aux Track and load up your headphone profile.
- Create a new stereo Audio Track with its input set to Bus 1-2 and its output can go to A 1-2. (You will keep this track muted.) This is your Print Track and you can record your final mixes to playlists on this audio track.
- Once you print a mix to this track, simply click on the audio waveform and press shift+cmd+k to export the file (at whatever bit-depth and sample rate you choose) to a folder of your choice.
Bouncing In Pro Tools
If you prefer Bounce To Disk for printing your mixes, here is the easy way to bounce without having to bypass SoundID Reference.
- Highlight the time selection that you would like to bounce.
- Click on File > Bounce to > Disk… (or press opt+cmd+b)
- In the Bounce Source popup window, select your mix bus (ie. Bus1-2). Do not select Output 1-2 since that is your monitor output with SoundID Reference on it.
- Set the File Type, Format, Bit Depth, and Sample Rate and press Bounce.
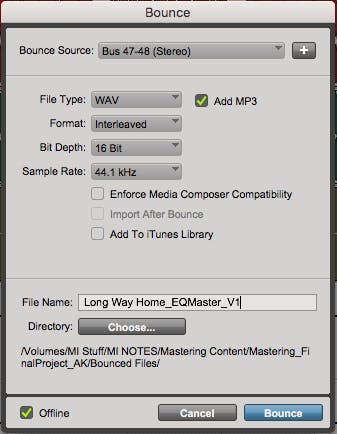
Here we see a properly setup Bounce to Disk window for Pro Tools. Our Bounce Source is set to our mix bus (Bus 47-48) and not to our monitor path (A 1-2). This will bounce a stereo 16-bit, 44.1kHz .WAV file plus an MP3 to a folder that we chose.
The bounce will not be affected by the SoundID Reference plugin because we are not bouncing through the monitor path, we are bouncing through the mix bus only.
Logic Pro and SoundID Reference
Below is a similar idea implemented in Logic Pro. Setting up busses in Logic is easy but annoying if you’re not used to it. When you send a signal to a Bus for the first time, a corresponding Aux Channel is immediately created. To set up several Aux Channels that receive from the same bus, you will need to duplicate the first Aux as many times as needed. Also, if you want to show the Aux channel as a track in the Arrange window (to change the order of tracks, for instance), you will need to select the Aux channels then click Create Tracks for Selected Channel Strips under the Mixer View’s Options menu.

In the routing pictured above, all the tracks in the mix are assigned to Bus1, which has been renamed “Mix bus.” The green fader named “Mix Bus” is acting as my master fader and I will simply ignore (leave at unity) the “Stereo Out” and “Master” faders that Logic automatically creates. The Mix Bus Aux Channel is set to input “Mix Bus” and output Bus2.
Next, I created two Aux Channels and set both of them to input Bus2 and output “St Out.” These two Aux faders are my monitor faders, with SoundID Reference inserted on them. I will use the one named “Monitors” when I listen to my speakers and the one named “Phones” when I listen to my headphones. Since my interface sends the same audio to my speakers and phones, I’ll simply mute the “Monitors” channel and unmute the “Phones” channel when I want to listen to my headphones and vice versa for the speakers.
Bouncing and Printing Tracks in Logic
To Bounce the mix in Logic, you have to make sure SoundID Reference is bypassed and the monitor fader (the one that’s unmuted) is at 0dB. Then select File > Bounce > Project, set the desired output range and the type, and click OK.
Here’s how to print the mix to a track in your project: The image shows a “Print Track” set up with its input set to Bus 3 and output to St Out. Our Mix Bus channel is sending the final mix directly to Bus 3, so we can print/record our mix without having to bypass the SoundID Reference plugin(s) on our monitor fader(s). To export a mix that you’ve printed onto a track, simply open the project browser window (top right corner of Logic), right-click on the audio file, and select Save Region(s) As… Then you can select what type of file you’d like to export and press Save.
Cubase Pro Control Room and SoundID Reference
The Control Room Feature in Cubase Pro allows you to set up custom speaker and headphone outputs for quick switching and listening comparisons. What makes this functionality even more useful is that each monitor output can have its own effects chain independent of each other.
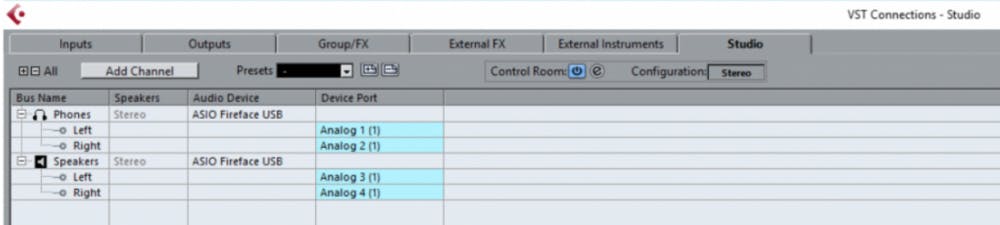
You could instantiate a SoundID Reference plugin in each monitor path’s chain and SoundID will not affect your bounce. This is perhaps the easiest solution of all that have been discussed thus far. Cubase essentially provides a built-in monitor controller via its admittedly awesome Control Room feature.
Conclusions
The way you use SoundID Reference in your day-to-day workflow in recording, mixing and mastering will be dependent on your particular DAW and audio interface. The more flexibility you have in terms of reference monitors and headphones, the better you can judge how your mix will translate to other playback systems. Every DAW is capable of a little creative signal routing to accomplish this task and you may need to experiment a bit to develop a solution that works best for you and your DAW.
Further Reading:
Logic Audio: Rockstar Monitoring Techniques


