
In our article “Take Advantage of Busses and Subgroups for Great Sound Mixes,” we cover how to route audio to take advantage of the flexibility and creativity that mix busses and subgroups allow for. Along with those benefits, subgroups and busses provide effective and efficient means to print and organize mixes and stems. As always, thinking ahead when planning your mix setup will save time and mindshare at the end of the process. Here some tips for setting up for easy printing in Logic Pro X.
Printing Mixes To an Audio Track
You should consider recording your rough and final mixes onto an audio track in your session, rather than bouncing the mix. Printing in your session keeps the mix handy in case you need to reference at a later time and you’ll never have to wonder where the file went. Furthermore, if you print your final mix, instrumental and alternate versions to their own tracks in your session, you can easily edit between versions since they are all in-sync with each other and on the same grid as your session. Here are two ways to set up a print track in Logic.
A. Use this method if you’ve created a custom master mix bus:
- Select the Aux Channel that you have created to act as your Mix Bus and re-assign its output to an unused bus. (You may want to rename this bus “Print Master”)
- Create a new Audio Track ( the Print Track) and assign its input to Print Master and its output to Stereo Output.
- Name the Print Track something appropriate (ex: “SongName_MIx_1”.)
- Record enable the Print Track. Start recording; the output of the mix is recorded to this track in real-time.
- NOTE: When you reassign the Mix Bus to an unused bus in the first step above, Logic will automatically create a new Aux Channel Strip at the right side of the mixer. You will want to delete this Channel Strip or you will be double-monitoring your mix.
B. Use this method if you haven’t created a custom master mix bus:
- Select all the Channel Strips or subgroups in your mixer, except for one audio track (the Print Track), and route the output fields to an unused Bus.
- Set the Input field of the Print Track (routed directly to the Stereo Output) to the same bus pathway used in the previous step.
- Name the Print Track something appropriate (ex: “SongName_MIx_1”.)
- Record enable the Print Track. Start recording; the output of the mix is recorded to this track in real-time.
BONUS: Each time you print, make sure you make the same time selection, like from bar 1, beat 4 up to bar 110, beat 1. That way every print of the same song is the same length and all the mix passes will always line up. For instance, you can simply separate and drag-copy a few beats of the instrumental mix to cover over a section of your main mix that contains foul language for a “clean” version of the song.
Printing Updated or Alternate Mixes to audio tracks
Often, we are asked to print the main mix and then a “vocal up” version, or a version with no bass in the second verse, etc. This section also applies to instrumental, MMO, TV tracks, or performance versions of the mix. It is also a good idea to print mixes each time you finish a particular overdub or mix session. Sometimes it’s helpful to reference an early mix to see what you were hearing before you spent too much time “fixing the mix.”
Here is the shortcut to creating new Print Tracks for updates or alternate mixes. The Logic Pro X Track Alternatives feature is the perfect tool for this. Track Alternatives are like playlists; audio tracks containing multiple alternate sets of regions, while sharing the same Channel Strip and plug-ins. For instance, one track alternative might contain the Main Mix, while another alternative on the same track contains an instrumental mix. One, and only one, Track Alternative is active when you play back or record onto that track. The Track Alternative menu is used to choose which Alternative is active versus inactive for a given track.
- After setting up the Mix Print Track as outlined in the above setup instructions, do the following:
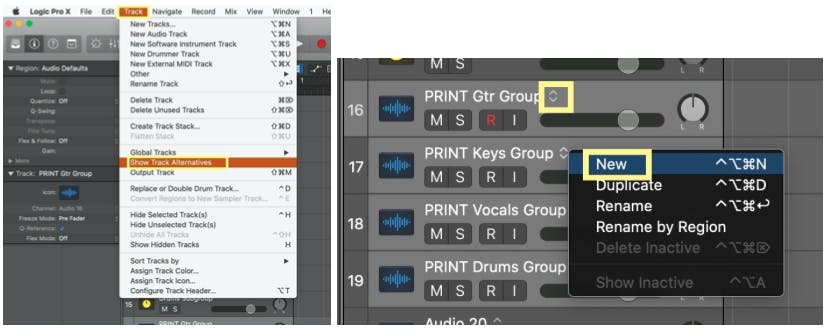
- From the global Track menu at the top of the screen, choose “Show Track Alternatives.” This displays a menu icon next to each track name.
- Select the Mix Print Track and click on the Track Alternatives field in the Track Header and choose “New.”
- Rename the new empty as desired.
- Record enable this new Print Track and record the new version of your mix.
- Use the Track Alternative field in the Track Header (next to the track name) to switch between the various track alternatives for playback.
Printing individual stems/subgroups to audio tracks
Many times artists and record labels ask for stems after a mix is approved. The stems can be used to create performance tracks or alternate versions and remixes without having to have the original session file. These stems can often be broken down like: drums, bass, rhythm guitars, lead guitars, keyboards, effects, lead vocals, background vocals. Efficiency is key to saving time while printing stems. With the right planning, many, if not all of the stems can be printed in one pass.
- Setup multiple subgroups as outlined in our Logic Pro X article “Creative Mixing with Subgroups and Masters”
- To print with processing (inserts), set the output of each of the Subgroups to a unique unused bus.
- Create a number of Print Tracks equal to the number of stems/subgroups you want to print. Name them accordingly (ex: Keys_Stem, Drums_Stem, Vocals_Stem, etc.)
- Set the inputs of these Print Tracks to match the Bus pathways set in the output fields of each subgroup.
- Record enable each of the Stem Tracks you just set up.
- Begin recording. The output of each subgroup is captured on each of the corresponding Audio Tracks in real-time, including any effects processing placed in the insert slots of the individual subgroups.
- NOTE: As mentioned before, when you assign the Subgroups to an unused bus in the first step above, Logic will automatically create a new Aux Channel Strip at the right side of the mixer. You will want to delete this Channel Strip or you will be double-monitoring the source.
You will soon find your own way of organizing alternate mixes and stems, like Track Stacks and color-coding your mixes and stems. Read our blog post about creating a mix template, to inspire you to create and keep updating your mix template for the most efficient use of your time and to boost your creativity.


