
In our article “Take Advantage of Busses and Subgroups for Great Sound Mixes,” we cover how to create multiple monitor outputs and monitor path for your mix bus and reference tracks. Here we explain these setups for Logic Audio Pro X.
Monitor the processed mix along with an unprocessed reference track
Routing your DAW mix tracks through a separate monitor bus than a reference track allows you to monitor either your mix or the reference track without worrying about your mix bus processing affecting the sound of the reference track. Here’s how to create two different monitor paths in Logic X.
- Assign the output of all the tracks or subgroups in your mix to a Mix Bus, except for the Audio Track(s) you wish to use for the playback of a reference track(s). See our article on creating mix busses and subgroups for more info about this.
- Place your wav file reference track on this audio track and rout it directly to the Stereo Output, not the Mix Bus.
- Place any stereo mix processing you need on the Mix Bus Aux Channel Strip, but don’t add any processing, except metering to your reference audio track.
To switch between monitoring your mix and the reference track, do the following:
- Mute the Mix Bus Channel Strip to silence your mixing tracks.
- Un-mute and/or solo the Audio Track hosting your reference track.
Routing Audio From Logic to Mulitple Monitors
Your studio setup may contain more than one pair of monitor speakers and maybe even a dedicated headphone amp. While a monitor controller can help wrangle this type of setup, you may also work with Logic faders as your monitor controller by assigning different monitor faders to different sets of monitors or headphone amps. Any performers wearing headphones may also want a custom mix, which can be set up using Sends from channels in Logic. These setups require an audio interface with more than two outputs.
Here is how to set up Logic for multiple monitor speakers/headphones
- Select the output fields of all the tracks or subgroups in the Mixer, and assign them to an unused bus.
- A new Aux Channel Strip is automatically created and added at the right end of the Mixer. The input is automatically assigned to the bus pathway chosen in the previous step.
- In the Mixer window, do one of the following:
- From the Option menu (in the Mixer window), select ‘Create New Auxiliary Channel Strip’
– or – - Press Control + N
- From the Option menu (in the Mixer window), select ‘Create New Auxiliary Channel Strip’
- Another new Aux Channel Strip is automatically created and added at the right end of the Mixer.
- Assign the Input field of the new Aux Chanel Strip to the same Bus pathway used for the output of all your tracks and subgroups.
- Name each of the two Aux Channel Strips accordingly to indicate the output destination (ex: “Monitors A,” “Monitors B,” etc.)
- Assign the Output fields of each of the two Aux Chanel Strips to separate physical outputs on your audio interface. (Out 1-2, Out 3-4)
- Connect your monitors to the physical outputs assigned in the previous step.
- The same audio stream is now sent to both of the physical outputs of your audio interface. Either mute or solo one or the other of the two Aux Channel Strips to hear audio playback from one set of monitors at a time.
- Repeat this process for any additional monitor pairs or headphone amp.
A bonus of using Aux Channels for each monitor output is that you can insert Sonarworks Reference 4 on each Aux Channel and apply the required profile for each output, saving you the time of changing your Reference 4 preset for each monitor/headphone output.

Setting up Headphone Cue Mixes for Performers
Performers often prefer a custom headphone mix, rather than the control room mix. This can be accomplished with Aux Sends from your mixing tracks and busses. Here’s how to set that up:
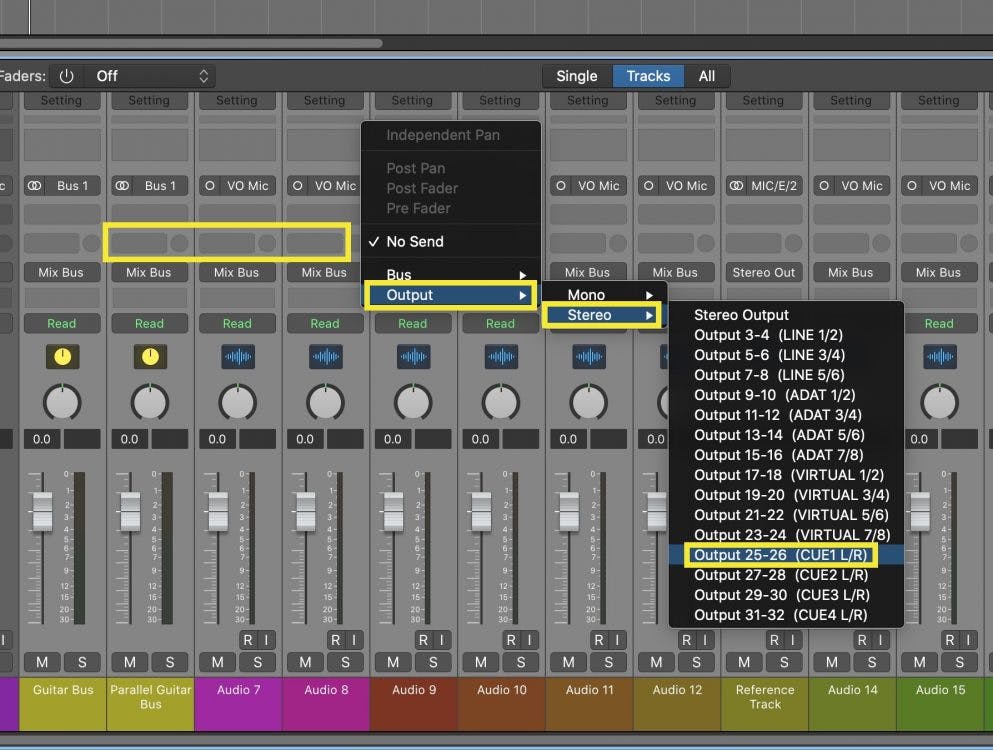
- Select all the tracks or subgroups in the Mixer.
- Click in the Send field and, in the Output field, choose the output that corresponds to the physical headphone output on your audio interface. Some interfaces have a dedicated “Cue” output, while some may require the use of a new pair of audio outputs on your interface, like Out 7-8.
- Repeat the above step for additional separate headphone sends. Assign to alternate outputs in the Output field.
- With all of the Channel Strips or SubGroups still selected, click in any of the send fields, and choose between either post-fader or pre-fader sends. Post fader send levels are affected by adjustments to the channel strip volume level. Pre-fader sends levels are independent of the channel strip volume, so the performer can have a mix that is not affected by changes you make in the control room.
- Set up a custom headphone mix for each performer using these (usually pre-fader) sends on your channels.
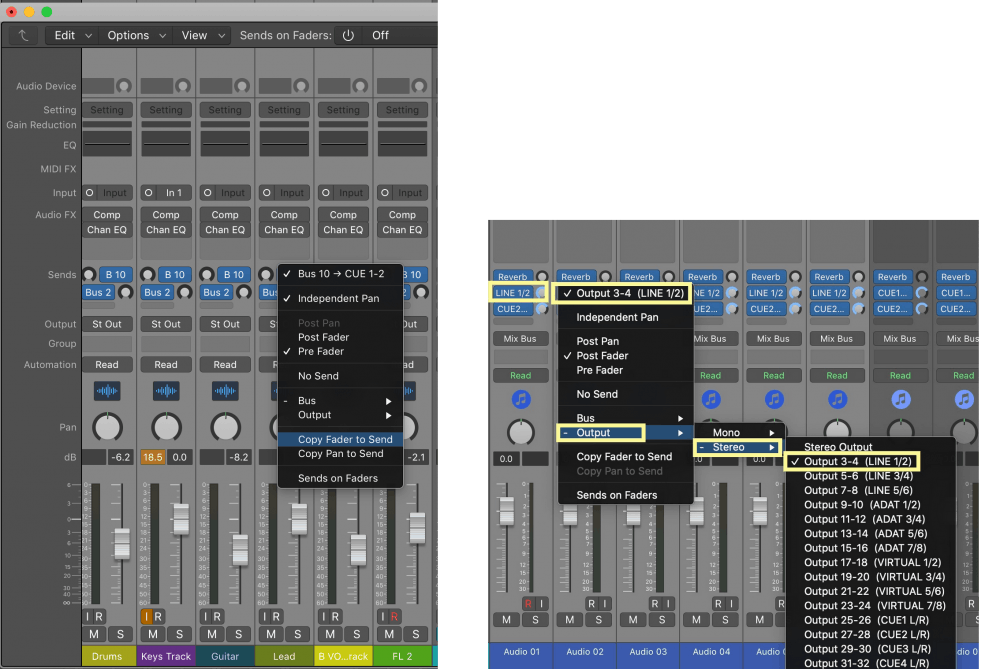
Note: A quick way to set up headphone mixes is to start with the control room monitor mix. Do this by swiping across all the tracks you wish to send to the cue mix and then select “Copy Fader to Send” from the menu next to the send level. This will set your sends to match your fader levels and you can adjust from there. (see image below)
You will quickly develop your preferred method for setting up monitoring and headphone mixing. Read our blog post about creating a mix template to learn how to create and keep updating your mixing and tracking templates for the most efficient use of your time and to boost your creativity.


