
In our article “Take Advantage of Busses and Subgroups for Great Sound Mixes,” we cover the applications for mix and aux busses and how to create them in Pro Tools. Here you’ll learn how to apply the same techniques in Logic Pro X.
Creating Master Faders and Mix Busses
A master fader processes the entire mix for the final “glue” or tonal shaping and also for the final fade-out. Logic automatically creates a fader labeled “Master,” which is not really a standard master fader, but a VCA fader (see the VCA sidebar at the end of this article). It controls the levels of all the physical outputs on multi-output interfaces. It is a great way to make adjustments, for example, to all outputs at once when working in surround. When working in stereo, this Master output VCA fader should generally be left at unity (0dB) and never touched.
Logic’s Stereo Output level control is the volume control for a specific output pair from your interface, like Out 1-2. Leave this output channel strip at unity as well. Adjustments to the full mix are better made on a user-created master bus, or mix bus aux channel strip that comes before the stereo output in Logic’s signal flow. Logic’s Stereo Output control is often used as a master volume control, but it may also affect the level of your bounced mix, so be careful about moving Logic’s Stereo Output from unity.
Here’s how to create custom master faders and mix busses:
- Open the floating Mixer window by pressing Command + 2
- Swipe across all the Channel Strips in your project to select them all.
- Click in the Output field and select an unused bus.
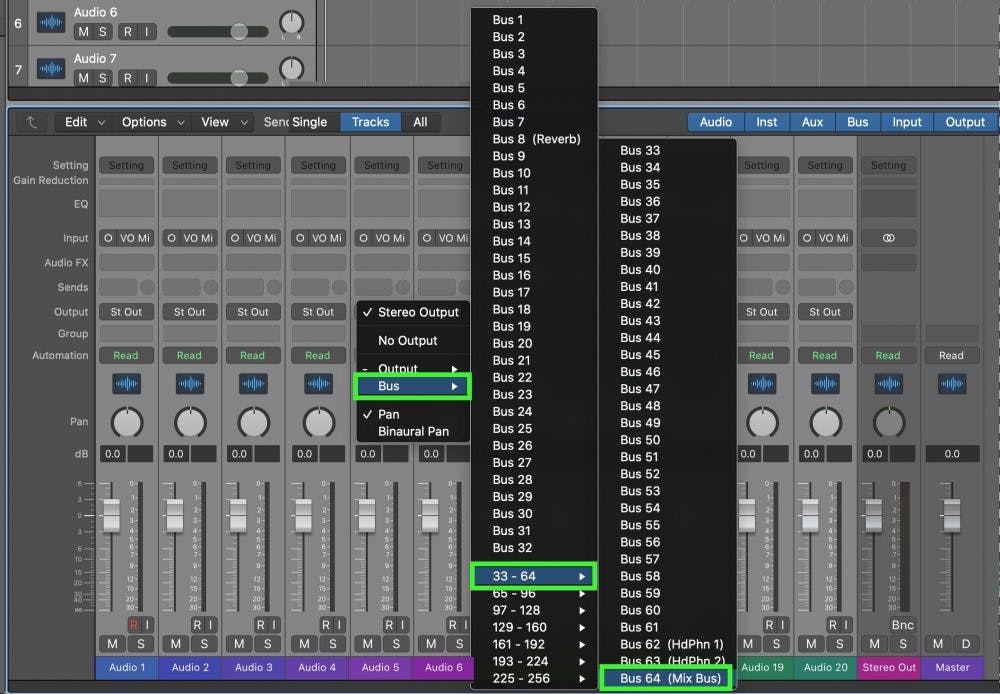
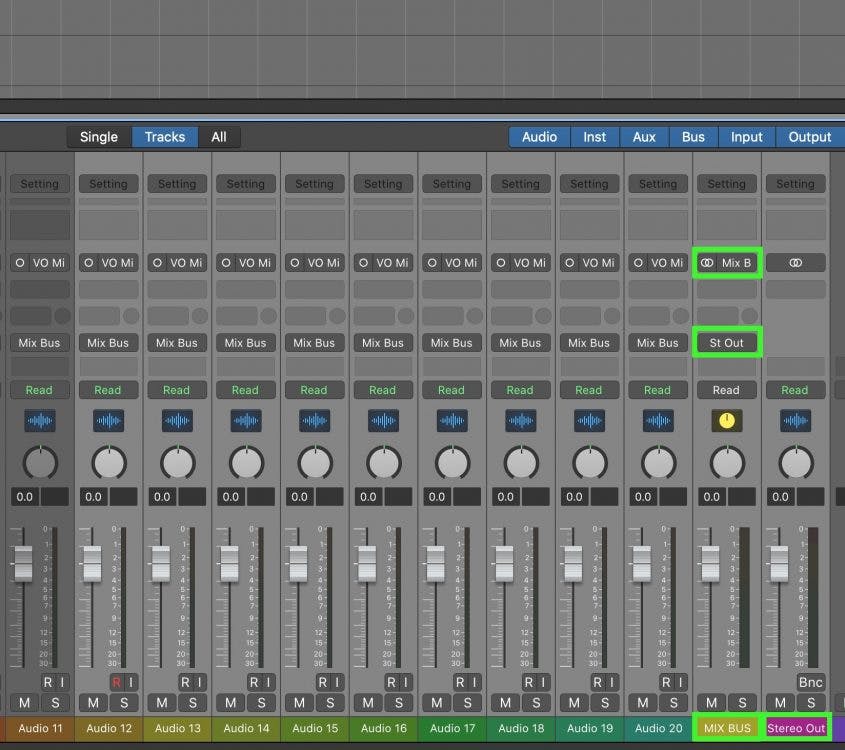
- A new Aux Channel Strip is automatically created. The chosen Bus is automatically set as the input. The output is automatically routed to the Stereo output.
- Select and rename the automatically created Aux Channel Strip to something appropriate, like “Mix Bus.”
- The output from all your tracks now arrives here, before continuing the pathway to the Stereo Output.
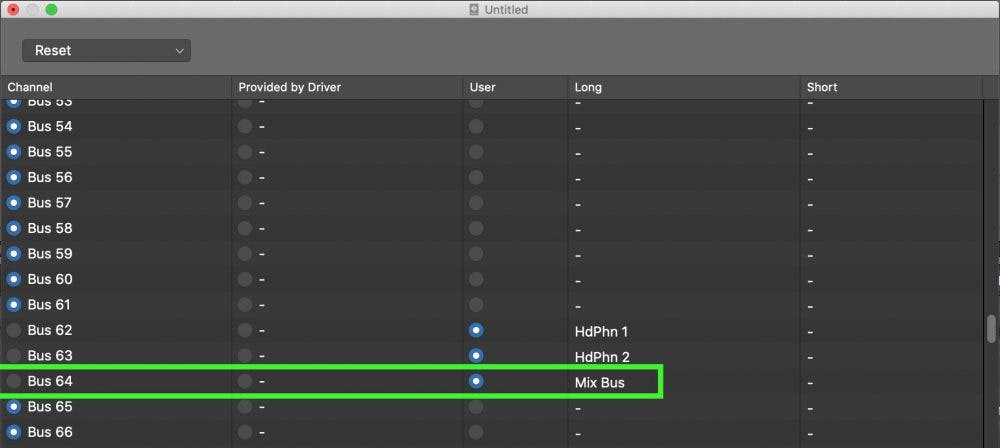
- To assign custom Bus pathway names: Open the I/O Labels window from the mixer’s View menu. Scroll to the Busses. Select the desired bus to be renamed, click in the “long name” field, and type your custom name.
Creating Subgroups
As mentioned in our longer blog post, subgroups can be used to process one type of instrument, like drums, or a group of similar instruments, like low-frequency sounds. Subgroups ultimately wind up bussed to the MIX bus.
- In the Mixer window, select the Channel Strips to be included in the new subgroup.
- Click in the Output field, and select an unused Bus.
- A new Aux Channel Strip is automatically created and placed at the right end of the Mixer. The Bus is automatically set to the correct input and the Aux output is automatically routed to the Stereo output.
- If you created a Mix Bus (see above), set the output of the new Aux Channel Strip to the Mix Bus and
- Name the newly created Aux Channel Strip accordingly.
Using Track Stacks to create subgroups:
- Select the channel strips to be included in the new subgroup. Press Command + Shift + D to put them into a Track Stack and then choose Summing Stack. A Track Stack is automatically created. The sub tracks contained within automatically have their output fields routed to an unused bus. This bus is automatically set as the input of the Stack Master channel strip, which acts as a subgroup for all the sub-tracks within the Track Stack. It is then necessary to route the output of the Track Stack master track to your mix bus.
Customizing the Placement of Sub Groups in the Mixer
Navigating a complicated session can be simplified by arranging your audio tracks, busses, and masters in a way that makes sense for your workflow.
Here is how to re-order faders in Logic.
- Select the subgroup aux track in the Mixer window, and do one of the following:
- Press Control + T (Create Track shortcut)
- Right-click on the channel strip and select “Create Track.”
- Click in the automation field and select any automation mode.
- The Aux channel strip is now visible in the Tracks Area. Select it there, and drag it to the desired location. The Mixer display will update to reflect the new position in the Tracks area.
Creating Parallel Subgroups
We often use parallel mix subgroups to transparently enhance an aspect of an instrumental group. We can accentuate the transients of a drum group or add some harmonic saturation to a synth subgroup, all while maintaining the character of the original signal.
- In the Mixer window, do one of the following:
- From the View menu select “Create New Auxiliary Channel Strip.”
- Press Control + N
- A new Aux channel strip is automatically created and added at the right end of the Mixer.
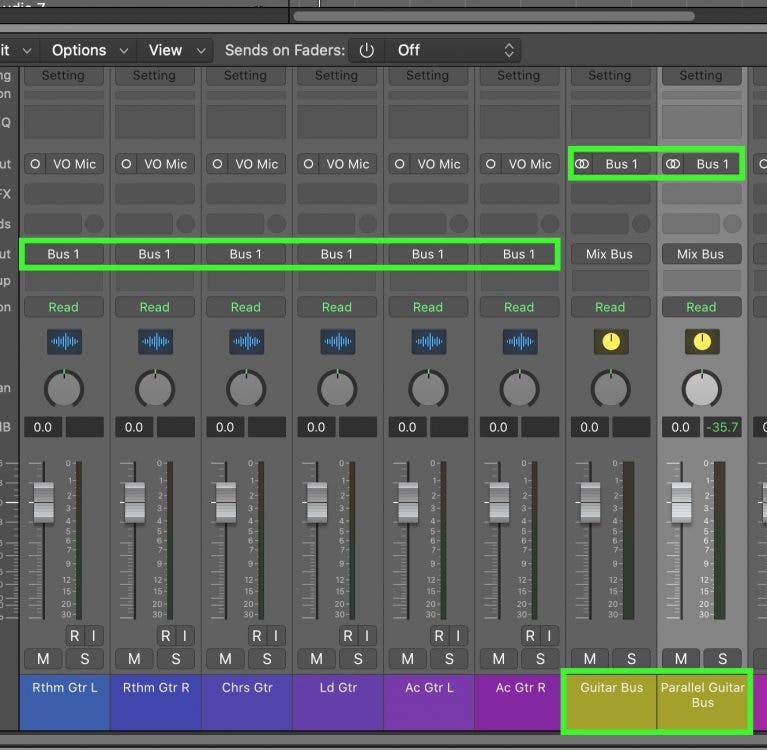
- Assign the Input of the new Aux channel strip to the same Bus path used for the main subgroup. The drums, for instance, will be routed to two (parallel) Aux channels.
- Name the new Aux channel strip accordingly to indicate that it is a parallel for the specific subgroup Aux. I would name my drum subgroup “Drum M” and the parallel group “Drum LL.”
- Assign the Output of the parallel Aux Channel to the same output as the main subgroup Aux, typically the Mix Bus.
Getting the Most from Your Mix Setup
Take advantage of Logic’s routing and bussing options to create a mixing architecture that provides creative options and an efficient workflow. For more ideas on how to use mix busses be sure to review our blog post “Take Advantage of Busses and Subgroups for Great Sound Mixes.”
What is a VCA fader?
A VCA fader, named for “voltage-controlled amplifier” on analog mixers, is effectively a remote control for other channels in your mix. VCA faders are used to simplify adjusting large groups of faders. For instance, you could create a Drum VCA fader that adjusts all of your drum tracks with a single fader. Once you’ve set your drum balance, this VCA allows you to adjust the overall loudness of all the drum tracks without changing the internal balance of the drum faders.
A VCA fader does not process or handle any audio, as an aux or master fader does. Therefore, there are no inserts or sends on a VCA fader, only level, solo, mute, and automation controls. Remember, the VCA fader is only a remote control for other faders.
Some mixers find VCA fader extremely useful, while other mixers never use VCA faders. Try using VCA faders in your projects to see if they fit into your way of thinking and workflow.


