
In a previous article, we had a look at the controls of an EQ, as well as the most common filter types and shapes.
Now we can get into some tips for getting the most out of your EQ plugins. Most plugin equalizers provide a variety of features that are time-saving for both finding problem frequencies and navigating the often cluttered user interface of your EQ. This article will describe many common EQs and the shortcuts that make them so valuable and easy to use.
Here’s a list of EQ shortcuts various plugins offer.
Soloing a Band
I’m sure you heard of the technique to find an EQ issue by boosting a band by a large amount (10dB+) with a narrow bandwidth, then sweeping around to find the frequency that jumps out. That works, but it also destroys your ears (and maybe your speakers), and it can impact your perception of frequency balance if done for too long a time.
A much better way to locate problem frequencies is to solo and sweep a narrow frequency band, which lets you hear only the content of that frequency range. Simply solo a band, sweep around and it’s easy to locate the offending frequency. It’s also easy to find the frequencies that an instrument takes up inside a full mix. Now you can easily dial in that kick without affecting the low end of the snare in your masters! Not all EQs allow you to solo bands, but there are a few that do. After using this technique for a while, you’ll realize how important it is.
Here are some EQs with solo functions
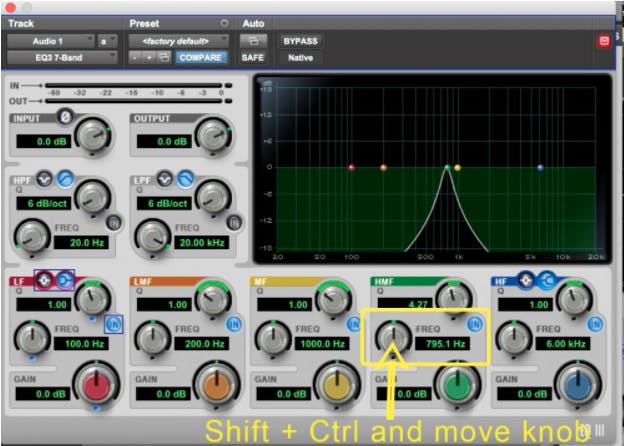
Hold shift+ctrl and sweep a frequency knob to solo that band. The band will solo with the Q that is currently set. In the image above, you can see that the midrange band is solid and the outside frequencies are greyed out and muted. Shift+Click on a gain knob to instantly invert the boost or cut.
Another shortcut: Shift+Click on any gain knob to instantly invert its boost or cut.
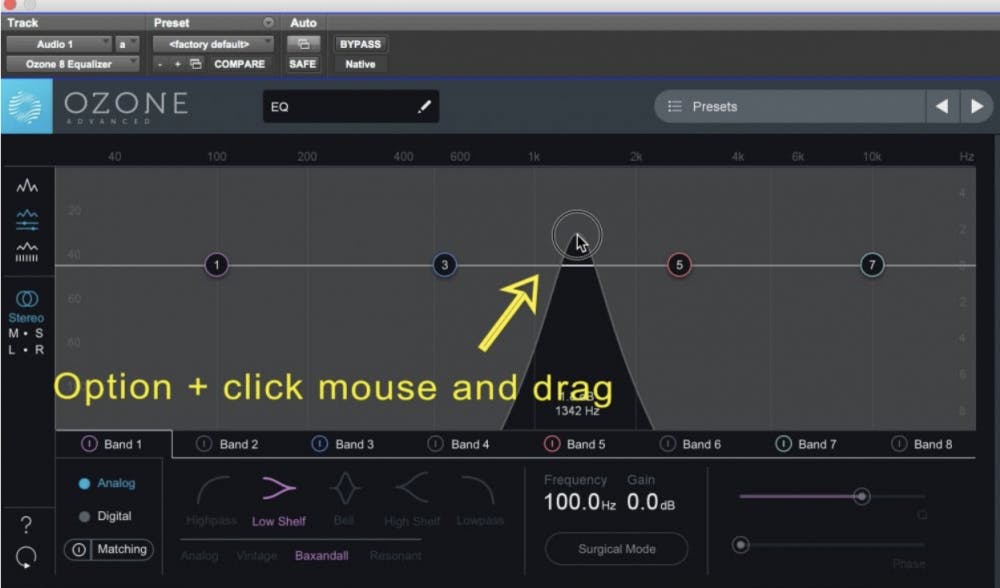
Hold the Option (alt) key and click anywhere on the EQ window to solo a band. You can adjust the Q of the band with your mouse wheel.
You can also Option+Click on a particular EQ point to solo that band with its Q setting.

When you hover your mouse over an EQ point, the parameters for that band pop up.
Click on the headphone icon to solo that frequency band. Band-pass filters solo only the frequencies that are being removed by the filter.
Cmd+Drag on an EQ point to adjust the Q of that band.
Option+Click on an EQ point locks the point’s movement to gain only or frequency only—whichever move is performed first takes precedence.
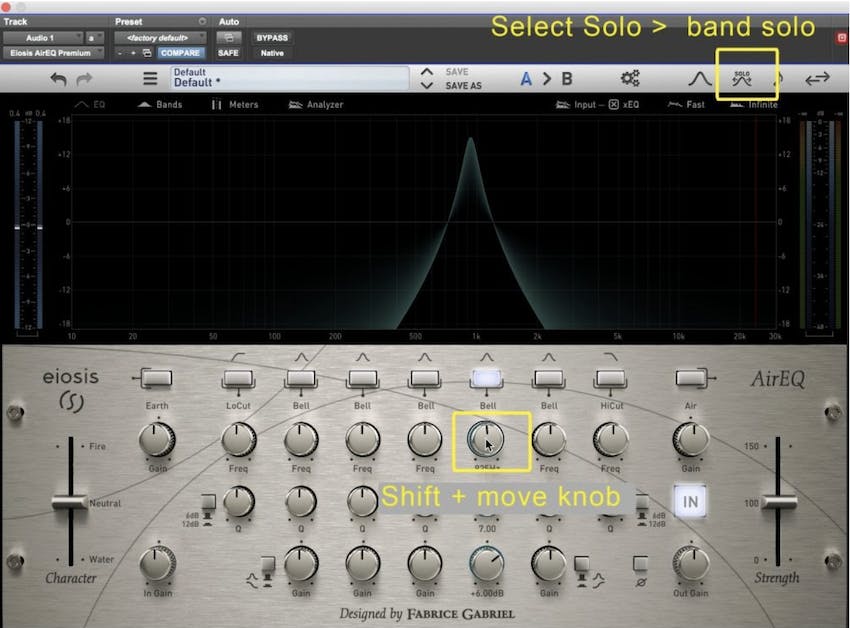
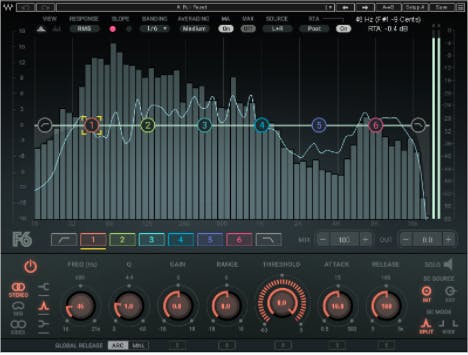
To solo a band, click the solo button at the top of the plugin and choose “band solo.”
Hold shift while dragging the freq knob to sweep through the frequency spectrum.
To solo a band, simply click the solo button in the bottom control section of the EQ.
Cmd+Click on any band to cycle through filter shapes
Ctrl+Click on an EQ point locks the point’s movement to gain only or frequency only.
Option+Drag will adjust the Q of any EQ point.

This is not an equalizer, but this free spectrum analyzer provides a solo function where you simply hold command and drag in the spectrum display to solo frequency bands. This is a great tool to use if your favorite EQ doesn’t provide a solo function.
Many other equalizers provide solo options, so be sure to read the manual (!) or watch some tutorial videos on how to get the most out of your favorite EQ.
Finding Critical Frequencies
Some EQ plugins help you locate trouble frequencies by analyzing either the sound you are working with or by automatically comparing one sound to another sound in your mix. This is an easy way to keep two instruments that live in the same frequency range from competing with each other for the same frequencies. For clarity, keep in mind that frequency points in some EQ plugins are referred to as “nodes.”
iZotope’s Neutron’s EQ module has a Learn mode. Learn moves the active nodes (EQ points) to frequencies that it determines might be causing rumble, sibilance, or other unwanted resonances. Bear in mind that the EQ module will not create new bands when clicking Learn. Once the EQ points have been assigned by the algorithm, you can select any node, hold shift to lock the frequency, and adjust the gain to hear whether the sound is improved by boosting or cutting that frequency.
FabFilter Pro-Q3 does a similar thing with a feature called Spectrum Grab. This allows you to see and grab peaks in the frequency spectrum and adjust them to taste. To do this, make sure the analyzer is active. Then hover the mouse above the spectrum window for a few seconds. The plugin will enter Spectrum Grab mode and the display will change slightly. Then you can adjust any of the highlighted nodes to fix those pesky resonant peaks. The highest peaks display a frequency label above them which can help sharpen your listening skills by showing you exactly what frequencies to listen for.

Automatic Equalizers
Artificial Intelligence and machine learning are slowly becoming an integral part of our audio tools. iZotope seems to have been doing this longer than any of the other big plugin makers. In recent years, they’ve started using machine learning to create their Repair, Mastering, Track, and Mix Assistants. One terrific use of machine learning is to help locate and clean up resonances.
Besides iZotope, other companies make processors that can assist in fixing frequency problems.
Soundtheory’s Gullfoss, oeksound’s Soothe 2, and Sonible’s smart: EQ 3 are, well….smart EQs. Slap them on your track or bus and you should be golden. These plugins predict trouble frequencies and adjust the tone in real-time to even out the frequency response of the signal. Plugin parameters let you adjust the strength and focus of the plugins to tailor their response to your track.
Smart: EQ 3 generates a static EQ curve, whereas Gullfoss and Soothe continually adjust the signal dynamically. Smart: EQ 3 works well on individual tracks, whereas Gullfoss and Soothe can be effective at processing busses, including the mix bus.
HoRNet’s ThirtyOne MKII is a gem of a plugin. This beast is a 31-band graphic EQ that has a sophisticated Auto EQ feature that can even out the harmonic content of a signal with user-defined strength, speed, and target controls. It’s a great tool to have in your arsenal and works well on a mix bus, right before the limiter, to will gently smooth the frequency content of your mix.
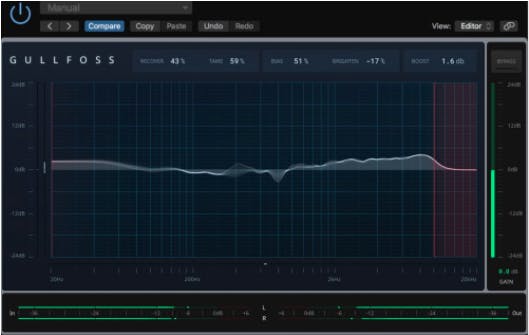
Gullfoss uses auditory perception modeling to analyze and adjust various frequencies of a sound or a mix that compete for our attention. Its goal is to minimize the masking effects of frequencies that overlap so the clarity of a mix is enhanced.
Dynamic Equalizers
While this article is not meant to cover the aspects of dynamic equalizers, it is worth noting that FabFilter’s Pro-Q3 provides some shortcuts for its dynamic functions.
Instantly convert a band into a dynamic EQ by holding Opt (Alt) and moving the mouse scroll wheel over a band. Alternatively, you can hold Option (Alt) and double-click to create a new EQ band.
The Pro-Q3 further simplifies its use by providing some automatic behaviors that would otherwise require many mouse clicks. For instance, the dynamic mode attack and release are automatic, so no adjustment is even required. Further, if you reduce or increase the signal level before the Pro-Q3 plugin, the dynamic EQ will continue to work the same way, without any need to adjust its threshold(s).
Spectrum Analyzers
Almost all modern EQ plugins contain a spectrum analyzer, so standalone spectrum analyzers are not a big deal anymore. Despite being ubiquitous, most people don’t take advantage of these analyzers. The purpose of a spectrum analyzer is to graphically display the energy of a sound or mix across the entire frequency spectrum. This allows us to use our eyes, along with our ears, to locate frequencies that may be too loud or too soft. Analyzers help to locate the fundamental frequencies of a sound or low frequency rumbling that you can’t hear, but that take up room in your mix. You can usually adjust the speed and resolution of a spectrum analyzer so that your eyes can more easily interpret the moving graph.
One situation where the spectrum analyzer may be used is when applying a high-pass filter to a signal. Play the track at the point where the lowest note or chord is played and look at the analyzer. Some analyzers even display musical note values as a keyboard under the graphic display. Look for the lowest fundamental frequency or the lowest actual note that the source contains and you may see some noise or rumble below the fundamental. Adjust a high-pass filter to remove everything until just below the information that you want to keep. Use your ears, but verify with your eyes!
Another use for the analyzer is when one sound competes with, or masks, another sound. This typically occurs with sounds like the kick drum and the bass. Send both tracks to a bus with an analyzer inserted on it and you’ll see exactly where the two tracks are competing with each other. Analyzer each sound soloed and then with both sounds playing together. Once you’ve determined where the important energy comes from in each sound, you’ll be able to make better informed EQ decisions to blend the tracks.
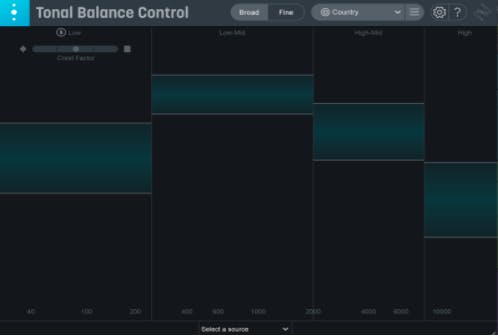
A third use is to analyze the tonal balance of a full mix. Set the analyzer speed to slow so you get a general overview of the mix’s tonal balance or energy in each frequency band. The key here is to look for any small frequency ranges that are either too loud or too soft. You should spend some time analyzing commercial songs in the same genre as yours to see how they look on an analyzer to become accustomed to looking at that type of display. Every genre has a typical overall frequency response curve. Once again, use your ears, but verify with your eyes!
EQ Matching Plugins
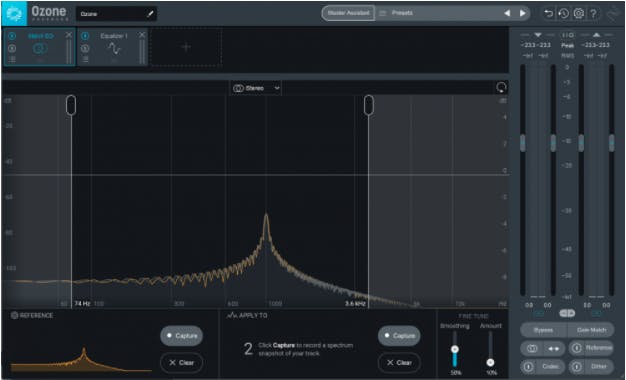
Many modern EQ plugins, like iZotope’s Ozone EQ and Fabfilter’s Pro-Q 3 provide a Match function. Generally, EQ matching allows an EQ to analyze a reference sound or song and then create an EQ that gives your signal a similar balance of frequency content. Think of it like this: you have a singer who had to punch in one line of a song using a different mic on a different day. EQ matching can make this punch-in sound more like the rest of the vocal. Some people are very much against this practice, calling it cheating. I sometimes find myself using it when I can’t quite put my finger on why a certain guitar tone isn’t as great as it could be. I open up iZotope’s Ozone 9, instantiate the EQ Match module, and away I go.
Mastering engineers may use EQ matching when they have a specific reference track and wish to match a collection of songs to that track. In the last few years, a few different EQ matching plugins have come to market, each of them offering a different solution. For example, iZotope’s Ozone 9 allows you to select what range of the frequency spectrum you wish to analyze and match ADPTR AUDIO’s MetricAB and Mastering the Mix’s Reference plugins both allow you to analyze multiple songs against your mix in real-time.
Typical Applications for EQ Matching
- Fix stereo drum room microphone tracks.
Let’s say the engineer didn’t use a matched pair of mics or the microphone placement was less than ideal and the cymbals are too bright on one side, pulling the stereo image to either side. You can use EQ matching to make the two channels sound more alike, saving them from being muted or converted to mono.
- Vocals or instruments that were recorded over several recording sessions.
Overdubs or punch-ins of a vocal or another instrument may not sound exactly the same from one session to the next. EQ matching can copy the EQ curve of the better-sounding recording and applying it to other takes.
Pitch Tracking Processors
Imagine this: you’re working your magic on an inconsistent bass track where certain notes seem louder than the rest of the performance. During the editing and mixing phase, you have a few tools to remedy this situation. You can manually adjust the clip gain or volume of every one of those notes or you can try a multiband compression or dynamic EQ on the bass. Perhaps a better solution than all these would be to use a pitch tracking plugin.
Pitch tracking equalizers continuously analyze the frequency content of an audio track and adapt its EQ frequencies to maintain a more consistent timbre or tone throughout a performance. These plugins excel at evening out a bass track like the one mentioned above or a vocal performance by a singer who doesn’t stay in one position relative to their mic.
SoundRadix’s SurferEQ was the first plugin I know of that offered pitch tracking. A few years later, iZotope’s Nectar 3 and Melda Productions’ MAutoEqualizer provide similar pitch-tracking functions. Nectar’s dynamic frequency mode also works well to cut low-frequency rumble from a vocal without affecting its overall tone.
Conclusion
Relying too much on these processors, especially when learning to mix, can keep you from developing the ability to distinguish frequencies by ear. Consequently, I suggest you use an ear training app, such as Sonarworks Match The Mix game, or SoundGym or Train Your Ears. Match the Mix helps you build your ability to hear important EQ points. SoundGym’s solution teaches you how to detect tempos, swing values, how to dissect and rebuild beats, panning, and much more.
At the end of the day, what matters most is how the music sounds—not the tools we used. The listener really doesn’t care what you’ve done to make the song sound great as long as it sounds great. Learn to use the tools you have and, most of all, learn to use and trust your ears!


