Why bedroom studios struggle with translation (and what you can do about it)
Most of us mix in spare bedrooms or converted offices. These spaces distort what you hear because of two main issues: room modes – standing waves that exaggerate or cancel bass – and early reflections – sound bouncing off walls, ceilings or your desk that smears imaging. Without treatment, you compensate for these problems in your mix, only to find that the track falls apart on other systems.
Older Sonarworks posts like Four Steps to a Better Sounding Studio and How To Set Up Your Studio For Better Mixes explain the basics of room choice, measuring dimensions, and setting up an equilateral triangle between your speakers and your ears. Rather than repeat that groundwork, this guide takes those fundamentals as read and focuses on fresh strategies for 2026 – so you can get big‑studio accuracy on a small budget.
How to treat a bedroom studio on a budget
Before building or buying anything, use existing furniture to help your room:
- Bookshelves & vinyl racks = diffusion. Fill them unevenly to scatter high‑frequency reflections.
- Sofas & mattresses = bass absorption. Placed against the back wall, they tame low‑end buildup.
- Thick curtains & rugs = high-frequency control. They cut flutter echo without deadening your room.
Once you’ve rearranged your room, follow the classic advice from Brad Pack’s How To Set Up Your Studio For Better Mixes by sitting about 38 % of the room’s length and centered between the side walls, and positioning your monitors in an equilateral triangle. For more details on finding the best listening position and basic treatment placement, see that article.
Best cheap acoustic treatment for small rooms (that actually works)
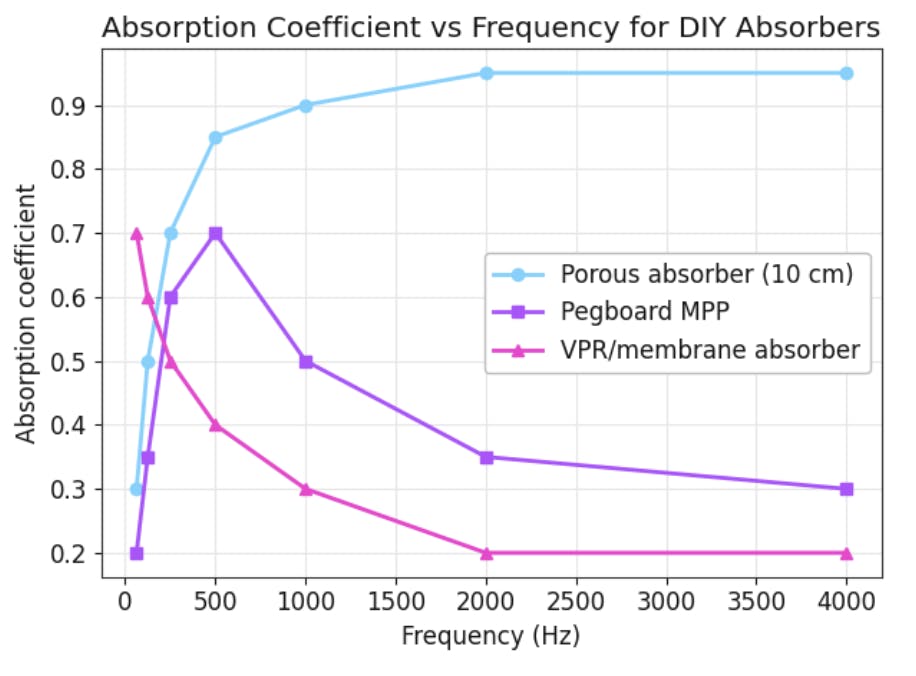
The usual warnings apply – egg cartons and thin foam only absorb high frequencies. Instead, combine these strategies:
- Porous absorbers (10–15 cm of mineral wool/rockwool framed and covered with breathable fabric) spaced 5–10 cm off the wall. They absorb down into the 80–100 Hz range and are easy DIY projects.
- Super‑chunk bass traps in corners: triangles of rockwool stacked from floor to ceiling.
- Pegboard micro‑perforated panels: A sheet of pegboard over a 40–80 mm cavity tunes mid‑bass absorption without itchy fibers. Hole diameters of 1–2 mm and 0.5–1 % open area work well.
- VPR‑style plate traps: Thin sheets of steel or aluminum bonded to foam or mineral wool, leaned against the wall, provide efficient low‑frequency absorption in a small footprint.
- Deep rear‑wall absorption (30–40 cm) behind your listening position: this is the low‑frequency sink that Tom Hidley and John Storyk use in non‑environment rooms. Bookshelves or sofas can supplement it, but a dedicated panel works better.
For a primer on the traditional difference between velocity (porous) absorbers and pressure (membrane) traps, revisit It’s All About That Bass and Four Steps to a Better Sounding Studio.
SBIR explained: exact speaker‑to‑wall distances to avoid bass suckouts
One of the biggest causes of uneven bass is speaker boundary interference response (SBIR). When sound reflects off the front wall and meets the direct sound from your speaker, it creates a cancellation notch at:
fc≈c4df_c \approx \frac{c}{4d}fc≈4dc
where c=343 m/sc = 343\ \mathrm{m/s}c=343 m/s (speed of sound) and ddd is the distance from the speaker’s front baffle to the wall. In small rooms, placing speakers very close to the wall (0–20 cm) or farther than about 2.2 m pushes that cancellation outside the critical bass range. Distances around 1–2 m create a severe notch right in the kick and bass region.
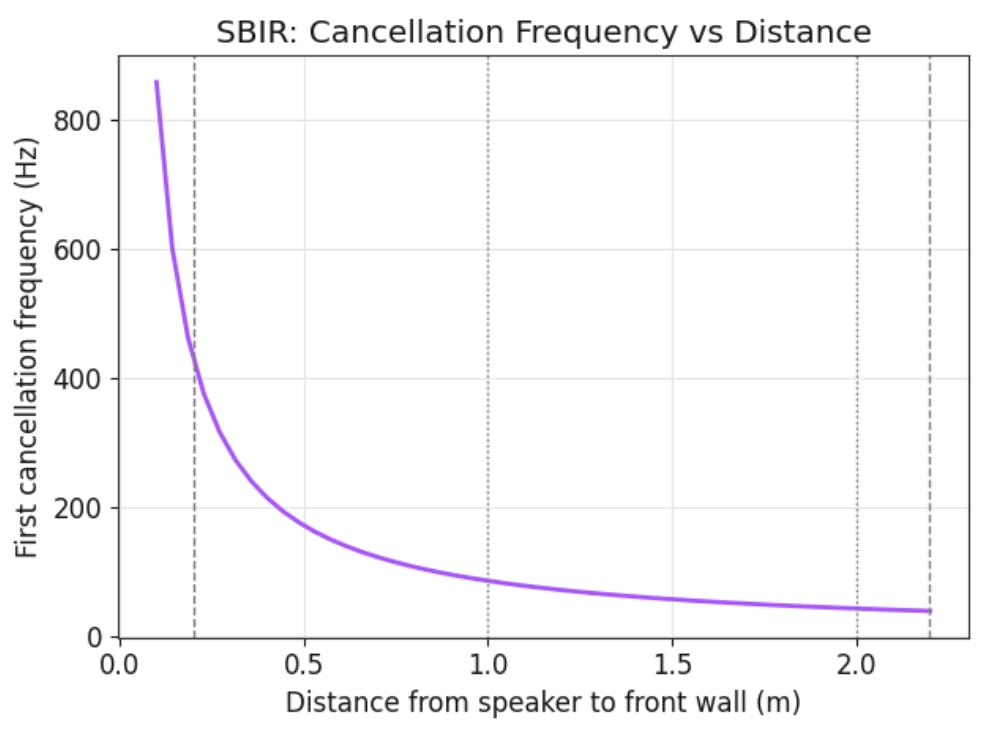
Hidley‑inspired non‑environment rooms flush‑mount speakers in the wall to eliminate SBIR entirely, but in bedrooms, you can approximate this by pushing your monitors as close to the wall as possible and adding absorption around them. For a more detailed explanation of SBIR and speaker placement, see Adam Kagan’s Setup Your Studio Monitors the Right Way.
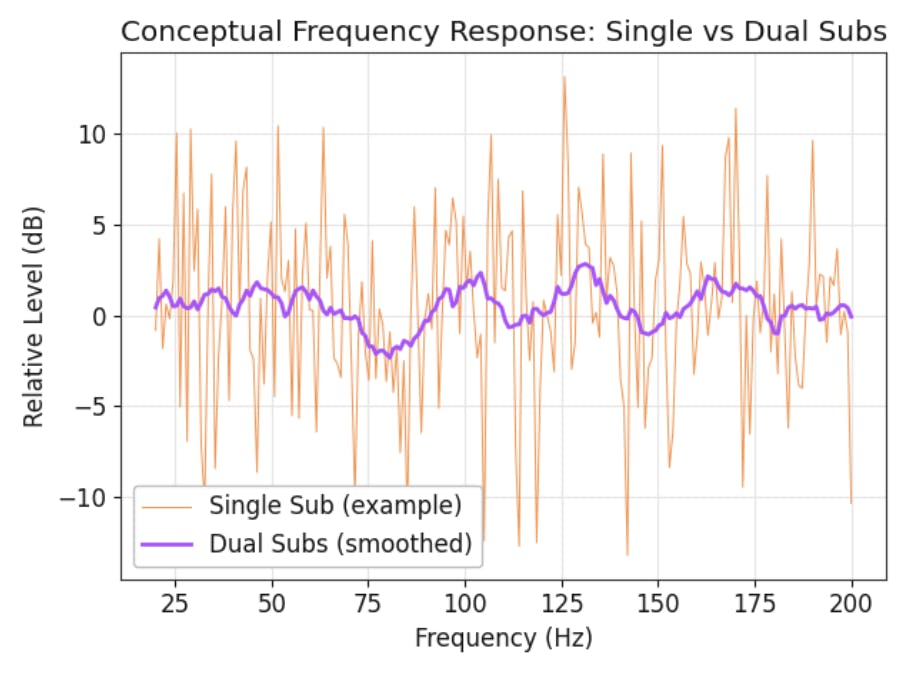
2 small subs vs 1 big sub: the budget trick for even bass
If your budget allows a single sub, consider buying two smaller subs instead. Research from Harman and others shows that placing subs at opposite midpoints (e.g., midpoints of the front and rear walls) averages out modal peaks and nulls. The result is smoother bass at every listening position than one large sub can produce on its own. Once placed, use gentle EQ to flatten the remaining variations.
Ceiling and desk reflection fix: the fastest imaging upgrade
Early reflections from your desk and ceiling smear stereo imaging and cause mid‑range comb‑filtering. Here’s how to clean them up:
- Push monitors forward so they extend beyond the front edge of your desk.
- Tilt or shrink the desk to minimize the reflection area.
- Install a ceiling cloud: a 10–15 cm deep panel hung 10 cm below the ceiling above the listening position. It acts as both a mid‑range absorber and a bass trap.
- Use an absorptive strip on the desk edge if you can’t reposition it.
For the basics of identifying reflection points with a mirror and the “first 20 ms” rule, see This Acoustics Problem Could Be Killing Your Mixes.
Room noise targets: hit NC‑20 in a home studio
An often‑ignored ingredient for accuracy is ambient noise. Even minor humming from computers or heating, ventilation, and air conditioning can mask low‑level details. Aim for a noise criterion (NC) or noise rating (NR) of 20 dB SPL across octave bands at your listening position.
Cheap wins include:
- Quiet fans and SSD drives in your computer
- Weather‑stripping door frames and sealing keyholes
- Rubber footers or isolation pads under racks and desks
- Slowing noisy HVAC vents with larger diffusers
Measuring noise can be as simple as using a phone app with an octave‑band analyzer; compare your readings to NC curves.
Calibration vs treatment: finding the balance
Sonarworks’ own research shows that calibration cannot replace acoustic treatment. EQ corrects the speaker output to your ears, but cannot eliminate physical cancellation nulls or shorten modal decay. Calibration excels when used after you’ve addressed placement and treatment problems: it smooths broad peaks, aligns subwoofers, and corrects speaker or headphone irregularities. See Does Room Correction Work? and Can software calibration replace acoustic treatment? for deeper discussion.
Rear‑wall strategy and Non‑Environment thinking
Traditional BBC control rooms and Live-End/Dead-End designs put diffusion on the rear wall. For small bedrooms, a non-environmental approach with deep absorption on the rear wall often works better. Combine this with near‑wall monitor placement and heavy corner traps to minimize room‑tone decay. If you want some sense of space, use lightweight diffusion (e.g., bookshelf diffusion) above the absorption.
In practice:
- Move your seat away from rear‑wall nulls (use the c/(4d)c/(4d)c/(4d) rule again, this time measuring from your ears to the rear wall).
- Add 30–40 cm of porous absorption or VPR‑style panels to the rear wall.
- Let two small subs handle the remaining room‑mode ripple.
Final word: reliable translation without breaking the bank
Professional control rooms chase flat, extended response at a huge expense. Your goal in a bedroom studio is to translate mixes that sound great everywhere. You’ll get there by:
- Leveraging furniture and rearrangement
- Using DIY absorbers that actually work (porous, pegboard, plate traps)
- Applying SBIR math and multi‑sub placement to tame the low end
- Treating desk and ceiling reflections for a clear stereo image
- Targeting NC‑20/NR‑20 for noise control
- Adapting non‑environment principles with deep rear‑wall absorption
- Calibrating only after the physical work is done
By following these science‑backed strategies, you can make a modest bedroom mix room perform like a well‑designed studio, and your mixes will finally survive the car test.
More deep‑dives and references
- Room modes & modal calculators: Mastering Room Acoustics
- First‑reflection treatment: Killing First Reflections
- SBIR & monitor setup: Setup Your Studio Monitors the Right Way
- Monitor orientation: Is it OK to Turn Your Monitors on Their Sides?