
Welcome to the third article in the series focusing on Reaper templates. In case you are just coming across this series of articles, part one covers how to build a recording template that helps keep sessions organized and moving efficiently. Part two introduces some time-saving workflows and highly efficient ways to import audio files. This article covers how my template incorporates an efficient and flexible layout for tracks, busses, and effects. You can use these ideas in your template, or you may just find inspiration and new ways of thinking by reading this article and discovering some alternative ways of working. If you’d like to work directly from my template, you can download my exact REAPER mix template here.
Main Mix Busses
My current workflow contains two mix busses, MIX A and MIX B. MIX A has all sorts of stereo bus processors ready to go, whereas MIX B gets used for heavy parallel processing.
I find it efficient for my template to have many processors pre-installed on my main mix bus, MIX A. I wouldn’t use all the plugins below at the same time, but I regularly use the first four items in the list below. This list contains the general type of processors I like and in the next article, I’ll cover the plugins that I can’t live without. Here’s a rundown of what kind of processors live on MIX A, just in case you need some inspiration.
- Clipper
- Vintage-style EQ
- Vintage-style compressor
- SSL-style VCA bus compressor
- Stereo image processor
- Neve bus compressor
- Transparent bus compressor
- Colorful EQ
- Tape Emulation
- Limiter/Maximizer
MIX B (my parallel mix bus) uses an ever-rotating cast of compressors, as well as EQs or transient designers. The point of this bus is to enhance the whole mix, adding thickness, sparkle, increasing the overall loudness level, or whatever else might be needed. I don’t use it very often, but it’s good to have it ready to go just in case it’s needed.
The outputs of MIX A and MIX B both route to the master bus. I use a few plugins on the master bus to affect the entire mix (MIX A + MIX B). On the full mix, I usually insert Bassroom, from Mastering the MIX, as well as an EQ and volume trim plugin. I may wind up automating the volume trim and EQ to add extra contrast and dynamics to the final mix.
Subgroup Mix Busses
Each track in my session goes to one of the following stereo subgroups: ALL MUSIC, ALL DRUMS, or ALL VOCALS. The ALL DRUMS and ALL VOCALS busses are self-explanatory, but I treat the ALL MUSIC bus in a special way.
The ALL MUSIC bus has a dynamic EQ set to the Mid-Side mode. I don’t particularly like vocals to float on top of the instrumental, so I use the dynamic EQ to create a pocket within the music for the vocal to sit in. My ALL VOCAL Bus feeds the sidechain input of the dynamic EQ on my ALL MUSIC bus.
On the ALL VOCAL bus, I add a new send to channels 3-4, which REAPER plugins use as their default sidechain input. The dynamic EQ plugin then reacts to the send from the ALL VOCAL bus and I find the frequency range where the music masks the vocal the most; it’s usually in the low-mid or mid frequencies. I set a bell-shaped filter to the dynamic EQ mode and let the plugin take care of the unmasking!

Instrument tracks
I use folders for instrumental groups, so all the drum tracks are nested inside a folder called DRUMS. [ For a refresher on how to create folders in REAPER, review our drum tracking info in part one of this series.] This folder has quite a few children tracks, which might even be folders themselves: LOOPS, BD, SN, TOMS, HH, OH, ROOM, TRASH. The kick, snare, and tom tracks each have a sample replacement/enhancement track ready to go and named bd+, sn+, and so on.
I label overhead and room mics according to which side of the drumkit they’ve been placed: OH HH if that particular mic was closer to the hihat, OH Ride if it was placed closer to the ride cymbal. This clarifies what side of the kit the mics were on—not everyone likes the drums to be panned from the drummer’s perspective. Being a drummer myself, I’m shocked whenever someone asks me to mutilate the stereo image of the drums and pan them according to the audience’s perspective. */joke* If your mix will accompany a video, you probably want to pan your drums to match the visual.
Following the DRUMS folder, there is a PERC(ussion) folder with tracks for a Shaker and a Tambourine, as this is the percussion I’m confronted with most often.
My BASS folder contains the main bass track, which I usually duplicate one or two times. I might have tracks for bass low, bass mid, and bass grit, once I get the mix going. Since consistent low-end is important to the overall groove of the song, I might squash the bass low track, whilst keeping the other two bass tracks more dynamic. I might also sidechain the BASS folder from the kick drum when I need the bass to stay out of the way of the kick.
To sidechain the BASS folder from the kick (BD folder track), I insert Reacomp on the BASS folder and send the BD folder track to the BASS folder, making sure the BD track goes to channel 3&4.
I set the Reacomp as follows:
The Dry fader is brought all the way down. Attack 0ms, Release 52ms, Ratio 3:1, Detector Input: Auxiliary Input L+R. I then bring down the threshold until I get around 4dB of gain reduction. The most important setting here is the Detector Input: this tells Reacomp to use the BD folder as its sidechain signal.

After the BASS folder, I have a SUB folder. This is where I place any bass drops or sub bass lines. This folder routes straight to the ALL MUSIC bus. I don’t apply any unnecessary processing that will mess with the delicious subs here. I don’t even use a console emulation plugin on this track.
Next is my SOLO folder, which usually houses the guitar solo. I separate solos from the other guitars so I can more easily process the latter. I may even use the guitar solo to duck (sidechain compress) the other guitars.
All the rest of the electric guitar tracks are huddled together under the protective wings of their daddy, EL GTR folder. Yes, he’s a penguin. He likes to be extra wide sometimes, so he often gets the JST Sidewidener treatment.
Acoustic guitars live inside the AC GTR folder
The KEYS folder houses acoustic and electric pianos.
The SYNTH folder usually contains pads and arpeggiators. You can generally find the Sidewidener plugin inserted here, too.
My STRINGS folder is where I group all the string pads, individual string sections, and individual string instruments. This folder also has Sidewidener engaged from time to time.
Lastly, all sound effects tracks go inside the SFX folder. Sound effects can be anything non-musical from dogs barking, cars screeching, to gunshots, etc.
Except for the drums, all the above folder tracks route directly to the ALL MUSIC bus.
Vocal tracks
I have quite a few lead vocal tracks ready to go in my template. I do this for several reasons:
- Sometimes vocal lines run over each other, such as a long final note in the verse that bleeds into the chorus. This means these parts have been recorded separately, so they need their own tracks.
- Often, punched-in lines use overlapping tracks to avoid tight punches or edits.
- You may want to (or need to) treat different sections of a song differently. For instance, the verse vocal may be soft and intimate, while the chorus needs to be loud and distorted.
- Sometimes, vocals have been recorded in various studios, with different gear and acoustics. The different recordings need to be massaged so they fit together with the rest of the vocal track, then they can be processed.
All the lead vocal tracks feed into a VOX BUS folder track, where I use processing that’s common to all the lead vocal tracks, such as deessing, saturation, compression, and EQ. Autotune may need to be placed on individual tracks, or it might work fine on folder track, depending on how it reacts to the different vocal tracks, especially if any vocals overlap.
Besides the main vocal tracks, I have a couple of effects tracks ready to go, where I drag certain parts of the vocal that I want to process. I use these FX tracks mainly as vocal throws for delays, weird reverbs, distortion, or whatever else is meant to be ear candy. Automating sends can be much more cumbersome than selecting and dragging a word or section of a vocal track to the appropriate FX track. These tracks live inside the VOX THROWS folder track.
Vocal Thickening Tip:
When it comes to thickening the vocals, there’s an old trick that’s been en vogue for years. Create copies of your lead vocal, pan them left and right, then slightly detune them. -3 cents on the left, +3 cents on the right, and so on in 3 cent increments, until the vocal’s thick enough.
This being REAPER, there is always a shortcut and I found a script for this type of thickening, spk77’s Vocal Thickener.
Select the item you want to thicken, then run the script. Easy as pie. If you want your whole lead vocal track to be thickened, make sure you glue all its items first; the script would create a separate process for each vocal item otherwise, on different tracks, and it would get messy.
Extract the archive file to the UserScripts folder in your main REAPER folder. To get to it, click on Options, located on the top menu bar, then choose Show REAPER resource path…Then open the Actions list (Shift+/). Click on New action, choose Load Reascript. Navigate to the UserScripts folder, select the Vocal Thickener script and open it.
I have a backing vocals bus (labeled BV) which houses all the doubles, harmonies, whispered takes, and adlibs. These, in turn, go into their respective parent folders, creatively labeled DBL, HARM, ADLIB, WHISPER. Again, this is especially important if I want to keep things tidy when I have a lot of tracks of a certain type. It’s also great for processing all the vocals belonging to one of the groups using minimal processing power. For instance, if the “oohs” need a little EQ, why not just EQ the group, and not each individual track?
All four backing vocals folders have ReaEQ and Joey Sturgis Tones’ Sidewidener on them. I like my BVs to be wide. I use Sidewidener on each subgroup because I might want to have the harmonies wider than the doubles, etc.
Effects tracks
What drives most people to build a mixing template is the effects tracks. We tend to use similar reverbs, delays, chorus, phaser/flanger, or distortion effects on every song and it’s great to have these at our fingertips in a template.
When I’m describing sends in my template, I’m referring to post-fader sends. I use post-fader sends for effects so that the effects send level/mute follows my fader levels. If I used pre-fader sends, you would still hear the snare reverb when the snare is muted. The post-fader method works well for effects. Pre-fader sends are great for headphone mixes and certain special effects.
My template has a parent FX folder, which holds children Vox fx, Drum fx, and General fx folders. These each have their own children, namely the individual effects tracks.
It’s important to note that the parent FX folder doesn’t send to any track; it’s just a way to keep things tidy.
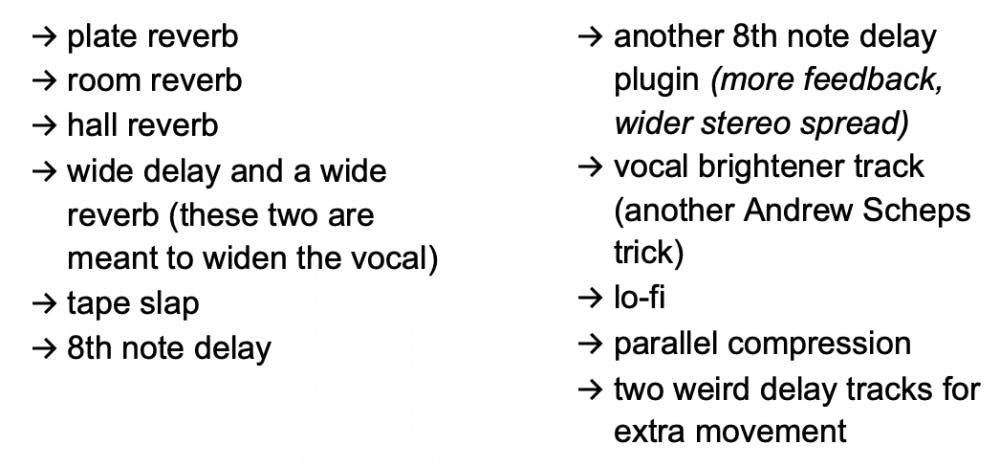
The Vox fx folder contains these aux effects tracks. This folder routes to my ALL VOCALS subgroup:
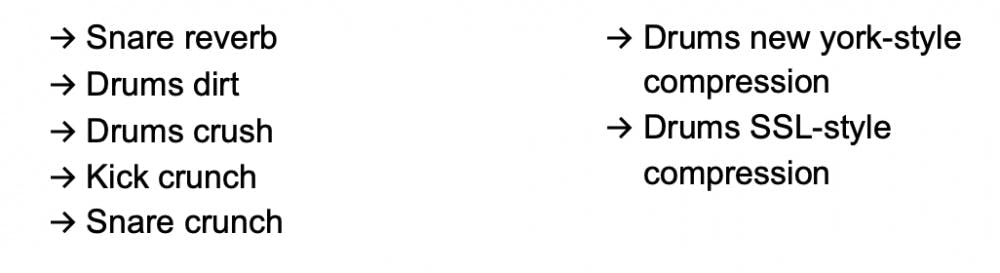
The Drums fx folder contains these aux effects tracks. This folder routes to my ALL DRUMS subgroup:
I have a General fx folder that routes to the ALL MUSIC bus. This folder contains modulation effects, like chorus, phaser/flanger, tremolos, etc. These are effects that don’t get used on vocals. If I need any of these effects on the vocals, I duplicate the effect and add it to the vox fx folder. I do this so I don’t make life harder for myself when I want to render alternate mixes, such as just the instrumental version, without the vocals in there. If a vocal effect was routed to the ALL MUSIC bus, for instance, you might hear a “ghost” of the vocal even when the ALL VOCAL subgroup is muted.
I also have a Rear Bus channel. This is something I got from Andrew Scheps. The term Rear Bus comes from the way old Neve console labeled their stereo mix buses, so the Rear Bus is just a stereo bus that is a parallel mix bus to the main mix bus. Every track, except for the drums, percussion (sometimes), and sub-bass, goes to the Rear Bus. This bus is used to thicken, increase the loudness, and elevate the whole mix.
REAPER’s Monitoring chain
The best thing about Reaper’s monitoring chain is by far the fact that it’s on a separate path than the render/export path. This means you don’t have to worry about bypassing any of your monitoring plugins, like headphone corrections, room simulation, or even meters when rendering your work. Monitor FX are inserted into REAPER using the Monitoring FX under the topbar’s View pulldown menu. Again, Monitor FX will not affect any bounces that you make.
REAPER also supports separate monitor paths for speakers and headphones, as long as your interface has more than one stereo output. This way, you can have both your headphones and your speaker calibration on, at the same time, without having to switch between the two. The setup for this is shown in the sidebar below.
My Monitor FX include a few metering plugins, which are before my SoundID Reference headphone calibration plugin. I tend to employ iZotope’s Insight 2 for metering, and their Tonal Balance Control to check my low end against the average low-end curve of various genres. I also use ADPTR Audio’s Streamliner to check how my work will perform on various streaming platforms and their MetricAB plugin for comparing my mix to other reference songs.
After my meters and analysis plugins, I insert SoundID Reference and dSONIQ’s Realphones. SoundID corrects the frequency response of my headphones or speakers and Realphones provides crossfeed to make my mixing on headphones translate more accurately to speakers. Both SoundID and Realphones provide mono/stereo listening and other useful features.
For my last Monitor FX, I have a +14dB volume boost, as well as a -18dB DIM armed. I rarely use the boost, but DIM is very useful when I want to check how my mix sounds when played softly without having to change my calibrated monitor level. DIM is also useful if I need to turn down the playback to have a quick conversation or answer my phone.
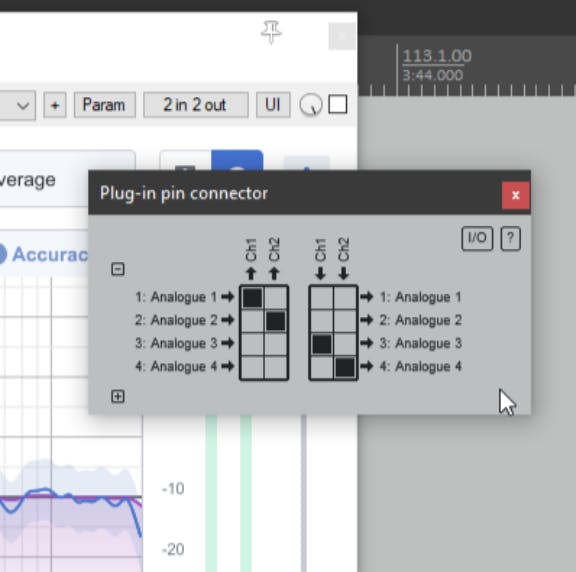
Here is how to apply headphone correction to outputs 3/4 of your interface without affecting the main monitor outputs:
You first need to route Output 3 and 4 from REAPER to the headphones output on your interface. This may be a software setting on your interface’s control panel, or you may need a separate headphone amplifier that is fed from your interface’s outputs 3 and 4. Next, click on the monitoring plugin you want to set so it only affects your headphones. On the top-right corner of the plugin, click on the box that reads 2 in 2 out. In this new grey plug-in pin connection window, click on the little “+” symbol. This will create another pair of I/O, so you should have outputs 1 and 2 (speakers) and 3 and 4 (headphones). Leave the Inputs columns alone, but in the Output columns uncheck the boxes for 1 and 2, leaving just the 3 and 4 ones checked. See the image below for more details.
Conclusion
Templates are indispensable if you want to work efficiently, at a professional level. You can’t spend an hour just setting up your routing and effects every time you have to mix a song. Take advantage of the cool features that REAPER offers with its routing options and scripts. Even if you’re not a tech-savvy person, REAPER allows you to make it your own with little effort.
Remember to have fun and treat your clients right. They’re working with you to have a great experience!
____________________
For more reading on this topic:
Part One of REAPER Templates (for recording setups)


