
This article, the second in the REAPER series, focuses on getting the most from REAPER by using mixing templates to increase your efficiency. Part one covered how to build a recording template that helps to keep sessions organized and moving efficiently.
The time invested into dialing in your template will pay dividends over the duration of your career. You won’t be burdened with re-creating all the same tracks, busses, and effects chains over and over again. You will be ready to go and many of your routing and effects options will be accessible with the click of your mouse.
Professionals rely on templates; all the mixers you admire went down this route. It’s time you follow in their footsteps. I want to reiterate one point I made in the previous article: you can (and should) have templates even if you’re a songwriter or composer—especially if you are a composer. Can you imagine having to set up your 150+ track session every time you want to write something? Nightmare! (Check out some template ideas for writing sessions in Eli Krantzberg’s article.)
Preparing your Reaper project
Importing Audio Files into a Reaper Mix Session
Once you’ve set up a session with all the elements you may need, you can save the session as a REAPER template. When starting a new project, you can open one of your templates, save it as a new project and then import the audio files into this new project.
First things first: set the project tempo(s) to match your song.
It’s much easier to set the tempo before you import the audio files. Otherwise, you may have to change some settings so your files don’t automatically get time-stretched during import.
Here is a game-changing tip for speeding up the import process:
There is a script pack from X-Raym that makes importing audio into your session infinitely easier than ever. This is a paid product (20.00€), but it’s invaluable and will save you time (time = money) in the long run. X-Raym (“Extreme” Raymond Radet) is one of many important contributors to the REAPER community, and you should spend some time investigating the online resources that make REAPER such a valuable product.
With this import script, all you have to do is rename the audio files to reflect the track name in the project where you want the files to import to and then run the script. You can even import specific audio files into specific folders in your template (folders need to have empty tracks for this to work).
Let’s say the audio file “Mandarine bells” needs to go into the SFX (sound effects) folder. In this case, you’d rename the audio file “+SFX+ mandarine bells.” Then you’d use the action called x-raym: Insert media files as item on existing similarly named tracks or and new tracks (parent track prefix support).
In the window that opens next, you’d select all the audio files.
- The ones that you’ve renamed to match the project’s track names will import directly to their appropriate track or folder. An audio file named “Guitar.wav” will import to the track named “Guitar.”
- The tracks that don’t match project track names will be imported to newly created tracks. You’re not leaving files named “Audio_001.wav” anymore, are you?
- Finally, tracks that contain a parent track prefix (name like: “+PARENT TRACK+snare.wav”) will be neatly tucked away in their parents’ arms.
This script will save not only time but a lot of mind-share when setting up a session. Imagine having to prepare a 150+ tracks pop session. You’d have to drag and drop each file onto the right track…oh dear, I get nauseous just thinking about that. The energy you expend setting up your session takes away from the energy and momentum you have to mix your session!
HOT TIP!
My template includes a console emulation plugin on the most important tracks. This helps me get a bit of console saturation (if needed), as well as a great-sounding channel strip to work with. The end result is me spending less time fiddling with different plugins, and more on actually getting the mix finished.
Coloring tracks and using track icons in Reaper
I don’t like using track icons because they eat up a lot of screen real estate, even on large screens. Color coding the tracks helps me to easily find what I’m looking for. That, and always labeling and ordering the tracks the same way. Consistency is key!
Coloring a track by right-clicking each track and setting a custom color can take some time, so we can use another script to automate the track coloring process. Bear in mind you need to have the SWS Extension installed before you follow the steps below. The first time you set up these color rules may take some time, but it will save you time for the rest of your life.
Here is how to automate track coloring:
- On the top menu bar, click Extensions. Then click on Auto Color/Icon/Layout.
- At the bottom of the window, click Add rule.
- To change whether you’re creating a rule for a track, marker or region, right-click on the word “Track” in the second column and choose the appropriate option.
- In the next column, type your track name, i.e. “rt” for rack tom.
- To choose a color, click on the colored (or white) square next to the Remove button.
- Pick a color, then press Ok.
- The next column is where you can choose your icon.
- Double click the empty field; this opens up a browser window, so you can select whatever image you want for your track.
- The last two columns let you select the specific track’s layout for the TCP (track panel in the arrangement view) and the MCP (mixer panel in the mixer view) if you want a specific one.
- Under Options (bottom bar of the AutoColor window), I selected/checked all the options. The “Force” button bypasses whatever settings you manually changed to your tracks and applies the rules in the Auto Color window.
To get you started on your color-coding journey, here’s how I color my tracks:
- Drums and percussion – red
- Bass – blue
- Acoustic guitars – weird lime
- Electric guitars – yellow
- Keys – green
- Strings – cyan
- SFX (sound effects) – washed-out green
- Vocals – purple
- Backing vocals – pink
- FX (effects) – orange
How to deal with false stereo items in Reaper
Once all the files are in the projects, I make sure there aren’t any two-channel-mono or “barely stereo” audio tracks. Many producers export all their audio files as stereo, even when they are actually mono. You could use a stand-alone utility like StereoMonoizer to check for and reconcile stereo and mono files, but, as usual, REAPER can automate this task using a script.
Run this script to get rid of extra tracks and save processing power for your project:
- In the Actions window, look for Script: gen_True Stereo Takes Test.eel
- This script has two simple controls: a threshold slider that lets you set the level difference between the mono and stereo information, and the Set false-stereo to mono button.
- If there are any pseudo-stereo items, or items with very little stereo information, such as pads that have a chorus on them to make them feel a bit wider, they’ll be converted to mono.
How to backup tracks in Reaper
Backing up your tracks creates an easily accessible safety net of original tracks for whenever you’re editing a track and need to revert back to the original unedited file. Why would you backup tracks, instead of just saving a duplicate copy of the project? It’s faster and easier, plus your project always contains the original tracks should you need to go back to them. For example, I backup vocal tracks before I start comping them, and then again before tuning and editing them.
You can create a custom action that duplicates the selected tracks and automatically hides them from view. I’ll show you what custom actions you need to create in order to backup your track.
The first custom action mutes and hides a track and bypasses all the FX on it so you’re saving some processing power. The second custom action duplicates the original track and then performs the mute and hide track(s) action. I’m using two separate custom actions because I sometimes use the Mute and hide track(s) action by itself. Once you’ve created both custom actions, Action 2 will take care of backing up and hiding tracks.
Custom Action 1
- Mute and hide track(s)
Track: Unsolo tracks
Script: Archie_FX; Offline all FX selected track.lua
Track: Mute tracks
Track: Hide tracks in TCP and mixer
Custom Action 2
- Create backup of selected track(s)
Track: Duplicate tracks
Custom: Mute and hide track(s)
To find a backup of a track that you’ve previously hidden:
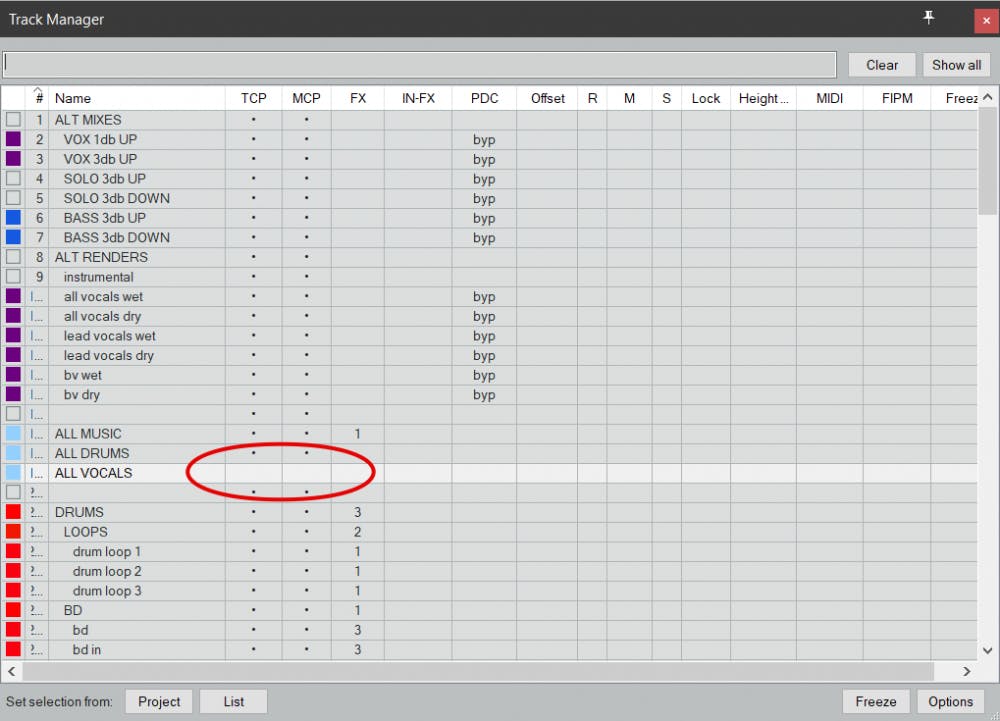
- Open the track manager window by using the default CTRL+SHIFT+M shortcut (Win), or CMD+SHIFT+M (Mac).
- Scroll around and you’ll see the track you’ve backed up. This is the original, unaltered version of whatever it is you’re looking for.
- Pay attention to the screenshot below. The missing dots in the TCP (track panel) and MCP (mixer panel) columns mean that the ALL VOCALS track is hidden.
- To bring it back, simply click in the empty spaces for each circled column and it’ll show up in your project again.
Normalizing audio and gain staging in Reaper
There’s a bit of a heated discussion going on in the industry regarding both normalizing your audio before mixing, as well as about gain staging. Some people say you shouldn’t normalize your tracks because the recording engineer and the producer set the levels right for what the rough balance should be, in accordance with the vision the latter has. Truth be told, for a lot of projects, the tracks aren’t necessarily recorded with the end result in mind. Normalization helps bring all the tracks to a level that’s easier for us to use in our mix template.
When mixing with plugins, gain staging matters because plugins are designed to operate at a “nominal level,” which is generally equivalent to an average (not peak!) level of -18 dBFS. Audio files that are too soft won’t trigger a compressor or gate properly and extremely loud files may trigger a compressor or gate too much and may limit the amount of EQ you can apply before overloading a plugin.
There are two types of normalization available: peak normalization and loudness normalization. Loudness normalization brings the average loudness of the file to a specified level, which is what we want for gain staging purposes.
Before normalizing, I first listen to the tracks as they are. Maybe they’ve been recorded and balanced well. In that case, I don’t normalize them and I maintain the rough vibe the producer liked. If they’re a bit too hot, I simply select all the items and bring them down together, to keep the internal balance intact. If everything is too soft, select all the items and bring them up together.
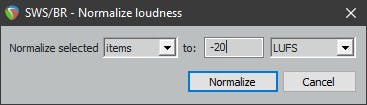
I use a script to normalize the audio tracks: SWS/BR: Normalize loudness of selected items/tracks…
Make sure you choose ‘items’ from the leftmost dropdown.
I generally go for a loudness for all tracks (average level—not peak!) of -20 LUFS. This seems to satisfy the plugins’ need to be fed audio at the correct level. After normalizing everything, to avoid peak overloads with the drum and percussion tracks, I’ll bring down their level by a few dBs. Then I might bring up the lead vocal tracks by a couple of dBs. This gets me to a good place to start the static mix where my plugins behave well and my faders are in a usable place (not too low).
X-Raym very generously created a free script based on my request. This one applies the volume fader level to the items themselves. Here’s why that’s useful: Once I’m done with the static mix, I run a custom action that includes the script. The end result is that I have a static mix that sounds good, and I also get all the fader resolution needed to further massage the individual tracks. Basically, each audio file is gain adjusted so that the fader can be reset to 0 and the audio file plays at the original volume as when the fader wasn’t at 0. You will want to run this script before inserting any plugins on your track, or your plugin setting will change drastically.
- Apply track volume to item, reset fader
Item: Select all items
Script: X-Raym_Select only tracks of selected items.lua
Script: X-Raym_Offset selected items volume by their track fader value.lua (this is the new script)
Xenakios/SWS: Set volume of selected tracks to 0.0 dB
Custom: Remove all selections
The last action consists of Time selection: Remove time selection and loop points and Unselect all tracks/items/envelope points. I also have it bound to the Esc key.
Using Song Markers in Reaper
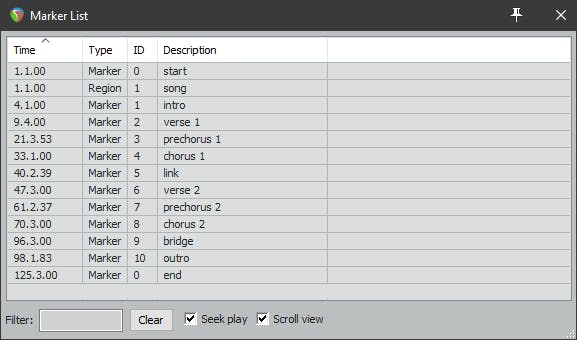
Most popular songs contain the same basic sections: intro, verse, pre-chorus, chorus, link, verse, pre-chorus, chorus, bridge, chorus, outro. I have created markers in my template to account for each section. I simply listen to the song once and place them accordingly. These markers help to quickly navigate around the song. Of course, we can create markers quickly by using Actions.
After you have arranged the markers so they follow the song structure (and created new ones, if needed), you may want to reorder the markers so their numbering is sequential. Under Extensions, go to Marker Utilities, then click on Reorder Marker IDs.
Navigating markers is as simple as typing the marker number or tapping on the bracket keys “[ ]”. I have custom-mapped the Function buttons to these actions. Go to marker 01 is mapped to F1, Go to marker 02 to F2, and so on. You can find and customize these navigation commands in Actions…show actions list.
Tip: if you have markers you don’t want to move around, nor do you care to focus on them using shortcuts, simply assign them an ID of 0 in the Marker List. This will make sure they won’t get rearranged when you reorder the marker IDs.
The Next Chapter
The next article in this series will cover the track, bus, and effects layout for my mixing template. Take some time to review and digest the principles in this article and you’ll start to formulate your own ideas of how best to layout your own template and you’ll also gain a better understanding of the strategies of using custom actions and scripts to speed up so many tedious processes.
Some resources:
Billy Decker’s Template Mixing and Mastering book
Sonarworks article on Templates


