Anyone paying attention to music or movies has surely noticed the buzzwords “immersive,” “spatial,” “3D,” or just plain “surround” attached to any and all streaming media. As content producers, we need to understand the principles of creating immersive audio, generically called “multichannel” audio. We have spent years developing the craft of stereo mixing, perfecting our listening skills, and carefully building highly accurate environments for our monitor systems. Our stereo monitor system. All of a sudden we have to expand that monitor system to twelve or more speakers! This article will help demystify the setup and calibration of a multichannel system necessary for achieving mixes that successfully translate to the rest of the world, on playback systems from headphones to smart speakers to home theaters.
This article will focus on multichannel music production, but the same principles and technologies apply to film, television, and even audio for games. The most common multichannel audio formats include 5.1 and 7.1 surround, Dolby Atmos, Sony 360 Reality Audio, MPEG-H, and Auro 3D. Atmos leads the pack for music distribution and streaming, although 360 Audio also makes a strong presence. We will see how things shake out for all the competing formats, but for our purposes, we will build on the standards set by Atmos, and these principles will translate to the other formats.
1. Multichannel Speaker Setups
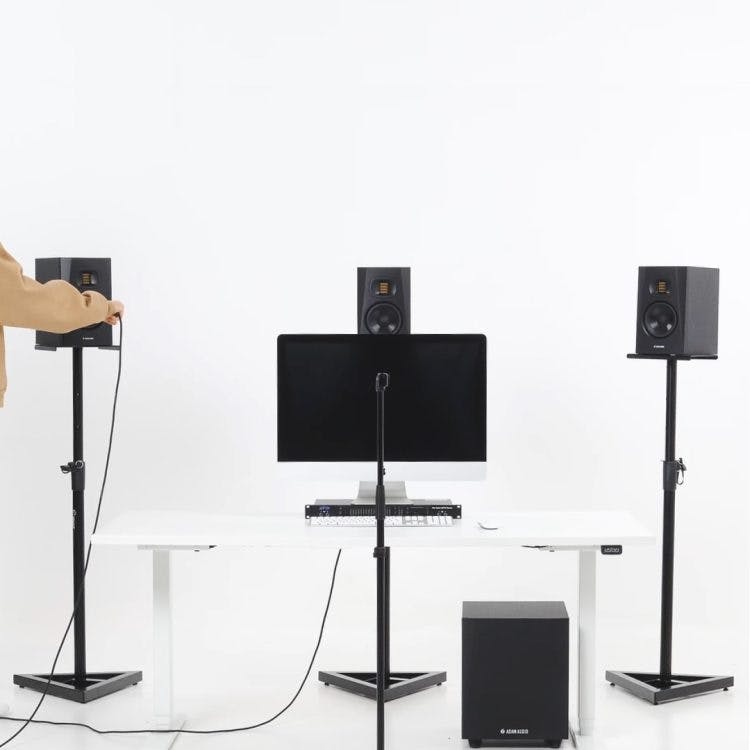
Stereo audio uses two speakers to present an arc of sound that reaches from one speaker to the other, while multichannel audio provides several speakers that encircle the listener at ear height, from above, and in some cases from below. A traditional 5.1 speaker system contains five speakers at the listener’s ear height along with a subwoofer (the .1) for low-frequency effects. The speakers are labeled left, center, right, left surround, right surround, and LFE. A 7.1 system expands this idea with left and right “side” channels. In a large room or theater, there may be several side speakers to cover the entire length of a room, so any sound panned to the side doesn’t have a pinpoint location, but rather a “zone” of space that it comes from. This type of setup is referred to as “channel-based” mixing. Modern multichannel setups are named like 7.1.4, which means seven surround speakers, one subwoofer, and four overhead speakers. Again, the “.1” subwoofer is dedicated to the LFE channel.
Many multichannel formats, like Atmos, expands upon the channel-based system and adds the ability to assign a sound to an object that can freely be panned to any x,y,z coordinate around the room. Rather than sending a sound just to the “left side,” the sound can come from a very localized point in the room. The x, y, and z locations represent pinpoint locations around and above the listener regardless of the size of the room. The minimum suggested Atmos speaker setup includes twelve speakers: left, center, right, left side, right side, left rear surround, right rear surround, LFE, left top front, right top front, left top rear, and right top rear. That is 7.1.4, or seven surround speakers, one LFE channel, and four overhead speakers. Atmos speaker systems can be scaled up to 64 speakers to cover very large rooms. While mixing with objects, any track or bus can be placed into a 7.1.2 channel bed (as in channel-based mixing) or assigned to any one of 118 objects. The objects contain metadata that tells the playback system where in the room the sound should come from, regardless of the size of the room or the number of speakers. Further, Atmos provides compatibility for playback of a multichannel mix on smaller systems, such as 7.1, 5.1, stereo, and even headphones with or without binaural processing. The playback system in a given room intelligently handles the way the audio is sent to the speaker setup in that specific room.
1. Room Setup
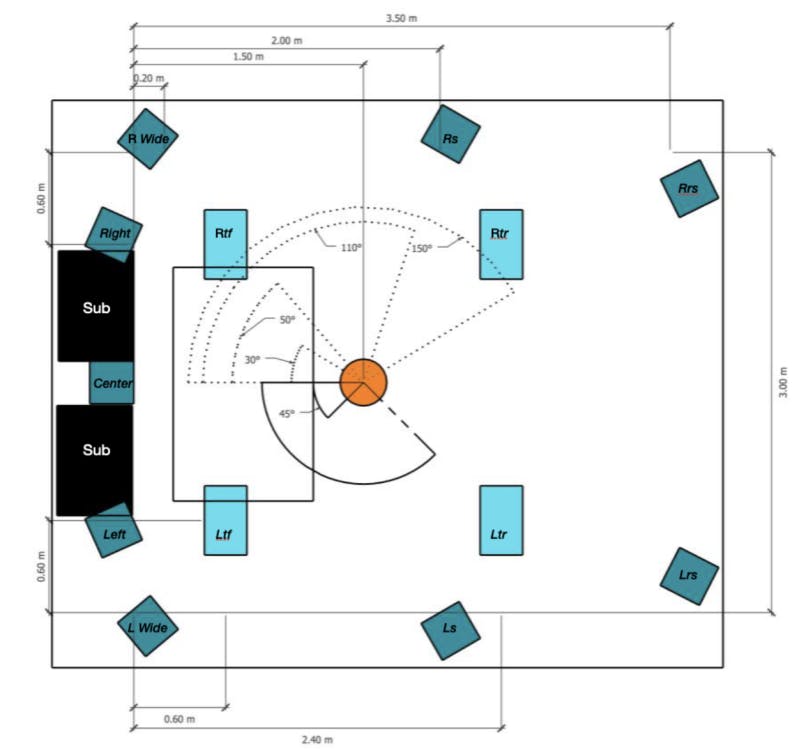
The best practices for studio setups for mixing music in Atmos are thorough but fairly simple. The speakers (7.1.4 minimum, 9.1.4 or above recommended) should all be capable of reproducing full-range audio (40 Hz to 18 kHz, ±3 dB) and each speaker should be capable of generating 85 dB SPL at the listening position with >20 dB of headroom. The subwoofer should be able to handle 31.5 Hz up to 150 Hz. For commercial music rooms, Dolby recommends a dedicated LFE subwoofer along with any additional subs that are needed to supplement the bass from the main speakers. When a subwoofer is used as part of the main speakers, the system is referred to as “bass-managed,” and your monitor controller should offer crossover control and routing options for bass-managed and full-range speaker systems. Most typical production rooms should be large enough for Atmos setups, as the recommended speaker layout dimensions range from 3.5m x 3m x 2.4m (L x W x H) up to 6.4m x 5.5m x 3m (11.5’ x 9.8’ x 7.9’ up to 21’ x 18’ x 9.8’).
The speaker geometry and distance from the mix position can be based on equidistant (circular) or orthogonal (rectangular) speaker layouts. As always, the rooms should be set up as symmetrically as possible, but the actual distance between the listener and the front or rear speakers can vary somewhat as the monitor system will be calibrated to the specific geometry of the room. For mixing rooms, remember that there is typically only one best listening position, which would be the same location for stereo and multichannel setups. The position of the ear-height speakers and their angles relative to the listening position are shown in the image below. The height speakers are placed 45 degrees to the outside of and 45 degrees forward and behind the listening position. Atmos follows the ITU-R BS.775.3 specification, which allows for slight variations in speaker placement for practical reasons, such as doors, or consoles.
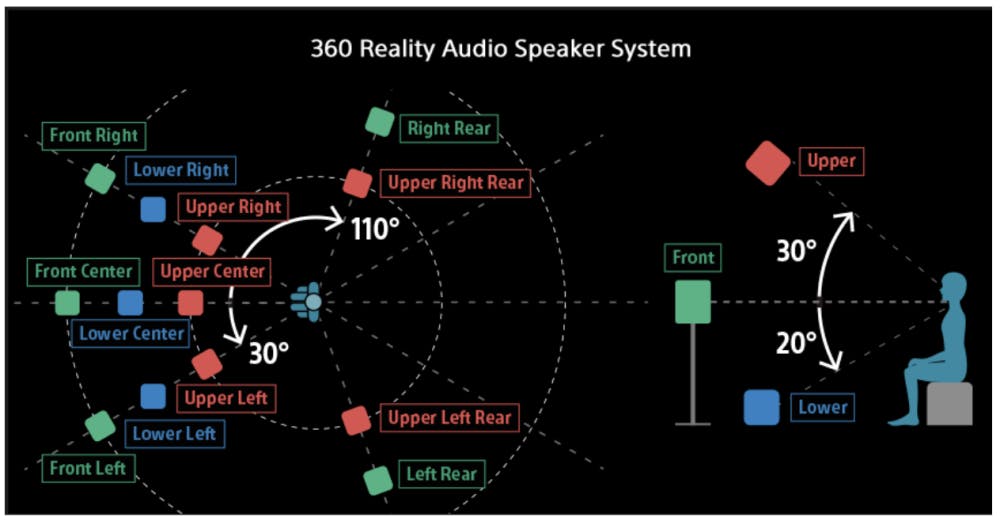
The Atmos recommended speaker setup is compatible with many other surround formats. Auro 3D, however, adds a top speaker layer (above the height layer), referred to as the “voice of God,” and 360 Reality Audio adds a lower height layer. If you are designing a room for Atmos, spend some time reading the Dolby Atmos Music Room Best Practices and try out the Home Entertainment Dolby Audio Room Design Tool, a spreadsheet utility that allows you to build a specific room layout using common brands of monitors or custom configurations. The full recommendations for Atmos music studios can be found here. For comparisons of the many available multichannel and immersive audio formats, take a look at Genelec’s Immersive Hub.
Now that we have some guidelines for the types of speakers needed and the placement of the monitors, it should be noted that the speakers must be calibrated for loudness, frequency response, and timing relative to the mix position. We also need a convenient method for simultaneously controlling the volume of all the speakers.
3. Monitor Control
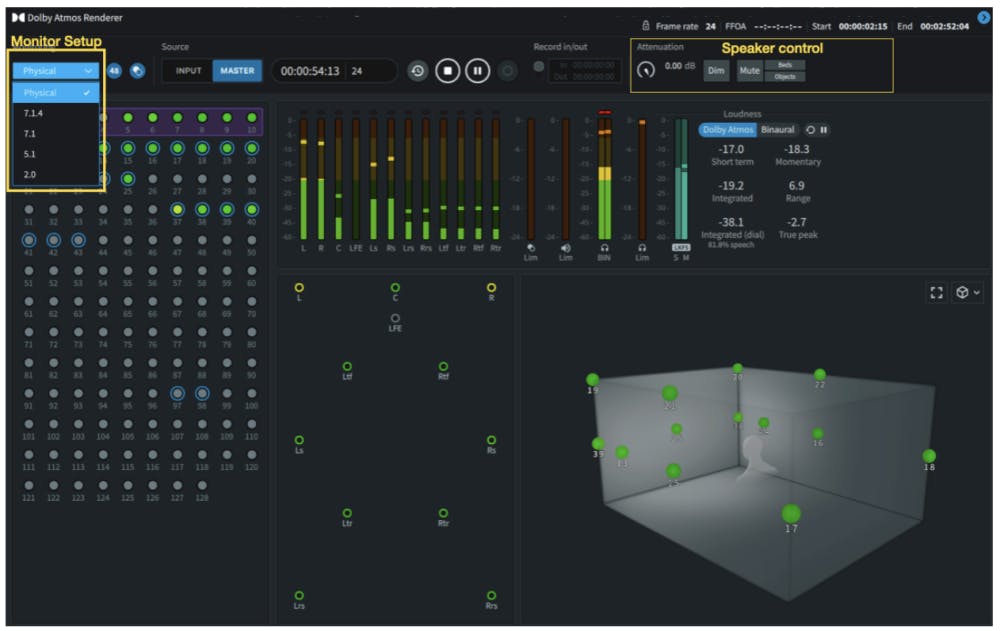
Multichannel setups for small music production rooms require monitor control for at least 12 speakers, plus perhaps headphones and alternate speakers. Larger rooms may require monitor control for up to 64 speakers. The options for monitor control range from software-only solutions to sophisticated hardware units, but even the simplest Atmos setup requires an audio interface with at least 12 outputs. If you feel comfortable or have a limited budget, you can control the speaker volume/DIM/mute with the Dolby Renderer app or even a monitor volume fader in your DAW. Cubase and Nuendo are especially well set up for multichannel monitor control. The volume fader in SoundID Reference for Multichannel could even be used as your monitor volume controller.
Some people are wary of software-based volume control and feel more comfortable with a hardware monitor controller. As of now, only a handful of monitor controllers are designed specifically for multichannel setups, including options from AVID, Focusrite, Genelec, Grace, JBL, Merging Technologies, NTP, and Trinnov. These brands provide speaker control plus DSP functions for calibrating the monitors. Other devices, such as Merging Technologies and MOTU interfaces can be user-configured to control multiple speaker outputs from a single volume knob and provide varying levels of monitor calibration. Expect to pay at least a few thousand dollars for a multichannel hardware monitor controller, especially if you prefer integration with dedicated mix controllers, like a EUCON controller.
4. Speaker Calibration
Multichannel speaker setups require precise calibration for frequency response, volume, and time alignment for each speaker. If the timing (phase) or frequency response of all the speakers do not match, sounds that play from more than one speaker could suffer from comb filtering and will sound unnatural, inaccurate, or have poor imaging at the listening position. If the loudness of each speaker is not calibrated, then your spatial mix will not translate well to other systems.
For loudness calibration, Dolby recommends that every speaker except the LFE is calibrated to generate the same level at the listening position. An SPL meter along with a pink noise generator or measurement software along with sweep tones may be used to measure each speaker’s output. For large mix rooms, pink noise played at -20dBFS should generate 85 dB SPL (C-weighted, slow) from every speaker. A subwoofer used for LFE should have an output of 89 to 91.5 dB SPL for its frequency range. A subwoofer used for bass management should play at 79 – 81.5 dB SPL with its full-range speaker muted. For smaller home studios and production rooms, you may wish to decrease all the SPL recommendations by 6dB. Immersive mixes tend to feel comfortable at slightly louder monitor levels than stereo mixes.
To calibrate the frequency response of each speaker, a sweep tone along with software that can create a measurement plot is recommended, although some calibration is possible using pink noise and an RTA. Software like SoundID Reference Measure, Room EQ Wizard, and Smaart can be used as complete solutions to measure the loudness, frequency response, and timing of every speaker. SoundID, for example, measures each speaker from several locations around the mix position and generates a multichannel correction profile that is then imported into the SoundID plugin. Both SoundID and Room EQ Wizard allow you to port their measurement results to certain monitor controllers with built-in DSP. A selection of hardware monitor controllers, including those from Genelec JBL, MiniDSP, and Trinnov, provide some amount of built-in measurement and room correction tools.
Playing and capturing impulses or short clicks is necessary to calibrate the timing of each speaker. This process could be performed manually by playing a click from a DAW and recording the click with a microphone located at the listening position. This must be done individually for each speaker and then the delay times can be measured in the DAW. These delays would have to be somehow applied to each speaker output, probably through the monitor controller’s DSP or via Dolby’s (optional and costly) Atmos Mastering Suite software. SoundID Reference measures speaker timing (actually phase response) and includes timing correction as part of the multichannel calibration profile it generates. Genelec, JBL, and Trinnov monitor controllers also perform time alignment in their room correction processing.
While the Dolby software and a few hardware monitor controllers provide some room correction capabilities, SoundID Reference for Multichannel measures loudness, frequency response, and timing for systems from stereo up to 9.1.6. The measurements cover a comfortable sweet spot around the listening position and a calibration profile is generated. This calibration profile can be saved and imported into the SoundID DAW plugin. or it can be ported from SoundID to several hardware monitor controllers, including DaDman interfaces with the SPQ card, AVID’s MTRX Studio, Merging Technology interfaces, Jones-Scanlon studio monitors, and the Dolby Atmos Renderer Mastering Suite. So there are several calibration options available, depending on how much money you wish to spend and what type of monitor control integrates with your particular workflow.
5. Acoustic Treatment for Multichannel Rooms
Electronic room correction is necessary, but should only be performed after a room has been optimized with acoustic treatment. By now we should all be familiar with acoustic treatments for stereo production rooms. Multichannel rooms present a slightly more complex challenge because sound comes from many places in the rooms and more than two speakers (often facing each other) can emit the same sounds. Time alignment, loudness calibration, and level matching go a long way to dialing in an accurate monitor system, but let’s take a look at some of the primary acoustic treatment considerations.
A major concern for speakers placed near walls or the ceiling is speaker boundary interference (SBIR). SBIR occurs when the low frequencies from a speaker reflect off the nearest wall/ceiling and create a cancellation of a specific and narrow range of low frequencies emitted from the front of the cabinet. With stereo monitors, SBIR can be mitigated in one of three ways: (1) soffit mounting speakers, (2) placing the speakers close to the front wall and treating the front wall to absorb low frequencies down to about 150Hz, (3) placing the speakers 2 meters or more from any wall to lower the SBIR frequency to a very low frequency. One or more of these solutions can and should be applied, even in a 3.5m x 3m x 2.4m room.
As an example of SBIR, speakers mounted very close to the walls and ceiling will require at least 10cm to 15cm (4” – 6”) of acoustic treatment behind them to absorb a reasonable amount of energy down to 125Hz. Without acoustic treatment, a speaker with its face 60cm (24”) from a wall or ceiling will create a problematic dip at just about 140Hz. Moving that speaker so its face is only 30cm (12”) from the wall raises the frequency cancellation to 280Hz—a much easier problem to treat. In small rooms, it’s therefore recommended to treat the walls with 10cm (4”) of absorption and place the speakers as close to the wall as is practical.
Space loading caused by speakers located close to a wall, ceiling, or corner is not so much an acoustic problem, in that the low-frequency exaggeration will be cured by correcting the frequency response of the speaker(s) with EQ. Space loading is one of the few frequency response problems of a speaker in a room that can be easily fixed with a simple shelving EQ.
Time alignment (as discussed earlier) should ensure that sounds that emanate from more than one speaker arrive in phase at the listening position. Further, it is recommended to utilize the same family of speakers for all the speakers in the system. For the most cohesive sonic impression, the left, center, and right speakers should be identical, as should all the surrounds, as should all the overheads. SoundID Reference, for instance, will align even mismatched speakers properly, but using the same model for all the speakers will produce the most cohesive soundfield.
For multichannel, like stereo, the decay time of a mixing or production room (T20) should be even across all frequencies and generally between 150ms and 250ms. Broadband absorption should be evenly placed around the room for multichannel systems since speakers face all directions. Low frequency absorbers may be necessary around each speaker location to minimize SBIR cancellations. Diffusers are unnecessary in all but the largest multichannel rooms as there are sound sources all around the room and the soundfield should only be that of the playback system. A final consideration for multichannel rooms would be to carpet the floor as much as is practical, since the overhead speakers fire at the floor and side speakers may also have floor-bounce to consider.
Subwoofer placement for stereo setups often requires some trial and error to find practical locations that constructively match the sub with the main speakers without creating destructive standing waves. With multichannel setups, we may need one or two subs to supplement our horizontal plane of speakers and another sub (or two) to supplement the overhead speakers. Due to the practicalities of mounting overhead speakers, these speakers produce the most band-limited audio and a subwoofer is often recommended to supplement their output. This sub will most likely be located at least 2.5 meters from the ceiling, and at a different distance from each of the four overhead speakers. How do we align one or two subs to play well with the overheads? Subs that crossover at 80Hz or lower probably can’t be localized, but they may still have noticeably different phase interactions with the different overhead speakers. My recommendation is to avoid using subs associated with overhead speakers and instead find a way to utilize full-range overheads.
As with stereo mixing and mastering environments, the key to properly understanding a multichannel mix and ensuring translation to other playback systems is to treat your mix room to have an even frequency response and similar decay times for all frequency ranges. Treating bass modes may be even more critical in multichannel rooms as more speakers are placed against walls and near corners, where modal excitement is sure to occur. Part of the excitement of multichannel mixes is that they produce greater dynamics, an enhanced sense of transients, and more apparent presence of bass due to the number of full-range speakers in the room. However, since multichannel rooms provide such wide dynamic range and clarity, it is important to proof a mix on headphones. A large majority of listeners will undoubtedly hear the mix via a streaming service on headphones, so it behooves us to verify that our mix translates well to headphone playback both with and without binaural rendering.
6. Flat Sound and Target Curves
Room-to-room translation of mixes is always a concern and Dolby have pretty much nailed this subject in regards to cinema playback. Mixing stages for films for theatrical release need to be calibrated with the “X-Curve” target curve. This X-Curve was developed to take into account the size and acoustics of movie theaters and the distances that listeners sit from the speakers. For stereo music, mixers and mastering engineers tend to prefer a neutral or flat frequency response that translates well to typical living room home stereo systems. The Dolby Atmos Music Studio Best Practices document recommends the “Dolby Atmos Music Target Curve” for commercial music mixed in Atmos. This target curve takes into account nearfield mixing environments and how the mixes will translate to typical home stereo environments.
Dolby recommends strict adherence to the target curve, although many mixers feel the Dolby Atmos Music curve is not significantly different from their customary target curve. SoundID Reference provides a target curve that has been verified in professional Atmos mix rooms to deliver the Dolby Atmos Music curve. Sony 360, on the other hand, suggests a flat frequency response for music mixing. Because of all of these standards, SoundID Reference allows the user to quickly switch their monitor’s target curve between Dolby’s target and a flat target.
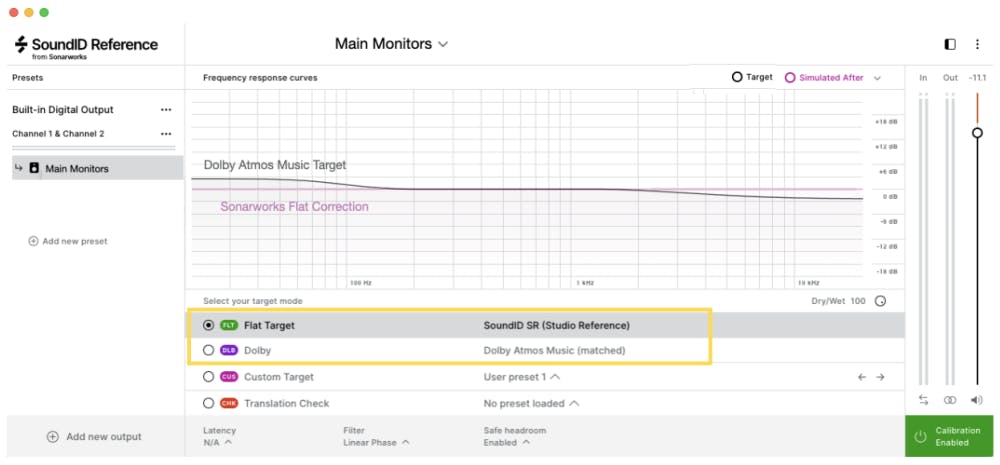
Dolby recommends averaging room measurements around the listening area and SoundID performs 37 spatially averaged measurements to arrive at its calibration profile. SoundID Reference for Multichannel allows you to easily switch between a flat target curve, the Dolby Atmos music curve, or any other custom curve you wish to use. If you port a SoundID correction curve to a hardware device, like the AVID MTRX Studio, you can choose to port whichever curve you prefer.
Conclusion
Setting up a multichannel audio system may seem a daunting task, but by taking into account proper acoustic treatment, speaker alignment, and calibration you can achieve an exceptional listening environment that will translate well to other multichannel playback systems. Multichannel playback for consumers, even more than stereo, will likely be on a system very different from the system in a typical mixing environment. It is therefore important to develop an accurate and consistent mixing environment and, even then, to assess your mixes outside of your studio on many different systems. This process, at least when you begin to mix in multichannel, will provide important feedback on producing mixes that sound great in a calibrated room and also translate to consumer playback systems and typical home environments.


