
Getting The Most From Creative Modulation Effects While Maintaining A Top-Quality Mix
Each of the three primary modulation effects— chorus, flanger and phaser— taps variously into a combination of filtering, phase and pitch relationships and delay to achieve their results; sonic principles that we already engage with throughout the mix process on more or less every audio track. These might commonly be considered more as creative after-touches for a lead part than signal processors that can impact the mix at a fundamental level. But a closer look at what they are actually doing to a given signal can help us incorporate them more substantially into the core identity of an overall mix, while still using them to impart their signature excitement and aesthetic energy onto key elements. Indeed, as we’ll see, when modulation effects are done badly, the effect they impart on a signal’s individual EQ and its relationship to the mix can sound more like a mistake, cancelling out much of the careful signal processing we’ve done to avoid the very thing they’re doing!
Alongside the coherence and frequency balance of a mix, when deployed effectively modulation effects can be of great benefit to the stereo image. They can help create space in the middle, widening mono signals or indeed generating a feeling of ‘beyond-stereo’ width across several elements. Mid-side imaging, for instance, works on the phase relationship between our left and right channels, and it’s precisely this type of relationship that we’re tapping into with our modulation effects.
We can choose to use any of the above in a subtle way, an extreme way, or anywhere in between. Wherever we choose to land on that spectrum, processing a signal with modulation effects will not only add a particular colour to the signal in itself, it’ll significantly impact that signal’s interaction with the rest of the mix, since by nature they change the frequency content and behaviour of a signal. No matter how creative they are, some effects— when badly applied— can be very disruptive! But keeping a few principles in mind, we can blend them in effectively alongside our other elements and present them at their best.
Managing Chorus With Dynamic Frequency Processing
At its core, chorus mimics the subtle inconsistencies of two or more simultaneous performances by creating a duplicate of the original signal, placing a subtle delay between the two and also modulating the duplicate’s frequency. When slow and subtle, this can sound almost like phasing, but when faster and deeper can sound thick, warbling and full.
Let’s imagine a lead guitar line that we want to work alongside a lead vocal, keeping the vocal present and dynamic within the track. If we choose to apply a fairly heavy chorus effect to our guitar, we are naturally adding a good measure of density to its frequency content, since we now have one or more versions of that signal orbiting the original. If that guitar line is operating alongside something like a vocal, we might find that new mid-range thickness encroaching on the frequency range of our vocal and working against its ability to lead the mix.
There are several things we can do to address this. Since we’ve added frequency information that orbits that of the dry guitar signal, we might find that certain frequencies become more prominent or disruptive than they were— or inversely, some key frequencies suddenly becoming more subsumed— so we might first try some simple EQ compensation. In this case, we’re using a FabFilter Pro-Q 4. It’s well worth looking at some gentle notching; but since a chorus effect increases the density of frequencies, we’re unlikely to get results adjusting extremely narrow frequency bands and are often better off considering a broader reduction curve in the upper mid-range to help ‘part’ the overall frequency content around the vocal.
But this of course, runs the risk of compromising the inherent character and bite of the original signal, which is always a particular consideration when it comes to guitars. This is where dynamic EQ or multi-band compression comes to our aid, only kicking in when particular frequencies cross their designated thresholds. Even more effective is the use of the side chain input for multi-band compression; perhaps our greatest ally when it comes to helping elements in our mix sit together amid the use of modulation effects.
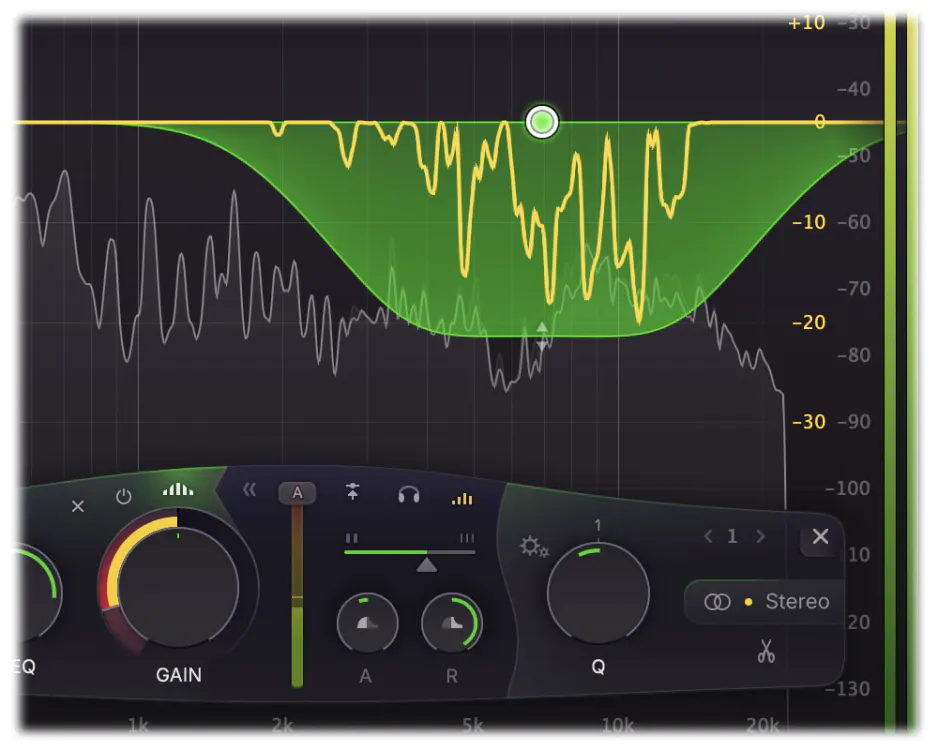
In the case of the Pro-Q 4, dynamic EQ works across a frequency band at large to adjust its gain depending on the input signal. But the plugin’s new Spectral Dynamics mode is an even more detailed variation on this function when it comes to managing intermittently disruptive amplitude peaks. Instead of responding to amplitude peaks by changing the gain of a full frequency band, it acts on the specific frequencies within that band while leaving the others unaffected. This makes it particularly useful for targeting particularly harsh or disruptive frequencies with a significant degree of accuracy.
This is a good moment to iterate a key principle of working with modulation effects: which is that they rely on dynamism and movement for their effectiveness. This means that in order to manage them well we must meet them with an equal degree of dynamism and movement with our moves in the mix: static shifts in compression or EQ settings might be effective to some degree, but might in many cases also hit a ceiling and even create more problems than they solve.
Continuing with our vocal-and-guitar example, then, let’s use the aforementioned Spectral Dynamics mode on the Pro-Q 4 and place it on our guitar signal. If you don’t have access to the Pro-Q 4, a parametric multi-band compressor plugin like Fabfilter’s Pro-MB or the Waves C6 can certainly also achieve excellent results, despite being less accurately responsive.
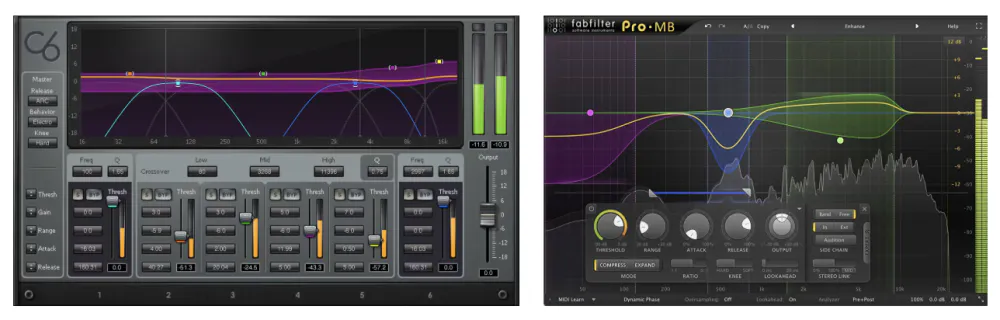
As with a multi-band compressor, the Pro-Q 4 has a side chain input which can be used in conjunction with Spectral Dynamics. If we select the external input option only for the specific frequency band that’s threatening to crowd out our vocal, we can duck the guitar signal in that particular range only when the vocal is present. This makes for a far more subtle and musical type of side chain compression, which also avoids the heavy ‘pumping’ effect that side chain compression can create by keeping the rest of the signal’s frequency content intact. To smooth things out even further, it’s also a good idea to instantiate subtle, low-ratio compression curves on either side of the ‘problem’ frequency bands, setting them to react to the internal dynamics of the guitar signal. This is an instance where a plug-in like the Pro-MB or C6 is a preferable choice, offering more detailed control over the bands’ threshold, range and envelope while also triggering more holistic movement of the band itself. This way our guitar goes some way towards consistently ‘managing itself’ in the vocal frequency range, but will be sure to get out of the way of the vocal when it really matters.
Width With Character
Chorus can also be used to create stereo width in a signal; another great way to create space in the middle channel for our vocal. The Haas effect is a psychoacoustic phenomenon discovered by one Helmut Haas in the mid-twentieth century, though its discovery has also been variously attributed to Hans Wallach, Lothar Cremer and even Joseph Henry, who was working a century earlier. The effect dictates that when we perceive two identical or similar instances of a sound in very quick succession (that is, generally 40ms or under), we hear the two as a single sound.
This principle can be exploited in the mix to deliver two wide-panned, technically discrete sounds as one— or, inversely, to deliver one sound as two— and generate a sense of space and width without changing the inherent character of a sound, as would happen with a pronounced effect like ping-pong delay or stereo reverb. Since modulation effects are all about subtle duplication of sounds, they can make best friends with the Haas effect to create effective width and add character while also keeping key elements front and centre.
Arturia’s JUN-6 chorus, which emulates the chorus found on the Juno-6 synth, is a great example of a chorus with stereo-widening capability. Similar but different is the MicroShift by Soundtoys, which emulates the sonic signature of units like the Eventide H3000 and AMS DMX 15-80s. Like any very wide stereo effect, this should be handled with care if a mix is likely to be heard through small speakers or a smartphone, since when the two channels are recombined, the phase difference between them can result in destructive interference or comb-filtering through phase cancellation.
A good way to check this in the mix is to occasionally sum your monitors to mono, or to use a small mono reference speaker such as an Auratone-5C. It’s also worth taking a mid/side approach to the stereo field and only applying the effect to the side channel, in which case it will just cancel itself when summed to mono. Of course, in stereo, using effects like these will also test the phase coherence, frequency translation and room interaction of your default monitoring setup. Even a minor inconsistency can make it incredibly difficult to accurately balance a mix in anticipation of different speaker setups. Sonarworks’ SoundID Reference is an excellent example of how we can ensure our monitoring starting point is accurate and reliable, enabling us to fully trust our ears as we make decisions along the way.
Flanger and Phaser; Polarity, Filtering And Frequency Balance
A flanger effect also makes a delayed copy of a signal with very fast delay times, of 20 milliseconds or under, meaning it doesn’t register as a delay but more as a filtering effect. Since a delay shifts every frequency by the same amount of time, the degree of phase shift increases in proportion to frequency— a linear phase shift, or constant group delay. When those direct and delayed signals are recombined, the result is frequency cancellation, where the two arrive in opposite polarity, and reinforcement where they arrive aligned. This is what gives a flanger effect its characteristically uncanny comb-filtered response.
The sonic principles at work in a flanger effect are applicable across all of mixing and even production in general. Comb-filtering, in fact, is usually an effect we do our very best to avoid! It’s indicative of things like poor microphone placement, or latency in a signal path— more or less anything that involves two versions of an audio signal reaching a common destination at subtly different times. It’s therefore crucial that a flanger keeps moving— because the moment it stops, it ceases to sound intentional and musical.
All-Pass Filtering And The Frequency Spectrum
A phaser, at its fundamental level, replicates a sound and sends it through an all-pass filter. This doesn’t filter out frequencies so much as continuously shift the phase of a signal at the point of its turnover frequency, at the extremity fully inverting it. When this all-pass filtered version of the signal is recombined with the dry signal, it creates a notch filtering effect which is then modulated to move back and forth through the frequency spectrum and creates the swirling phase shifting sound that we’ve come to know and love. A two-stage all-pass filter will create one moving notch filter, while a four-stage all-pass filter will create two, and so on.
While the frequency content of the signal is theoretically left intact with all-pass filtering, its dynamic behaviour across the frequency spectrum changes, taking on different harmonic emphases. When more stages are instantiated, the more complex and ‘watery’ the phase shifting effect will sound. When fewer stages are instantiated, the more gritty and conventionally filter-swept the effect will sound.
Multi-band compression is also extremely useful, perhaps even more so, when it comes to using phaser and flanger effects. Since the mechanisms behind both of these are so closely linked to filtering (in fact, they are filtering!), their musical value is intrinsically linked to how it morphs the frequency content of a signal as it sweeps up and down the spectrum. Just like in any low-pass, high-pass or band-pass filter, it’s possible to add resonance to flangers and phasers and in some cases feedback or self-oscillation. This will naturally emphasise certain harmonics in a sound and potentially create an inconsistent relationship with the rest of the mix.
Shifting Complex Audio
Atop this, a phaser of course ‘twists’ and ‘untwists a signal’s phase continuously. When applied poorly, a phaser can make a signal feel like a hollow version of itself that is simply rising and falling in a mix, unbalanced in the midrange and tiring on the ear. The complexity of different vowels and consonants in a vocal sound, for instance, combined with the particular frequency range of the specific vocalist, can make for a wide range of potential excitations of a phaser process; so if we wish to keep that vocal feeling natural, musical and consistent, we need to put some measures in place to keep it under control while still allowing the flair of the effect to shine through.
Once again, we can use a multi-band compressor like our Pro-MB plugin to smooth out these inconsistencies only when they threaten to become disruptive, keeping the signal consistent until the cutoff frequency of a phaser stage passes a particular value. I find that an additional compressor placed between the modulation effect and multi-band compressor can help further, set with a high threshold, quick attack and release and fairly tight ratio of between 5:1 and 8:1 to swiftly catch and release only the most troublesome resonant peaks. It can also be useful to place a second compressor with a slower envelope, lower ratio (2:1 or 3:1) and lower threshold after the multi-band compressor to holistically smooth things out even further.
On the one hand, those simpler, more vintage-sounding phasers with only one or two stages moving deeply through a sound are easier to manage in this respect, since their problem areas are easier to spot. But while things become harder to pin down with more complex phasers that might send several LFOs moving through a signal, this can also work to dynamically even things out. So it’s always worth auditioning different phaser plugins or hardware units where possible— as well as different options within those effects— since its likely you’ll find that some iterations intrinsically sit better within a particular mix than others.
When used well, a phaser can create a brilliantly ‘liquid’, ‘morphing’ musical effect; reminiscent of the sound of old-school psychedelia pioneered by the likes of erstwhile EMI Technical Engineer Ken Townsend. Townsend oversaw the emergence of techniques like Artificial Double Tracking while recording vocals with John Lennon for the Beatles’ Revolver; originally a means by which repeated vocal recordings could be avoided. Subsequently, albums such as Innerspeaker by Tame Impala have decisively emulated these dynamic types of sounds in the modern era.
As I’ve mentioned, and with all aspects of mixing, our most important tool when it comes to deducing the use of modulation effects is our ears. In many cases, inexperienced mixers can ignore clear hazards of modulation effects for fear of compromising their creative impact on a mix. But if we’re listening scrupulously and paying close attention to how such effects’ frequency footprints influence both the sound of a signal and its relationship with other signals, we can manage them well on a technical level to ensure they are contributing to a characterful, rich and dynamic mix.