The home recording revolution has democratized music production, yet capturing professional-sounding vocals remains one of the most challenging aspects for bedroom producers and indie artists. While expensive gear gets the attention, vocal recording success comes from understanding fundamental principles: how microphones interact with voices, how rooms color sound, and how the entire signal chain affects your final result.
This guide focuses on practical techniques that deliver immediate improvements, explaining not just what to do, but why these methods work. Whether you’re recording in a bedroom, basement, or converted closet, these strategies will significantly elevate your vocal captures.
Microphone Selection and Positioning
Understanding Microphone Behavior
Microphone choice extends far beyond simple frequency response specifications. Every microphone exhibits complex behaviors that interact with vocal production in ways that can either enhance or compromise your recordings.
The Proximity Effect as a Creative Tool
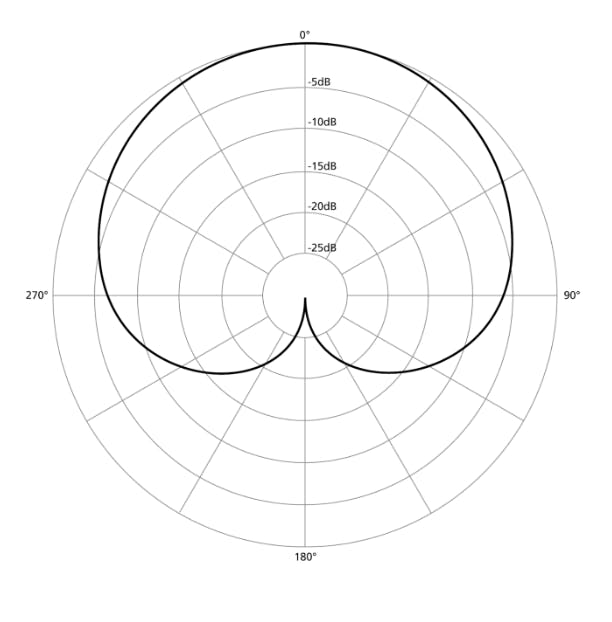
The proximity effect, the bass boost occurring when sources move closer to directional microphones, represents one of the most powerful yet underutilized tools in home recording. This phenomenon occurs because low-frequency wavelengths create pressure variations around the microphone capsule, resulting in increased bass response as the distance decreases.
Positioning a vocalist 15-20 centimeters from a cardioid microphone typically yields a 3-6dB boost in the 100-200Hz range. This isn’t merely a technical specification; it’s a psychoacoustic phenomenon our ears interpret as increased vocal weight, intimacy, and presence. For naturally thin voices, this proximity-induced warmth can add body and authority that helps vocals sit confidently in a mix. Conversely, vocalists with naturally full tones may require greater distances to maintain tonal balance.
Use the proximity effect intentionally rather than accidentally. A vocalist performing an intimate ballad might benefit from the warmth achieved at 15cm, while an energetic pop vocal might require the clarity found at 25-30cm. Understanding that vocal character changes predictably with distance allows you to shape tone during recording rather than relying solely on post-production.
Large Diaphragm Condensers vs Dynamic Microphones
Large diaphragm condensers have become synonymous with professional vocal recording due to their sensitivity and extended frequency response. However, this sensitivity becomes problematic in typical home environments where acoustic treatment is minimal and background noise is prevalent.
The extended high-frequency response that captures vocal detail also makes condensers susceptible to room reflections, HVAC noise, and the acoustic colorations characteristic of untreated domestic spaces. In properly treated studios, these qualities enhance vocal intimacy. In bedroom studios, they can make vocals sound harsh, distant, or artificially bright.
Dynamic microphones often provide more musical results with less post-processing in challenging environments. Their reduced sensitivity to room reflections and superior handling of loud transients can yield more natural-sounding recordings than expensive condensers in typical home settings. The physics behind this advantage lies in their moving-coil design, which naturally attenuates high frequencies and reduces sensitivity to room acoustics.
Positioning Techniques That Work
Height and Angle Optimization
Position the microphone slightly above mouth level, between nose and eye height, and angle it down toward the mouth. This technique reduces plosive problems naturally while capturing clear vocal projection and minimizing breath noise pickup. The human voice radiates differently at various angles, with reduced low-frequency content above the mouth axis, making this positioning both practically and acoustically beneficial.
Off-Axis Recording for Problem Solving
When harsh sibilants become problematic, position the microphone 15-30 degrees off the direct mouth axis. This maintains vocal clarity while naturally reducing sibilant energy without requiring extensive post-processing. This technique works because sibilant sounds are highly directional, while fundamental vocal energy radiates more broadly.
The Critical Distance Concept
In any enclosed space, there exists a critical distance where direct sound from the source equals reflected sound from room surfaces. For typical home environments, this critical distance ranges from 30-60 centimeters from the vocalist. Recording within this distance emphasizes vocal clarity while minimizing room coloration, though complete elimination of room character isn’t always desirable – some acoustic interaction adds naturalness and helps vocals sit organically in mixes.
Room Acoustics and Treatment
Understanding Your Space
Every room exhibits unique acoustic characteristics that profoundly affect vocal recordings. Rather than viewing room acoustics as obstacles, successful home recording requires understanding how your space colors sound and working with these characteristics effectively.
Standing Waves in Small Rooms
Small rooms operate differently from large studios. Individual room modes (standing wave patterns created by parallel surfaces) create frequency-specific peaks and nulls throughout the space. A typical bedroom measuring 3 by 4 by 2.5 meters will exhibit strong resonances at approximately 57Hz, 43Hz, and 68Hz, with harmonics extending throughout the vocal range.
These resonances don’t simply affect frequency response – they create complex interactions with vocal formants that can dramatically alter vocal character and intelligibility. Understanding this requires careful microphone placement that minimizes problematic modal interactions. Rather than positioning microphones in geometric room centers where multiple modes converge, slight asymmetrical placement often yields more balanced results.
Thoughtful Treatment Approaches
Effective room treatment balances absorption of problematic reflections with preservation of natural acoustic support. Over-damping creates an unnatural, clinical environment that can make vocalists uncomfortable and performances tentative.
Primary reflection control provides the greatest improvement with minimal intervention. The wall directly behind the microphone typically creates the most problematic reflection, arriving nearly simultaneously with direct sound and creating comb filtering that affects intelligibility. Simple solutions prove most effective: positioning the microphone to face an absorptive surface like an open closet filled with clothes, or hanging thick blankets on stands behind the recording position.
These approaches control primary reflections while maintaining enough acoustic liveliness to support confident vocal performance. The goal isn’t perfect frequency response (impossible in small rooms) but consistent, musical coloration that enhances rather than fights vocal character.
Practical Treatment Solutions
Quick Assessment Methods
Perform the clap test in your recording space. Clap your hands sharply and listen for distinct echoes or slap-back reflections. Good rooms sound controlled without obvious reflections. Choose rooms with soft furnishings, like bedrooms with clothes, curtains, and carpet, which work better than bathrooms or empty rooms with hard surfaces.
The Closet Method Refined
Don’t record inside your closet, as this creates a boxy sound. Instead, open the closet and position your microphone facing the clothes, using them as natural absorption. This provides the acoustic benefits of treatment without the claustrophobic sonic characteristics of enclosed recording.
Bass Management Reality
Corner bass traps can help control some modal behavior, but their effectiveness varies dramatically with frequency and placement. In many home studios, bass treatment alone cannot achieve ideal low-frequency response. A more practical approach involves microphone positioning that minimizes interaction with problematic room modes combined with careful gain staging and high-pass filtering during recording or mixing.
Signal Chain Optimization
Gain Staging for Digital Success
Digital recording systems behave fundamentally differently from analog tape, requiring adjusted gain staging approaches. While analog tape provided natural compression and harmonic enhancement that often improved with increased levels, digital systems offer greater dynamic range but less forgiving overload characteristics.
Optimal Recording Levels
Maintain peak levels between -12 and -6dBFS during vocal recording. This approach provides sufficient resolution for quiet passages, adequate headroom for unexpected peaks, and optimal input levels for subsequent processing. Modern 24-bit systems provide excellent noise performance at these levels, making hot recording levels unnecessary and potentially problematic.
The goal isn’t recording as loudly as possible – it’s capturing the full dynamic range of vocal performance while maintaining signal integrity throughout the chain. Digital clipping produces harsh, unmusical distortion that’s difficult to repair, making prevention far preferable to correction.
Preamp Character Considerations
While modern digital interfaces have eliminated noise performance issues that once made preamp selection critical, sonic character remains musically significant. Clean, transparent solid-state designs preserve vocal character without editorialization, while tube circuits introduce harmonic content that can enhance vocal warmth and presence.
Choose a preamp character based on the natural qualities of your vocalist and the aesthetic goals of your production. Vocals lacking warmth often benefit from tube enhancement, while naturally full voices may require solid-state transparency to maintain clarity and definition.
Advanced Techniques and Problem Solving
Managing Multiple Takes and Harmonies
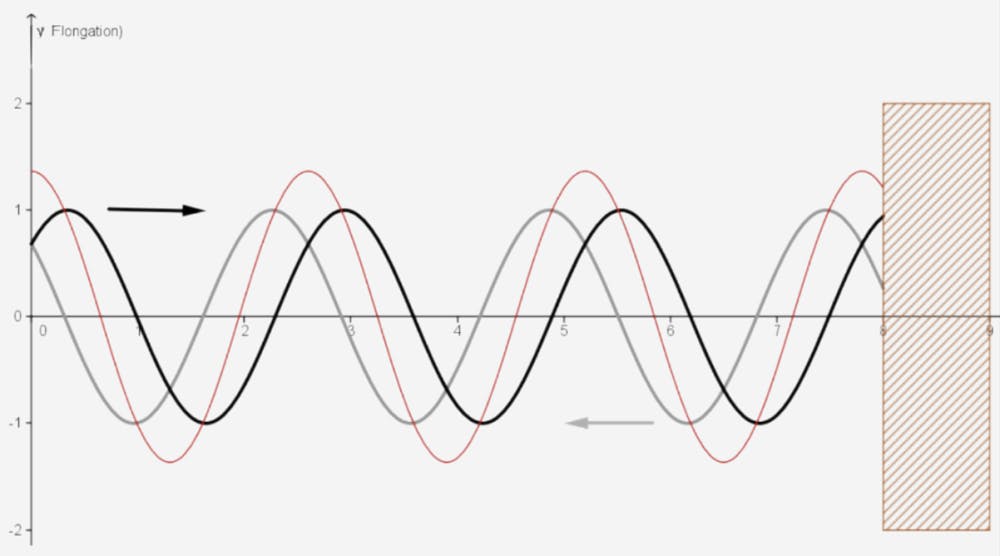
Contemporary vocal production frequently involves multiple takes, harmonies, and doubled parts that create complex phase relationships. When multiple vocal recordings combine, small timing differences can create phase cancellation that weakens the presence and creates spectral holes in the frequency response.
Phase cancellation becomes audible when timing differences exceed approximately 1-2 milliseconds, corresponding to physical path length differences of 30-60 centimeters. Maintain consistent microphone positioning across all takes using physical markers, constant vocalist-to-microphone distances, and awareness of how room reflections might create phase issues even with consistent direct positioning.
Sibilance Control During Recording
Sibilant consonants create energy in the 6-9kHz range that can become harsh and unnatural in home recording environments. Rather than addressing symptoms during mixing, manage sibilance during recording through microphone technique and selection.
Recording slightly off-axis reduces sibilant energy while maintaining vocal clarity. Dynamic microphones often handle sibilants more naturally than condensers due to their rolled-off high-frequency response, providing natural de-emphasis of harsh consonants. This approach reduces post-processing requirements while yielding more musical results. More about that can be read in the Sound on Sound article about managing sibilance.
Common Problems and Solutions
Excessive Room Reflections
When vocals sound distant, hollow, or echo-laden, move the microphone closer to increase the direct-to-reflected sound ratio. Position absorptive materials behind the vocalist or record, facing into soft furnishings. Long-term solutions involve treating primary reflection points with appropriate acoustic materials.
Low-Frequency Buildup
Muddy, boomy vocals (particularly problematic with male voices) often result from room mode interactions or proximity effect. High-pass filtering at 80-100Hz removes subsonic content without affecting vocal warmth. Moving recording positions away from room corners and applying gentle EQ cuts around 200-400Hz can restore clarity.
Digital Clipping Prevention
Set initial recording levels using the vocalist’s loudest anticipated passages, then reduce gain by 3-6dB for headroom. This prevents clipping while maintaining optimal signal-to-noise ratios. When clipping occurs, specialized restoration software can sometimes repair minor instances, but prevention remains far superior to correction.
Processing and Enhancement
Compression as Musical Tool
Vocal compression serves functions beyond level control – it affects sustain, presence, and how vocals interact with instrumental arrangements. Gentle compression with moderate ratios (3-4:1) and slower attack times preserves vocal transients while evening dynamic variations, maintaining naturalness while ensuring consistency.
Parallel compression, blending heavily compressed versions with unprocessed vocals, adds density and impact without over-processing the primary track. Create duplicate vocal tracks with aggressive settings (8:1 ratio, fast attack) and blend approximately 10-20% with the original.
EQ as Problem Solver and Character Enhancer
Vocal EQ serves both corrective and creative functions requiring different approaches. Corrective EQ addresses problems inherent in recordings – room resonances, microphone colorations, or acoustic issues detracting from clarity. Creative EQ enhances character and helps vocals integrate with arrangements.
High-pass filtering provides the most significant improvement by removing subsonic content that can interfere with other mix elements. Gentle cuts in the 200-400Hz range often reduce muddiness without affecting warmth, while presence enhancement around 2-5kHz improves intelligibility and forward positioning.
Process problems with corrective EQ first, followed by creative enhancement serving the musical arrangement rather than making vocals sound “better” in isolation.
Practical Implementation
Session Preparation
Effective vocal recording begins with preparation, addressing both technical and performance considerations. Environmental factors (temperature, humidity, lighting, and noise levels) significantly affect recording quality and vocal performance. Moderate temperatures (20-22°C) and humidity (40-60%) maintain vocal cord comfort, while appropriate lighting creates psychological comfort, encouraging confident performances.
Technical preparation involves establishing consistent microphone positioning, optimizing monitor mixes, and setting proper recording levels before creative work begins. This prevents technical issues from interrupting the creative flow essential for compelling vocal performances.
Performance Psychology
Comfortable monitoring, including subtle reverb (not recorded) helps performers judge their sound while maintaining confidence. The balance between direct vocal monitoring and instrumental playback affects performance energy- excessive instrumental levels can cause over-singing, while insufficient levels result in hesitant performances.
Create an environment encouraging multiple takes without performance anxiety, enabling the relaxed confidence necessary for compelling deliveries. The best technical setup means nothing without performances that serve the musical material effectively.
Conclusion
Professional home vocal recording results from understanding fundamental principles rather than acquiring expensive equipment. The physics of microphone behavior, room acoustics, and signal processing remain constant regardless of environment. Success comes from working with these principles, adapting techniques to suit specific spaces and musical requirements.
The democratization of recording technology has made professional tools accessible, but knowledge remains as important as ever. By understanding why techniques work rather than simply following instructions, home recording artists can achieve results rivaling traditional studio productions while developing problem-solving skills for consistent success across different projects and environments.
Technical excellence provides the foundation, but musical sensitivity and creative vision determine whether recordings connect with listeners emotionally. In this balance between technical capability and artistic expression lies the true art of vocal recording.
On our blog, you will find more useful information about vocal techniques to achieve a crystal-clear recording, creating backing vocals and harmonies with AI, how to treat vocal booths, and more.