
In this article, we’ll take a look at how to prevent noises, clicks, and pops in your vocal tracks and record the cleanest vocals possible. Then we’ll explore how to clean up any clicks and pops that got by. Clean vocal tracks make for a professional mix and may save you from criticism from your audience and collaborators.
I often hear new popular songs that feature poorly cleaned vocals, and the mess distracts from the song. For instance, when listening to Lana Del Rey’s “Young And Beautiful,” I notice lip smacks and other mouth noises during the first minute of the track. In my opinion, these don’t make the song feel more intimate; instead, the production feels unfinished and the mix is sub-par.
We can generally divide noise issues into two main categories: continuous and intermittent. Continuous noises would be like hiss from a guitar amp, fan noise on a vocal track, and other sounds that occur for long durations throughout the entire audio file. These noises tend to stand out during quieter moments of a song. Intermittent noises are annoying bursts that can occur occasionally during the program, like clicks, pops, ticks, plosives, or crackling sounds.
Prepping the tracking space
Reducing the noise that leaks into a recording will save the effort of cleaning a track, so a proper recording space is vital. Whenever possible, it’s best to track vocals in a studio with a vocal booth or an isolation room. If you record at home, you’ll want to set up a recording space that provides consistent and reliable results so the artist can focus on their delivery.
In a home studio, you’ll need a quiet room, without any noise from air conditioners, computers, fridges, fish tanks, and such. Listen carefully for rushing air or whistling from poorly sealed windows and doors. Also listen with the lights on and off, as light bulbs and dimmers can produce high-pitched buzzing at various brightness settings.
While recording, be sure to turn your phone to airplane mode as recording equipment can pick up electronic noises from the phone’s data connection as it intermittently communicates with cell towers. Lastly, check the recording space for strange resonances, reverbs, or rattling sounds that might even vary depending on a performer’s location or frequency range. Make sure the singer isn’t recording under a bell-shaped light fixture as those resonate.
In a home studio, a carpeted floor can reduce reflections, footsteps, and chair squeaks from getting into the mic. Blankets hung behind the singer will help reduce any reverb that the mic picks up. If the sound is still too echo-y, you may try to hang a heavy blanket to cover the area above the singer’s head and the microphone. This will reduce ceiling reflections from getting into the mic.
Try to treat the room rather than using a reflection filter that surrounds the microphone. These shields tend to negatively color the sound without really reducing the reverb that the mic picks up. Budget to purchase or build a few broadband absorbers to treat the room around the performer.
You can read more about treating rooms in my previous article.

Microphone choice
When choosing a mic, we should consider the singer’s voice and also the acoustics of our recording space. Condenser microphones capture more detail but they are very sensitive and may pick up room tone and unwanted noises. Dynamic microphones have lower sensitivity and will mainly pick up the sounds closest to the microphone. Don’t sleep on dynamic mics—they may capture a cleaner vocal recording than a condenser. A Shure SM7b, Electrovice RE-20, or even just a Shure SM57 or 58 will often beat out more expensive condenser mics in a vocal shootout.
Microphone Patterns
We can optimize microphones (or mic) choices by selecting an appropriate polar pattern. Microphone polar pickup patterns describe the directionality of a mic, indicating how the mic ‘hears’ the surrounding environment. The two most commonly used patterns for recording vocals are the cardioid (unidirectional) and the omnidirectional patterns.
Cardioid
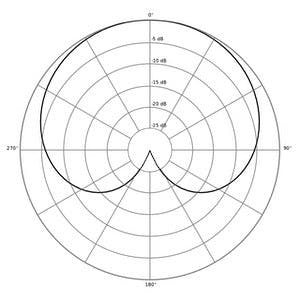
This pickup pattern is most sensitive to sounds coming from directly in front of the mic and least sensitive to sounds from directly behind the mic. A cardioid pickup pattern has a wide pickup angle of 131°, making it a good choice for singers that move around in front of the mic. Cardioid mics reject sounds from behind the mic, helping to avoid picking up excess reverb from the recording space. However, cardioid microphones are susceptible to plosives and the proximity effect.
The Proximity effect refers to the bass boost that occurs when a source is very close to the microphone. This effect can add weight to a singer’s voice, but it might cause problems when a singer does not maintain a consistent distance from the microphone during a recording. A pop filter can be used to strategically control how close a singer can get to the microphone. Plosives are thumps or distortion that occurs when a blast of air from the singer’s mouth hits the microphone capsule. These tend to occur on “p” and “b” sounds and pop filters will greatly reduce plosives.
Omnidirectional
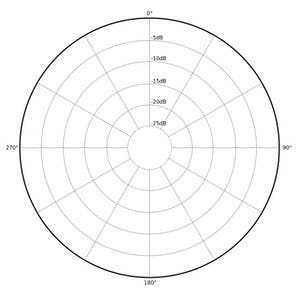
The omnidirectional pickup pattern is equally sensitive to sound coming from every direction. For a great singer in a great-sounding room, an omnidirectional condenser microphone will capture the most natural sound. Many singers, including Karen Carpenter, rely on omni mics in the studio.
Omni mics have the added benefits of being immune to the proximity effect and resistant to plosives. This means a singer can get close and personal with the mic for a detailed sound without the drawbacks of the cardioid pattern.
In fact, vocals recorded very near to an omni mic in a dry room will sound very similar to vocals recorded using a cardioid pattern, but with a more natural frequency response.
Tip: In a really difficult recording space, try a dynamic mic that also defeats the proximity effect, such as the Electro-Voice RE20. There are even a few notable dynamic mics with omnidirectional pickup patterns, like the Shure SM63, Audio-Technica AT804, Beyerdynamic M58, E-V RE50, E-V 635, and the Gefell MD120.
Microphone placement
In most use cases, the ideal distance from the mic to the singer’s mouth is between 15-24 cm (6-9 in). Closer recordings will cause proximity effects, while more distant recordings may exaggerate the room sound over the singer’s direct sound.
To further eliminate the pickup of noise in your recording space, make sure the mic is facing away from noisy or reflective areas. This means that the singer will face the noisy intruder. Remember that cardioid microphones reject sound coming from their rear but will pick up sound coming from the singer’s side of the room.
Preventing Recording Problems
Sibilance and Plosives
If you struggle with excessive “esses’ and p-pops (plosives), try singing or speaking diagonally across the microphone capsule, so your wind goes past the capsule instead of directly into it. Singing straight into the microphone can be a major cause of sibilance and plosives. A pencil taped across the center of your pop shield or the microphone’s grill can also help break up the stream of air that causes sibilance and plosives.
The singer can repeat a phrase while experimenting with their position relative to the mic to find the distance and angle that optimizes the vocal while reducing any problems as much as possible. Use a pop filter whenever possible. A pop filter not only breaks up plosives but also protects the microphone capsule from the humidity in a singer’s breath which can cause the mic to misbehave until it thoroughly dries out. In a well treated room positioning the singer a bit further from mic, up to as much as 50 cm, will reduce or eliminate pops and even sibilance problems. Classic records, like Bing Crosby and Frank Sinatra were often recorded with the singer as much as 60 cm from the microphone.
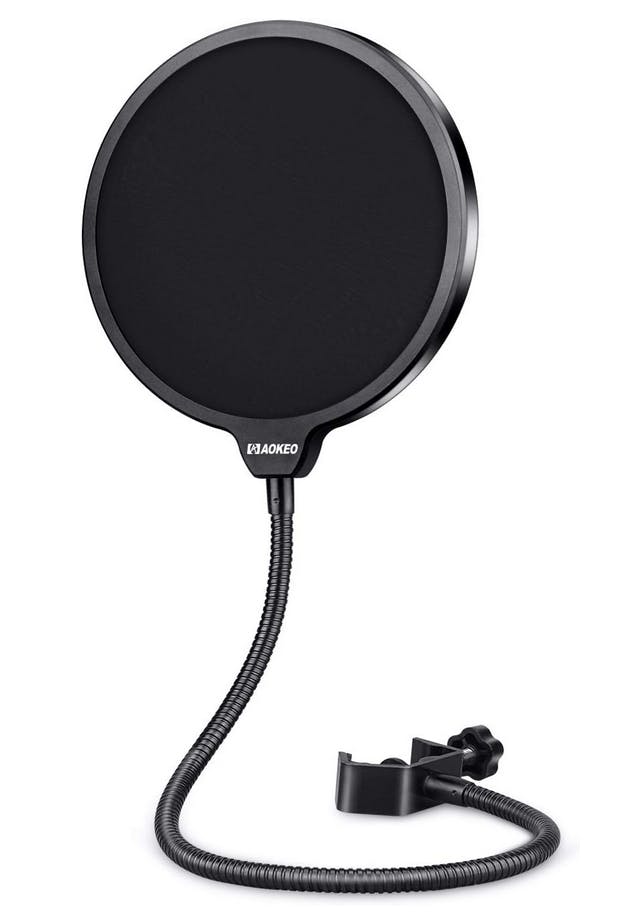
Pop filters come in a wide variety of shapes, materials, and prices. Metal screens are durable and easy to clean, while nylon mesh may sound slightly different and may feel less hygienic since the fabric can trap odors and particles. It’s essential to use a pop filter regardless of which one you choose.
Distortion
Do not clip (overload) the microphone or preamp while recording vocals. You should become familiar with the sound of a mic overloading vs. a preamp overloading so that you can adjust your setup accordingly.
For loud vocals on a condenser microphone, 30 to 40 dB of preamp gain should be sufficient, but more gain may be necessary with a dynamic mic or a quiet sound source. If your interface isn’t able to provide enough gain, a booster such as the Klark Teknik Mic Booster CM-1 or the Cloudlifter cl-1 will add up to 25 dB of clean gain to any dynamic mic.
Try to record vocals with the DAW meter reading at an average level of around -18 dBFS and a peak level of around -10 dBFS. Stay away from the red lights—you’ll thank me later! Most preamps, even inexpensive ones, will not add significant noise to the signal, so if your mic sounds noisy, that noise is most likely the sound of an untreated or noisy room.
Mouth noises
Lip smacks and saliva noises often cause ticks and crackles during a vocal take. Some people just have louder mechanical noises than others. These typically occur when the mouth is too dry, so staying hydrated is the number one cure for mouth noises. Chewing gum between takes (but not during takes!) can also help. Excess phlegm is also best dealt with by, you guessed it, drinking water. Once again, a little distance between the singer’s mouth and the microphone will reduce or eliminate most mouth noises.

Drinking warm water or ginger-lemon tea with honey will work wonders for the voice apparatus, as will gargling a bit of salt water. Be sure to have these handy for singers. Throat Coat® tea, preferred by many session singers, contains soothing ingredients and is caffeine free to avoid dehydration. Drinking a tiny bit of vodka (or any non-sweetened alcohol) may seem to help in the moment, but it will dry your mouth and should be avoided. Singers, like any athlete, should pay attention to what foods and drinks help or hinder their vocal performance.
Conclusion
It’s always best to record as cleanly as possible. While prepping for a mix, you will undoubtedly have a bit more cleaning to do and in the next article, we will cover the tools and techniques to ensure great-sounding vocal tracks.
Have fun and treat your clients well!
Continue learning about the subject with our suggested articles about vocal doubling, parallel processing recipes for vocals, and how to treat vocal booths.


