
Every modern music genre includes the use of drum loops and samples, from Dance and EDM to Hip-Hop and Trap. The main groove is often enhanced with sampled percussion phrases, layered loops, and stacked drum samples. Our ability to incorporate, tweak, mangle, and transform drum and percussion loops have come a long way over the years. In the early days of hardware sampler-based drum loop manipulation, one or two bar samples could be timed to a song’s tempo only by speeding or slowing down the sample, which also changed its pitch. Before DAWs and sophisticated software samplers, editing a drum loop was a time-consuming and difficult process.
Gone are the days of merely looping a single pitch-shifted drum pattern throughout your song. With modern tools, pitch and tempo can be manipulated independently or simultaneously. Slicing, extracting, replacing, and layering bits of samples and loops has become intuitive and commonplace. This article presents some new and some tried-and-true ways to spice up the drum loops in your music.
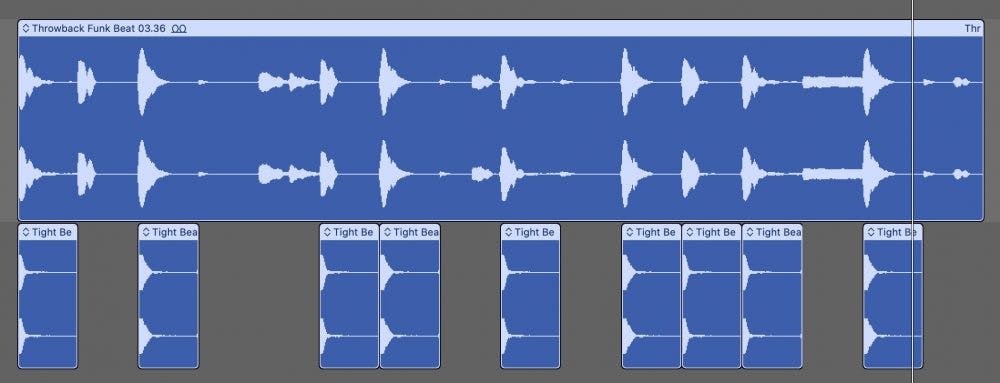
Here is the two-bar loop that will be used as the basis for the techniques and examples in this article:
Special Moments
A straightforward way to create interesting variations of a loop is to resample, or bounce/record passes of your loop(s) while applying resonants filters, or modulation based effects like flangers and phasers. These new sonic variations are useful for different textures, breakdowns, or other special moments in your arrangement. For a reminder on how to perform real-time effects processing, check out our blog post by Enamour.
There are several plug-ins, like Sugar Bytes’ Effectrix or iZotope’s Break Tweaker and Stutter Edit 2, that can slice, process, and re-sequence audio regions with built-in multi-effects. These are great tools, but you don’t necessarily need dedicated plug-ins to create your own unique sonic bits.
Re-Sequencing Loops with Slices and MIDI
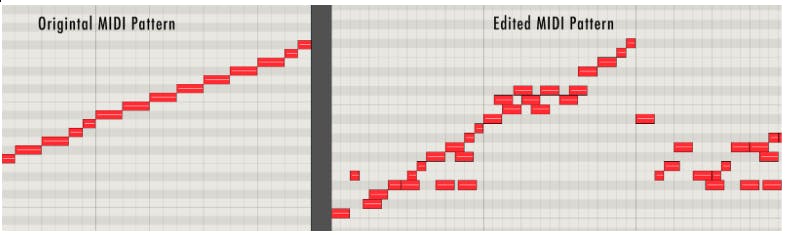
Many modern samplers include the ability to slice up drum loops and assign midi notes to each slice. Imagine cutting a 4-beat drum pattern into eighth-note slices and playing the slices with your MIDI keyboard, where C1 plays the first slice, C#1 plays the second slice, D1 the third, and so on. If you play a chromatic scale as eighth-notes, you will “reconstruct” the original loop, but if you change the order of the notes, leave out certain notes or play the notes with different timing you can create custom variations of the loop.
The new Quick Sampler plugin in Logic Pro 10.5 is perfectly suited for this. Drag a drum loop onto Logic’s Track Header and choose to load it into Quick Sampler. Quick Sampler automatically slices up the loop and assigns a midi note to each slice. Use the action menu to copy/paste the MIDI note data into the workspace. This function creates a MIDI region with trigger notes representing each slice, mapped out chromatically across the keyboard. It is then a simple matter of rearranging the MIDI notes that represent each slice for exciting variations. Besides Logic’s Quick Sampler, check out Spectrasonics’ Stylus RMX and FXpansion’s Geist2. These two plugins have been the reigning kings of time-sliced beats for quite a while.
Re-Sequencing Loops as Audio Clips
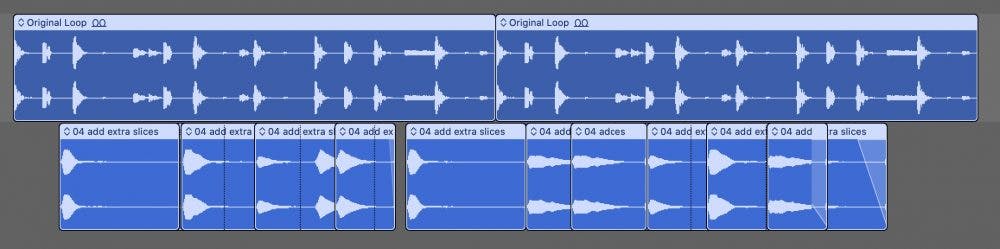
Suppose you don’t have a software sampler with this type of functionality, not to worry. Every DAW makes it easy to divide a region into equal length slices. This function usually involves setting up a quantize grid and separating audio clips from within a region. Simply slice the audio clip into bits of equal lengths and then rearrange the slices by snapping one after the other to create new patterns while maintaining the same tempo. With this method, you can create “unplayable” drum patterns that stutter, overlap, and cut off in new ways.
Adjusting the Pitch of Sample Slices or Drum Loops
Once a loop has been chopped up, either within a sampler or on an audio track in your DAW, transposing the pitch of individual slices can yield exciting sonic variations. In Logic Pro 10.5, replace the Quick Sampler instrument containing your sliced up loop with an instance of the more fully-featured Sampler plugin. The same loop will be loaded and sliced in the new plugin. Use the plugin’s mapping pane to transpose individual slices by changing the root key for each slice. Moving the root key lower will cause the sample to sound higher in pitch and vice-versa.
If you are working with a sliced-up loop as audio on a DAW track, use the region transpose feature to change the individual slices’ pitch. Depending on the DAW, you may need to enable elastic audio or flex editing for this type of audio region functionality. Some DAWs have offline transpose tools, such as Pro Tools’ Pitch (Audiosuite) plugin.
Effects
Process individual slices of your loop in different ways to create interesting sonic or rhythmic variations. If you are working with the loop chopped up on your DAW timeline, the procedure is simple. Drag each of the slices onto its own audio track and experiment with different plugins on each track. Try filters, modulation, or bit-crushing effects.
If you have your slices in a sampler, you may be able to assign individual slices to different outputs of the sampler. The outputs should appear as separate tracks, busses, or channel strips within your DAW, and once your audio slices are sent to different channels in your DAW, the processing possibilities are endless! Many samplers also provide built-in effects that can be applied per sample or per output channel.
Stacking Loops and Samples
Why limit yourself to a single loop? Find a second loop that complements the first loop either rhythmically or sonically. Load the second loop into a new sampler instance to slice it up, or slice it manually on a fresh DAW track. The idea here isn’t to simply slap two loops on top of each other but to use only certain slices from the second loop to enhance the original loop.
If you’re working in a software sampler, export the MIDI file and edit the pattern by deleting some of the slices, so that only a few selected slices are left in place. These will augment the original loop when both are played back at the same time. If the second loop is already chopped up on an audio track, play around by muting or deleting various slices to create interesting patterns. For even more variety, apply the processing techniques mentioned above to this new loop.
Another technique is to program the drum loop in real-time by triggering the slices from your MIDI controller. Playing the drum slices like sounds from a drum machine will almost definitely lead to some serendipitous patterns you might not have otherwise considered. A drum pad controller or MIDI keyboard will work for this technique.
Layering and Stacking Individual Drum Sounds onto a LoopThe idea of adding additional elements to enhance a loop can be approached vertically as well as horizontally. What I mean by this is, instead of adding slices to enhance the rhythm, slices can be lined up vertically on top of the original loop. Do this to fatten the tone of the kick and snare, for example. Slice the kick or snare out from different loops, and line them up on top of the original drum loop.
Plug-ins like Regroover simplify this process. Regroover extracts, or un-mixes, the individual drum hits from sampled drum loops. This allows you to isolate sounds, remix loops, or combine elements from different loops together. With Regroover you can replace a kick, snare, or hat sound while keeping the pattern and feel of the original loop.
You can achieve this same effect without Regroover by using sidechain processors like duckers or compressors. Create a snare track and bus the snare to a sidechain input of a ducker or compressor on the original loop. The compressor or ducker will turn down the loop in the spots when your new snare plays. Volume automation applied to the original drum loop track will do the same trick, but requires more mouse clicks!
Old School Sampler Mode
Modern processors can alter the pitch and tempo of audio independently. Classic hardware samplers could only speed up or slow down samples, which changed the pitch and tempo at the same time. Although considered a limitation at the time, this linked pitch/tempo sound became a legitimate aesthetic of its own. Replicate this behavior and sound by loading your loop into a software sampler, like Logic’s Sampler or Native Instruments’ Kontakt.
Instead of chopping a loop into individual slices, use the default mapping where the loop can be triggered from any note on the keyboard and the pitch/speed of the loop will change for each note played. Classic time stretching dictates that intervals of an octave will playback at even ratios of the original. An octave higher, for example, will playback twice as fast—an octave lower gets you half-speed playback. This also means that half-speed playback sounds lower in pitch and plays twice as long as the original sample.
As you trigger the entire loop at its normal pitch/speed, also trigger it with the same MIDI note an octave lower for half-speed playback (also an octave lower in pitch). You don’t need to trigger the lower octave for the full length of the loop. Vary what beat you start the transposed notes on and how long you hold them for interesting pitched rhythmic variations. Use the half-speed downbeat kick stacked on top of your regular-speed loop for that familiar break-beat sound! Play around with your sampler’s loop mode for “one-shot” or “play-until-end” to find interesting ways to play your loop.
The Sound of Vintage Samplers
We are all familiar with the sounds of the classic Akai, E-mu, Linn, and Ensoniq samplers. A big part of the sound of these samplers is due to their crude analog-to-digital converters. These vintage converters create aliasing distortion and quantization noise artifacts that make drum samples sound “tougher” and more aggressive. Modern samplers and converters do not create these distortions, so if you wish to recreate that vintage sound, try bitcrusher or saturation plugins on your drum sounds. Avid’s Lo-Fi plugin and Logic’s Bitcrusher plugins, along with many other plugins, can add vintage-style distortion that emulate vintage sampler converters. Some producers and mixers, like Michael Brauer, keep a vintage Akai sampler around and run sounds through its converters when they want that particular flavor of distortion.
The Final Dirt
Don’t be afraid to really twist your loops and drum samples to create unique and interesting sounds. One unique element in your groove may be just the thing that sets your song apart or becomes a hook of the track. Gone are the days of a simple single one or two bar loop used throughout an entire song. These techniques and any other experiments you come up with on your own will serve you well in creating interesting sonic and rhythmic variety in your music.


