
Before the advent of digital recording technology, engineers had to physically print their multi-track recordings from a mixing console to a two-track (stereo) tape machine in order to create a final mixdown. Later, there were high-resolution digital “master recorders” that recorded onto digital tape or disk. Since the dawn of the DAW, we have the ability to simply ‘bounce’ full sessions inside our computer to create a digital mixdown file of the final mix.
When working entirely in-the-box, there are three mixdown options: we can ‘bounce-to-disk’; we can print our mix onto a new track in our mix session; we can still print the mix to a stand-alone hardware digital recorder, like a second DAW, an Alesis Masterlink, or a high-resolution DSD recorder. There are benefits to all these approaches. But which is best?


Tascam DA-3000 DSD Recorder
The only time you would benefit from a dedicated master recorder is if you wish to run your mix through other hardware boxes (analog or digital) on the way to the master recorder and capture your mix at a different sample rate or bit depth than your mix DAW. In this blog, we’ll break down the pros and cons of printing vs bouncing mixes to help you determine the best approach for your workflow.
DAW Options
DAWs provide an easy and efficient way to ‘bounce’ a session, either in realtime or offline. Bouncing creates a digital mix file that can be saved in any location for quick and easy reference. Realtime bounces take the full amount of time to create the mixdown file, while offline bounces happen faster than realtime. The speed of an offline bounce is variable, depending on the CPU and disk usage of the particular mix you are bouncing. Instead of bouncing, we can simply record our mix bus onto a new audio track and print our mix right into our session.
Printing Mixes
Each DAW may have slightly different routing options, but printing a mix to a new track inside the mix session is easy. Simply route your mix bus (via sends or busses) to the input of a new stereo audio track. Then press record on the print track and record the new audio file of your mix—just make sure you’re not monitoring the output of the record track (simply mute it) to prevent double-monitoring or feedback issues. Obviously, this way of printing your final mix happens in realtime, which is usually fine for pop songs but may be frustrating for podcasts or movies that are dozens of minutes long.
Despite the time it takes, there are several benefits to printing your final mix within a session. First and foremost, realtime printing allows you to intently listen to the track from start to finish. This is an excellent opportunity for quality control.
We all know how a mix can sound totally different the minute you play it for someone else. The same thing usually happens the first time you listen to a track while you are printing it. You start hearing things in a whole new light and will often notice issues in your mix that you overlooked during your hyper-focused mixing session. Take notes during this print pass and address those issues and then print again. Save your first pass, though—you may decide your first instincts were correct!
In addition to psychoacoustic benefits, printing your final mix to a new audio track enables you to use external inserts (analog or digital) on your mix bus or individual channels, which is not possible when bouncing offline. By choosing to print your mix, you can easily integrate outboard processing, run your mix through a summing mixer, or even route your mix to an analog tape machine and print the tape output back into your DAW.
Printing a mix in real-time certainly takes longer than bouncing offline, but with some clever routing you can simultaneously print your final mix and any stems you may need, which could save you many bounce operations. For instance, if you create submixes for each instrument group (drums, bass, guitars, keys, etc.), you can create print tracks for each subgroup and print all the subgroup stems in one pass.
Printing mixes, onto tracks, playlists, or track alternatives, keeps every mix neatly organized and perfectly in-sync. This makes it easy to quickly compare different mix versions, and when working on a grid you can easily comp multiple mixes together. For instance, maybe you prefer the verses from mix 1, the choruses from mix 2, and the bridge from mix 3. Printing an instrumental and a full mix perfectly in sync allows you to easily edit together a “clean mix” or a performance version. Additionally fixes to small sections of long projects, like movie mixes, can simply be punched in on the print track without having to print the whole session again.
Organization is a breeze when you print mixes into your mix session. Backing up your entire mix session will create one folder that includes all the mix data plus all the mixed versions, should you ever need to go back to find the original tracks and/or mixes.
After your mixes have been printed to an audio track in your session, the mix files can easily and quickly be exported in any audio format for mastering or reference. Pro Tools, for instance, provides the “Export Clip as File” command, while Logic calls it “Export Track as Audio.”
Bouncing Mixes
While we saw how printing final mixes into the mix session can provide several benefits, it’s not always the best solution. Using your DAW’s offline bounce feature can significantly reduce the amount of time it takes to bounce a track, which can save you a huge amount of time when bouncing multiple sessions, multiple versions of a track, or long projects like live recordings, film mixes, or podcasts.
While listening to a track from top to bottom is a great way to spot any issues you may not have noticed during the mix, there’s no need to critically monitor alternative mixes, such as the instrumental, acapella, performance tracks or alternate versions. Similarly, if you’re simply tweaking a mix for a client, there’s no need to re-assess the entire mix. Simply make your changes and bounce!
Anyone who’s ever mixed a session on an underpowered machine understands the struggle of trying to mix on a system that can’t make it all the way through the song. If that sounds familiar, offline bounce may be your best bet. Because the system doesn’t have to actually play the audio, bouncing your session can sometimes save a significant amount of processing power and makes it possible to offline bounce even the most cumbersome sessions.
Bouncing can also speed up your workflow by allowing you to print multiple formats of a single mix. For instance, when bouncing a session, most DAWs offer you the option to simultaneously create WAV/AIFF, MP3, and even M4A files.
Many DAWs also allow you to automatically apply dithering when bouncing to a lower bit depth, saving you time from having to load and set a dedicated dithering plug-in. Some DAWs include workflow-enhancing features in the bounce window, such as normalization options, automatic fade-out options and even the option to instantly add the bounced files back into your project—just like you printed it!
Some DAWs, like Studio One, allow you to export (bounce) your mix and automatically publish it directly to streaming platforms, like Soundcloud or Nimbit. There may be specific extensions and settings to set up, but once these are enabled your mixes can be automatically uploaded during the bounce operation.
Pro Tools bounce options include the ability to bounce your mix or up to 16 stems (busses) at the same time.
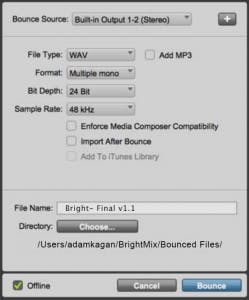
Bounces can create multiple file types simultaneously, like WAV + MP3
Bounces can convert sample rate and bit depth, as well as create as mono or interleaved files.
Note:
Pro Tools bounces do not apply dither. Pro Tools “Export Clips as Files” command will apply dither.
Bounces can be sent to any directory and imported to the session after bouncing.
Bounces may be sent to the iTunes library automatically
Files may be bounced Offline for faster processing
Do Bounces Sound Good?
Any current DAW should be trusted to maintain the same quality whether you print or bounce and I have done the tests to feel confident that Pro Tools, Cubase, Logic and Studio One can be relied on for both bouncing and realtime printing. Some functions, like the arpeggiator in Logic or using external inserts in any DAW, require realtime printing, so that may limit your options. I recommend you become familiar with your DAWs modes of operation and test which procedure fits into your workflow.
Which is right for you?
As you can see, there are pros and cons to printing and bouncing your mix. Typically, printing your mix affords better organization and more flexible future editing options, while bouncing your mix can significantly speed up your workflow. You may even find it best to vary between printing and bouncing as needed, depending on the session you’re working on. At the end of the day, there’s more than one right way to finalize your mix.


