A good sounding home studio starts with careful planning, measurement, and a realistic expectation of how well a room can function within the constraints of your budget and the physical limitations of typical residential rooms. Converting an apartment, spare bedroom or garage into a studio presents built-in challenges because they weren’t built or intended to be proper recording studios or mix rooms.
For now I will set aside a discussion about sound isolation or soundproofing as it will be covered in a subsequent article. Know that with professional recording studio design, proper sound isolation must be considered as part of the initial, ground-up construction. In typical home studio room conversions it’s nearly impossible to “add on” truly effective sound isolation to existing structures.
The overarching goal when setting up any home recording studio is to provide a viable space where you can produce, record, and mix music while confidently making crucial artistic decisions throughout the process. The only way sound and the spatial effects of stereo or surround productions can be recorded and mixed accurately is by working in as acoustically neutral a room as is possible. Two key considerations for sonic accuracy at the listening position are the proper setup of the monitor loudspeakers and the application of acoustic treatments. You have to be able to predict how your end product will translate to the outside world when played on consumer-grade speakers and/or headphones.
Let’s Start With The Room’s Size and Shape
When selecting a room for your studio, you should try to use a rectangular-shaped room, as they tend to have the best potential for proper bass reproduction. Try to avoid square, round or irregular rooms, as they tend to be more problematic.
Most residential sized rooms are in the range of 3 meters wide by 4 meters long or even smaller (10 feet by 13 feet). Typical residential ceiling height is somewhere around 2.6 meters (8.5 feet). Begin your planning process with precisely measuring the dimensions—length, width, and ceiling height of the room you want to convert into a recording studio.
For easy measuring, I use the Bosch Blaze Pro Laser Distance Measure GLM165(https://www.amazon.com/Bosch-Distance-Measure-165-Feet-GLM165-40/dp/B076C3TB8P/barryrudolphrec), but you can use an ordinary tape measure. Get a friend to help you by holding one end of the tape while you take the measurement at the other, or thumbtack one side of the tape to the wall to make one-person measuring easier..
When planning your furniture and equipment layout, I recommend drawing (try a drawing app like SketchUp) a dimensionally accurate layout of your room. Include all architectural features you cannot easily change: the location of doors, windows, support columns, closets, alcoves, and varying slanted ceilings.
The biggest acoustic problems in small rooms stem from the fact that low frequency wavelengths, the physical length of the sound wave, are much too long to be contained within the room’s dimensions without reflecting off a nearby floors, ceilings or wall boundaries. For example, a 20Hz waveform is approximately 17 meters (56 feet) long, while a 100Hz waveform takes up about 3.5 meters (11.5 feet).
If you have the option of more than one room, try setting up a pair of monitor speaker on stands so that they project down the longest dimension (length) and start listening to familiar music to get a “sense” of your particular room’s character and feeling. Listen in one room and then the other to see if one feels more comfortable to you.
Placing Gear In Your Room
A symmetrical layout of the equipment around the listening position promotes better workflow because you are always at or near the listening position while making gear adjustments and DAW tweaks during a mix or recording. It is essential that the intrinsic beauty of symmetry is applied to the positioning of your monitor speakers, the listening position, and the application of acoustic room treatments—absorption panels, bass traps and diffusers. The ultimate goal is to get your studio to function as a system and not a bunch of random pieces of gear thrown into a room.
Symmetry, as an abstract, is easily applied to the layout of your studio. Symmetry can separate a random and haphazard music setup into a reliable “tool” you can trust to evaluate your mixes and performances. Think of your left and right walls as mirror images of one another with your mix position in on the centerline. Any treatment you put on the wall to your left side should also be placed on the wall on your right. It is important to match the acoustic space around you at the listening position and the space around your monitor speakers.
Speaker Positioning
I recommend placing monitors on stands, instead of on a desk surface, as this allows for easy minor positioning adjustments in the future. The monitors are to be positioned in the front of the room and just in front of the 25% point in the length dimension. At about the 38% point of the room’s length—approximately halfway between the 25% location and the 50% point is the ideal listening position lengthwise in the room. Referred to as the 38% listening position, this location is a good compromise between the severe room modes of vibration. The various peaks (where frequencies are reinforced and sound too loud) versus nulls (where frequencies may cancel) tend to be present at 25%, 50%, and 75% positions in the length dimension of any room.
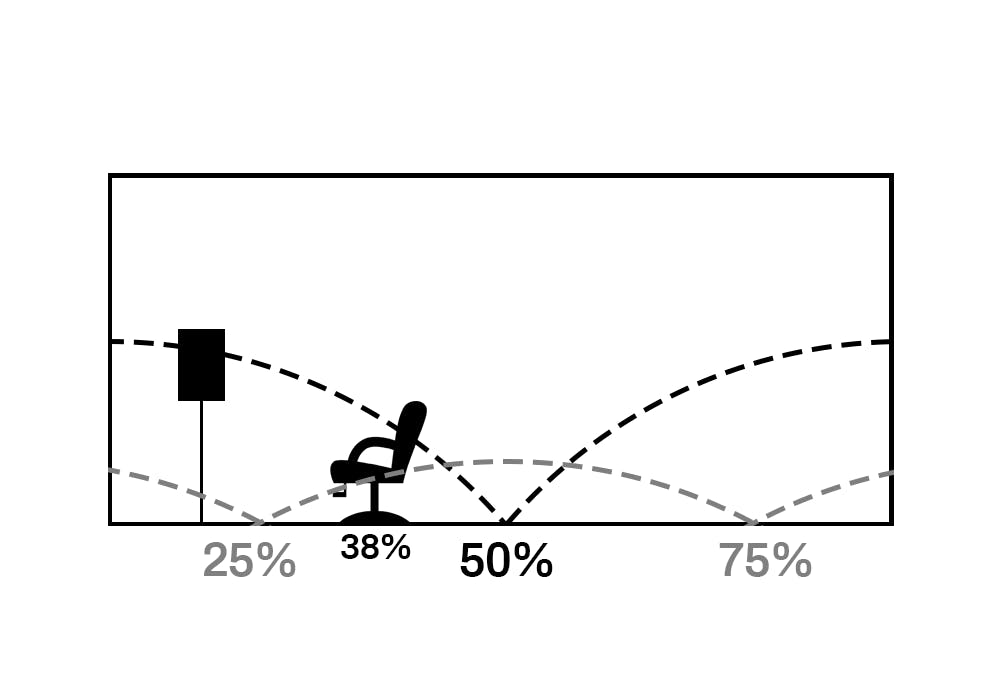
Symmetry is assured by locating the listening position at the 50% point, or centerline, of the width dimension. The intersection of the 38% point in the length dimension and the 50% point in the width dimension is where you would sit—the listening position or “sweet spot”.
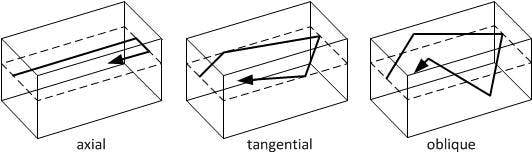
Room modes based on the physical dimension of the room exist in all three dimensions of the room—the length, width and height. Furthermore, there are three types of room modes. The strongest and most problematic modes are axial room modes cause by two waves traveling in opposite directions and striking two parallel walls. Tangential room modes employ four waves and four walls and are more numerous but have half the energy of axial modes. Lastly, oblique room modes arise from eight waves reflecting off six walls; they are one-fourth the energy of axial modes.
After measuring your room’s dimensions, you may calculate the 1st Room Mode frequencies present in each of the three dimensions easily using this formula: 1st mode frequency (Hz) = 344 (speed of sound in meters per second) divided by twice the room dimension in meters. So, for a 4 meter long room, the first and lowest mode would be 344/8 = 43Hz. An online room mode calculator can be found at: https://amcoustics.com/tools/amroc
After you’ve set up your desk, computer, outboard gear and your monitor speakers start playing music in your space and move your seat forward and backward from your original listening position—always staying at the 50% point of the width dimension. If you are too close to the speakers you may hear the left and right speakers as separate point sources. Too far away you will not get solid stereo imaging. Somewhere within reach of your desk, there should be a location where the stereo image is solid and immersive. This feeling is sometimes described as hearing the music and not the speakers. If your speakers are placed on stands, dialing in the best listening position is easy.
Acoustic Treatment Products
The application of acoustic treatment panels centers around and should focus on the listening position. The listening position is to be as reflection-free as possible. All reflections from the ceiling, floor, and side and back walls should be at least 20dB quieter than the direct sound coming from the loudspeakers. Sometimes called the reflection-free zone, this is accomplished by acoustic absorption panels and bass traps.
Acousticians, experts in room acoustics and treatment, have only three tools when treating rooms: surfaces that absorb sound, surfaces that reflect sound, and surfaces that diffuse, or scatter, sound.
Rooms must have the proper amount of acoustic absorption at various frequencies to function well. A rule of thumb is that the smaller your room, the more acoustic absorption you will require. “The exacting use of absorption has a powerful impact on the subjective performance of a room. No other room treatment will make the most dramatic change in your room’s acoustics.”
There are two main categories of acoustic absorbers are they can be divided by use and frequency range: velocity absorbers for middle and upper frequencies and pressure based absorbers for lower frequencies.
Absorbers
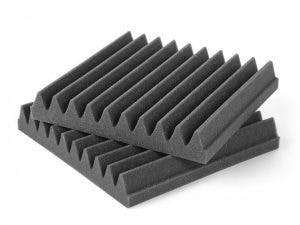
A velocity absorber slows down the speed of sound within fibrous, porous materials such as rigid fiberglass, mineral fiber, cotton/polyester fibers or open-cell polyurethane foam. Sound energy is converted to an innocuous form such as heat (not enough heat to feel any change in the room’s temperature however). Velocity absorbers work best on the middle and high frequencies above 300Hz. You can build your own or purchase commercially made absorption panels from companies like GIK Acoustics, Real Traps, and Auralex through many musical instrument retail stores.
Bass Traps

Bass traps are low frequency absorbers that work below 300Hz. Low frequencies, with their much longer wavelengths, require much more mass and density to be absorbed. Rather then using a velocity absorber, low frequencies are absorbed more efficiently using pressure based absorbers, which are constructed of pliable membranes that bend and flex with the incoming wave energy. Velocity absorbers, like acoustic foam panels, may be used as bass traps, but their required depth may take up too much space in a typical home studio.
Ideally a bass trap would not affect frequencies above 300Hz but many velocity absorption panels are sold as bass traps when they do little to actually absorb bass frequencies yet absorb mid-range and high frequencies excessively.
Diffusers
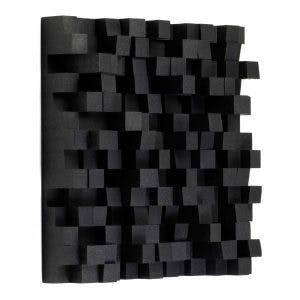
Diffusers reduce echoes by “jumbling” and randomizing reflections off walls and ceilings to provide the feeling that those surfaces are farther away from your ears. Diffusers can help provide a sense of spaciousness to a small room.
Sometimes referred to as quadratic residue diffusers or skyline diffusers, these devices don’t remove energy from the room, but return the sound back into the room it in a randomized, scattered manner that affects the direction and timing of the sound waves.
In professional recording studio control rooms, there are usually diffusers placed on the rear wall behind the listening position. There are no hard and fast rules here but if your rear wall is closer than about 2.5-meters, usually deep bass traps are a better idea for that rear wall.
Summary
The considerations for setting up a home studio involve proper room selection, monitor and listening position setup and the application of acoustic treatments. Keep in mind the simple ratios for the listening position and the three types of acoustic treatment and you can achieve an excellent sounding environment. Once your room is setup and tuned to the best of your ability, room correction software, like Sonarworks Reference 4, will further perfect the accuracy of your room.


