
Some tasks in life benefit from a slow, measured, “take your time” kind of approach. Others benefit from a “jump right in” approach where the ability to work quickly and get the job done fast is an asset. When it comes to creative endeavors, time is usually of the essence. Whenever we are working, we want to capture creative inspiration as quickly and effectively as possible before it evaporates. How do we start? What is the first step?
Blank Page Syndrome
Blank page syndrome is often paralyzing for writers, despite having their minds teeming with ideas they want to capture. Staring at an empty page, there is no prompt or indication of how or where to start. To avoid this, writers often create outlines before beginning to write (as I have done with this article.) The act of writing then becomes a process of fleshing out broadly structured ideas that all tie together to reinforce the subject at hand.

As musicians, we are often in a similar predicament. When we have an idea we want to put down, first we have to boot up our DAW. Then what? Create a track, call up an instrument, set up a headphone mix, a click track, a count-in, and so on. As mixing engineers, we may have a great picture in our minds of the final mix. But first, set up that send, create the busses, set up the routing, load up the plug-ins, tweak the parameters, dial in the levels, etc.
Working in a digital environment, however, we can mitigate this “blank page” syndrome by using templates. In the early days of desktop production, templates were called stationary pads. The metaphor is that of a pad of paper with a pre-designed letterhead and logo. Tear off a sheet, use it, and there is always another ready for next time. The fundamental underlying idea is to put into place the basic and commonly-used elements you will likely need while leaving enough room on the canvas to develop each project further. This way, time is saved by not having to repeat everyday, time-consuming, set-up tasks over and over again.
Templates
When you first launch your DAW, the first window at launch usually prompts you to either create a new session or open an existing project. This window usually includes a list of pre-set sessions with names like “Hip-Hop Beat,” “Vocal Tracking,” “Band Recording,” etc. These are factory preset templates that include many of the basic tracks you will need to begin a session in a particular style or with a particular workflow.
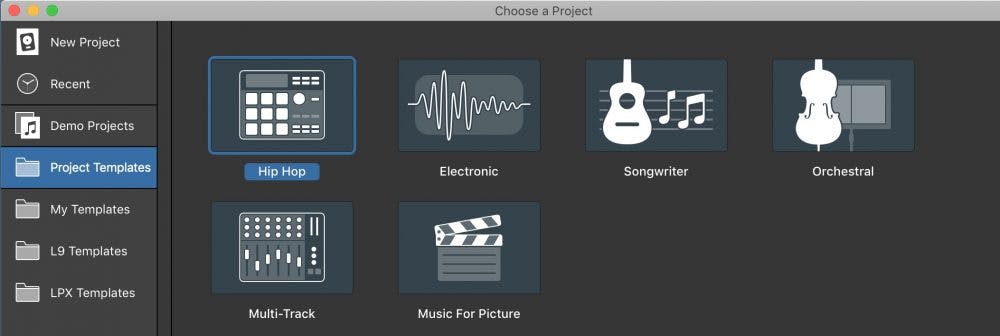
Think of a template as the equivalent of walking into a fully furnished room instead of a bare room with four white walls. Which environment is more inviting? Why decorate from scratch each time you enter when you almost always need the same furnishings? Some users prefer having one or two general work templates. Others create multiple templates to cover various creation/mixing/mastering scenarios. Either way, you’re off to a running start as soon as you press the “New File” command.
Types of Templates
There are several types of DAW templates one can use, and there are different approaches to set them up. There are generally three categories of DAW templates. I like to think of the first type as “creation stage” templates, which are best suited for starting a new project.
- Creation Templates
For an engineer in a tracking studio, a simple tracking template could include twenty-four or more audio tracks. Each audio track is already named with a generic instrument name. Routing is in place on each channel to correspond with the inputs and outputs of your audio interface. Audio tracks come color-coded for each instrument/group. Headphone sends are in place, as is a talkback channel. Perhaps there are some tracking EQs or compressors on some or all of the tracks, as well as some basic reverbs and effects.
The idea is that you don’t need to start building every session from scratch. The common elements you generally use as a starting point are already there, ready to go. You may customize and fine-tune each new session, but you are not starting from a blank slate. There is no need to re-invent the wheel each time when you know there are certain tracks/busses/sends you will ALWAYS need.
For composers, your creation template might include banks of orchestral instruments and effects already set up and ready to go. Many DAWs provide ways of opening templates with specified instruments or tracks offline or inactive. Templates load quickly and use only the minimum CPU resources if tracks load up inactive and then you simply activate anything you might need with a single mouse click.
For a producer or songwriter, your template might include some of your favorite drum or rhythm section instruments, with samples and loops pre-loaded. Your favorite software instruments might be in place ready to go, with your favorite presets loaded.
- Mix Templates
Templates for mix sessions are the second type. Instruments, sounds, and headphone routings used in creation templates are generally not relevant in this setup. Mix templates are focused on audio tracks, effects, and busses. Perhaps some of your favorite mixing plug-ins are in place on specific tracks, optionally with settings useful as starting points. Tracks come routed to subgroups and assigned to VCAs. Effect sends are already set up and labeled and effect returns are in place, complete with your most often used plug-ins.
Again, the ability to load these templates with individual tracks inactive is a huge asset. You can set up multiple instances of parallel mixing chains that may or may not be needed, without taking up valuable CPU resources, yet can immediately activate should you choose to experiment with them.
No matter how many different styles of music you mix, you can have templates ready for any genre that may be relevant. Rap, rock, jazz, singer/songwriter, orchestral, country, or any other genre, each require unique approaches to track naming, grouping, routing, and processing. Your custom templates can reflect the requirements of each specific style.
- Mastering Templates
The third types of template often used are those designed for mastering. These projects are usually much smaller in scope. Typically, only a few tracks are necessary. In addition to your favorite mastering processing chain, you might set up a path for reference mixes and busses for printing final masters to a new track. Perhaps you’ll include some tracks for parallel mastering chains dedicated to different categories of processing (parallel saturation, compression, frequency splitting, etc.).
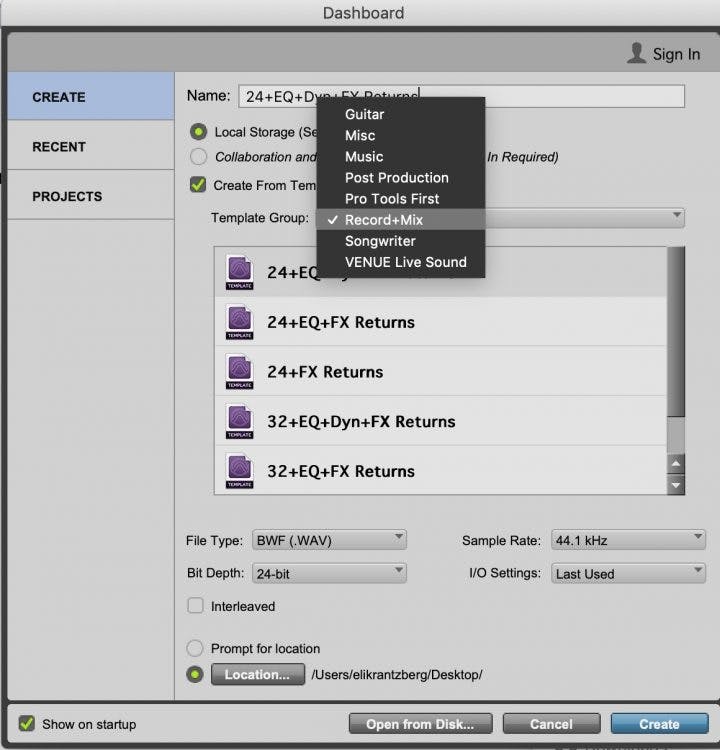
Factory Templates
All DAWs ship with a selection of factory templates to get you started in each of the above categories. Music creation templates are usually populated with multiple software instruments and effects processing common to a specific genre. Mixing templates often include effects routing, with essential mix plug-ins and master fader processing in place to get you started.
Third-Party Mixing Templates
Besides your DAW’s stock templates, you can find a variety of third party mix templates available from sites like Puremix and The Mix Academy. These templates are often much more elaborate, with complex routing, bussing, and effects options in place. Mix With The Masters provides templates from Andrew Scheps, for example, that have a series of busses set up for parallel processing different elements in the mix. Our friend David Glenn, over at The Pro Audio Files, has templates set up with separate effects returns for every conceivable delay length and reverb type you might need. Another source, Mixed by Marc Mozart, produces the Mix Temple templates for the most populars DAWs that take advantage of specific plugins that you already own. Some might consider this type of template overkill, but everything you might need is there ready to go.
As we mentioned before, these templates usually include inactive tracks that can be activated as needed and if you don’t have the specific plug-ins that show up in the template you can substitute your plug-in of choice. While these particular templates may or may not perfectly suit your workflow, it is always informative seeing how others work and is a useful means of kick-starting ideas for your templates. Use these templates “as-is” or customize them or use them as a source for importing tracks into your sessions.
Create-Your-Own Template
Once you’ve got a few projects under your belt and have looked over some of the available templates, you will quickly realize the benefits of setting up one or more templates of your own from scratch that match your exact needs.
Start by setting up as many audio tracks as you estimate you’ll need. If this is for writing/composing, set up a bunch of midi/instrument tracks, too. Don’t worry about your template getting bloated. Almost all DAWs allow you to de-activate and even hide unused tracks. The important thing is that they are ready to be activated if you need them.
Name your tracks and color code them with a system that is meaningful for you. For example, if you track live drums, you might color all of those one color, while loops or programmed drums are another color. Lead guitar tracks might be another color, rhythm guitar one color, keyboards another, vocals another, and so on.
Route all the tracks to associated subgroups. While you are at it, why not set up two or more subgroups for each instrument group. You don’t need to use them all, but the idea is that they are there, should you choose to do any parallel processing of subgroups.
If the template is designed for the tracking stage, set up a send for all the likely headphone mixes on every track. I like to set my templates with these send values at unity gain (post-fader), so they automatically mirror the monitor mix. I continue adjusting them from there during the session. It’s also a good idea to set up a “comfort” reverb for vocalists or guitarists to monitor while tracking. I like to set up a (muted) send to this reverb on every track, so it is available to dial in quickly when needed.
Don’t Get Overwhelmed
Too much choice is paralyzing. Staring at an endless list of plug-in options is our version of the “blank page.” Templates used for mixing can and should include specific plug-ins, with basic starting presets in place. If you know you like to use something like Fab Filter’s Pro Q 3 as your go-to EQ, why not set up your template with one on each track. If you know that more times than not, you like to begin with a gentle roll-off at 30 Hz or so, why not set each new instance to open with this setting. Do the same with your favorite compressor.
Most plug-ins can be set to open with a specific preset loaded. There is no obligation to use these settings, or even the actual plug-ins themselves, but they are there and ready, in the likely event you want to reach for them.
It’s a good idea for mix templates to include aux returns for effects commonly used during mixing. Common effects returns include two or three different reverbs (short, medium, special FX, ), various delays (slap, and sync-to-tempo at different values), and other time-based modulation effects (chorus, flanger, phaser, etc.).
And let’s not forget about the mix bus. Make sure to route all tracks or subgroups in your template to a master bus before hitting the monitor output of your audio interface. There are many useful reasons for doing this. It’s a good idea to have a parallel master bus ready to go as well, in case you decide to parallel process the full mix. For more about bus processing, check out my blogpost about top-down mixing.
The Modular Approach To Templates
All the above tried-and-true techniques will serve you well. However, modern DAWs also provide tools for a more streamlined approach where everything you need, while not stored directly within the template, is no more than a mouse click away.
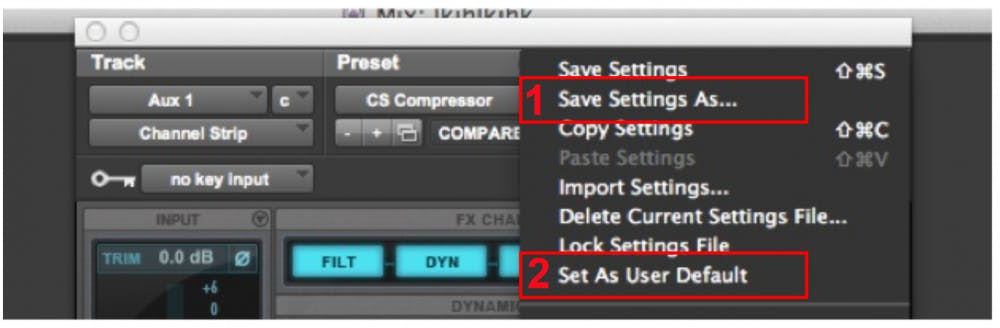
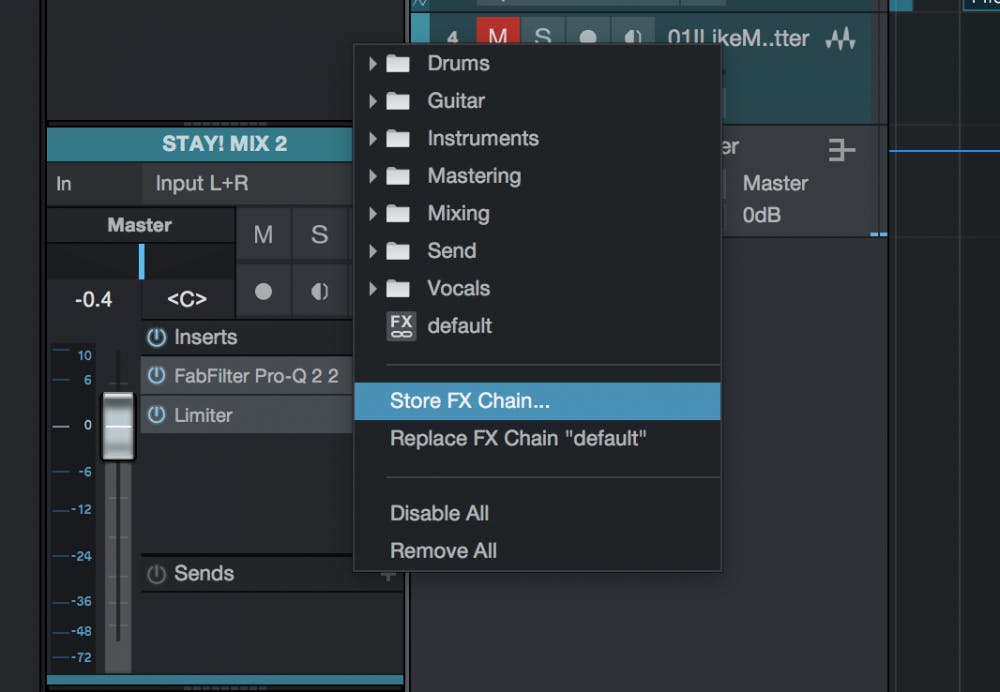
Instead of populating your template with every possible track and plug-in type, you can store your plug-in processing chains as custom objects (presets) that can be recalled to any channel in your session. Each DAW uses different terminology for this and each DAW allows presets to contain different data, like plug-in settings, routings, automation data, etc.. In Pro Tools, plug-in chains and channel routings are called Track Presets. Cubase refers to them as Effects Chains. In Studio One, the name assigned to these plug-in-chain presets is Channel Editor FX Chains. Logic Pro X has channel strip settings or presets.
The basic idea is the same for each DAW. You can create a library of setting files that recall a specific chain of plug-ins or track settings. Presets may include several pre-set plugins, routings, sends, and even the returns associated with the sends. The idea is to build up a library of settings for various use case scenarios, and have them readily available in the nearby settings menu. Imagine a lead guitar preset with an EQ, compressor, overdrive and sends for chorus delay and reverb—all set up with just one click!
I have several presets saved for each drum track type, for example. I also have created presets for different musicians who I regularly record. I am never more than a single key command away form auditioning processing chains containing variations in plug-in choices and parameter values relevant to me.
Another function found in most DAWs is the ability to define defaults for newly created audio, instrument, and bus tracks. So every time you create a new track, it contains your personal choice of routing, default plug-ins, and other default settings. Channel strip defaults, combined with channel strip macros, allow you to build your session with easily accessible presets, rather than as objects already in your template.
A hybrid approach, of course, also works. Set up your templates with whatever tracks you need to get started. Also, save multiple effect/instrument preset chains and channel strip defaults, so they are ready when your projects start to grow or you would like to quickly change your template’s preset effects.
As another alternative method, I regularly start a mix from a template and then import tracks from previous mixes that have effects or processing that I feel I can use in my current mix. In Pro Tools, the “Import Session Data” command allows you to import tracks with plugins and settings from other sessions.
Maximize Efficiency
You can see how your efficiency can be improved and you can spend your time on creative thoughts, rather than “housekeeping” chores. Setting up templates and custom presets may seem a little time-consuming on the front end, but you will be rewarded on the back end with more creative time to work on the music. Take a look at your DAW’s built-in templates and presets and formulate your own ideas. Remember, your templates will evolve as you find new ways to work and add new plug-ins to your workflow.


