What is oversampling? Simply put, oversampling is processing audio at a higher multiple of the sample rate than you are working at. The sample rate we work at must be at least twice the highest frequency we wish to record or process. For example, a 10 kHz signal can be represented correctly by a digital signal with a sample rate of at least 20 kHz, and a sample rate of 44.1 kHz can properly encode audio with a frequency response up to 22.05 kHz. So why should we oversample and use higher sample rates? As with all things in our world of audio, there are some practical considerations, some technical considerations, and some sonic considerations when deciding whether or not to oversample. Let’s cover these considerations so that you will feel comfortable and confident when deciding whether to use oversampling.
The Problems
The enemies of audio recording and production are noise and distortion and oversampling helps in a small way to reduce certain types of noise and distortion. The noise and distortion that oversampling helps with are the types caused by digital conversion and processing, not analog noise and distortion caused by mics, preamps, and analog signal processors.
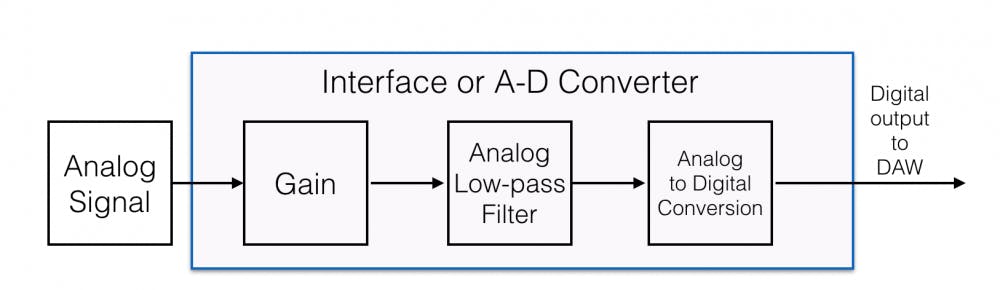
As a rule (the Nyquist Theorem), you can only record or process audio frequencies that are below half of the sampling rate’s frequency. If your A-D converter or interface is set to 48 kHz, you can record audio signals as high as 24 kHz. That is true in a perfect world, but in our real world, things are a bit uglier. We need to consider sample rates and their frequency limitations not only when recording audio, but when processing audio with plugins inside our DAW.
If we force a digital processor to pass audio signals above half the sampling frequency (half the sampling frequency is called the Nyquist Frequency), we will generate aliasing distortion. Aliasing distortion creates harmonic content that appears as audible non-musical noise below the Nyquist Frequency. A-D converters try to eliminate aliasing by running audio through a low-pass filter to ensure that no frequencies above the Nyquist Frequency enter the A-D converter. Now we have the problem of a low-pass filter rolling off high frequencies or creating some kinds of filter distortions (phase shift). There is a tradeoff between the problems that a low-pass filter creates and the aliasing distortions that will occur without the low-pass filter.
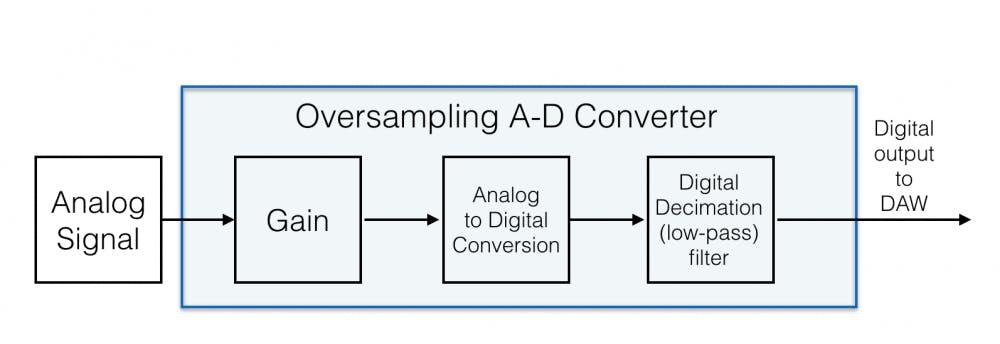
One clever solution to avoid the low-pass filter artifacts is to increase the A-D converter sample rate (oversample!) while recording. With higher sample rates, the analog low-pass design is less critical because the problems the low-pass filter creates are above the frequencies we can hear. Further, any aliasing distortions that occur will also be in frequencies above the range of our hearing. Once the signal is digital, we can apply a well-designed digital low-pass filter to get back to the sample rate that we desire. This digital filter removes any high frequencies, including any aliasing distortions or phase artifacts of the filter.
In the real world, our interface’s A-D converter may run at a very high sample rate and then reduce the sample rate of the audio as it is sent out to our DAW. This sample rate reduction is performed by a digital low-pass filter. Recording at high sample rates (88.2 kHz or higher) sounds better because of fewer aliasing artifacts and less phase shift. High sample rates sound better because they record better-sounding audio, not because they record audio at frequencies we can’t hear. You should spend time recording through your own interface/converters to hear if they sound better while recording at one sample rate vs. another.
An additional benefit of oversampling is reducing a type of noise called quantization noise. Quantization noise is a rounding error created during digital sampling that produces a very low-level noise correlated to the audio signal. Oversampling can shift this noise into higher frequency ranges, where they can be filtered out or become less audible to the human ear. In pop music production, especially when working with 32-bit float DAW sessions, quantization noise is of very little concern. For purist forms of music every last bit of audio quality matters (pun intended), so reducing quantization noise and aliasing is a noteworthy issue.
Why Do Plugins Need Oversampling?
It’s easy to see why the Nyquist Frequency is essential when we are capturing audio from analog to digital, but why do we need to worry about oversampling once we have the audio as digital audio in our DAW? Because some types of processing create distortion and that distortion is made up of new high-frequency content near and above the Nyquist Frequency. These new high frequencies will create aliasing distortions that could result in ugly lower-frequency distortion in our audio. To avoid this distortion, our plugins can run at a higher sample rate than our session is running at. Any distortions inside the plugin will be very high frequency and the plugin can pass the audio through a low-pass filter and come out at our session’s sample rate.
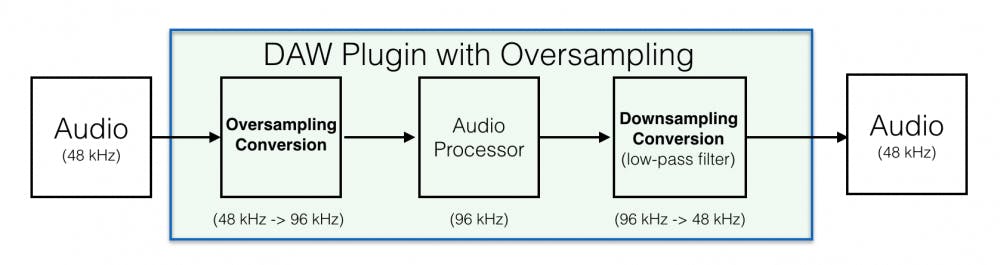
Oversampling benefits the kinds of plugins that change the shape of the original waveform or create new frequency content. Since these plugins create new harmonic content, we need to worry about aliasing distortion. Oversampling inside plugins is meant to eliminate, or reduce, the amount of unwanted distortion. Plugins that benefit from oversampling include compressors, limiter, clippers, amp simulators, saturators, and exciters, but not usually equalizers or time-based processors, unless they also provide some kind of saturation.
Plugin Oversampling Options
Ultimately we care about what the audio sounds like. Some plugin manufacturers choose to let aliasing distortion occur and that becomes part of the sound of the processing. Other plugin manufacturers build oversampling into their process and the user knows nothing about it. Some plugin manufacturers provide user control over how much oversampling the plugin provides. 2x oversampling means the plugin process audio at twice the session’s sample rate. Often oversampling can be applied at 4x, 8x, 16x, or 32x. The drawback to applying high values of oversampling is the amount of CPU processing required. It’s easy to see how doubling the CPU usage of several plugins in your session could start to tax your machine.
How and When To Apply Oversampling
Fortunately, aliasing distortion and quantization noise have an extremely small audible effect, and most of the time we don’t need to be concerned with them. This generalization applies to pop and rock music productions, where noise and distortion are typically abundant and part of the character of the production. If you produce natural-sounding acoustic music or are a mastering engineer, these very small audible changes may matter very much to you.
If you enjoy the sound that a particular plugin creates and the plugin provides some oversampling options, it is worthwhile to audition the different settings. In some plugins, like FabFilter Pro-L2, the oversampling options may work in tandem with other parameters, like look-ahead and true-peak processing options. In those cases, careful listening must be done to find the settings that you prefer for a given musical piece. For example, sometimes turning off the look-ahead function provides more transient punch, and a higher oversampling setting is called for. For longer look-ahead settings, lower oversampling values can be used.
What Should You Do?
A good starting place would be to read the manual for your plugin to see if the manufacturer recommends specific oversampling settings. Since oversampling increases CPU load, there may be a limit to how much oversampling you can even apply. Keep in mind that all plugins are not created equal and the knobs and buttons may not do what you think they should do. Trust your ears and, most importantly, don’t let technical considerations of oversampling get in the way of creating great music!
Additional Resources:


