
What is Parallel Processing?
Parallel processing is a method of signal processing where the original track or bus is duplicated and special signal processing is applied to the duplicate track. Then, the duplicate (parallel) track and the original track are mixed together. This processing preserves the original sonic qualities of the track or bus, including the all-important dynamic range, while allowing you to tweak and add to the original sound.
Parallel processing can transparently enhance any aspect of any track or bus—augment the transients of a drum kit or add saturation to synths or vocals while maintaining the character of the original audio. A simple example would be to duplicate a full mix and low-pass filter the duplicate track so only the sub frequencies remain. Mix that audio with the original track and you have the original mix with extra sub frequencies!
General Advice
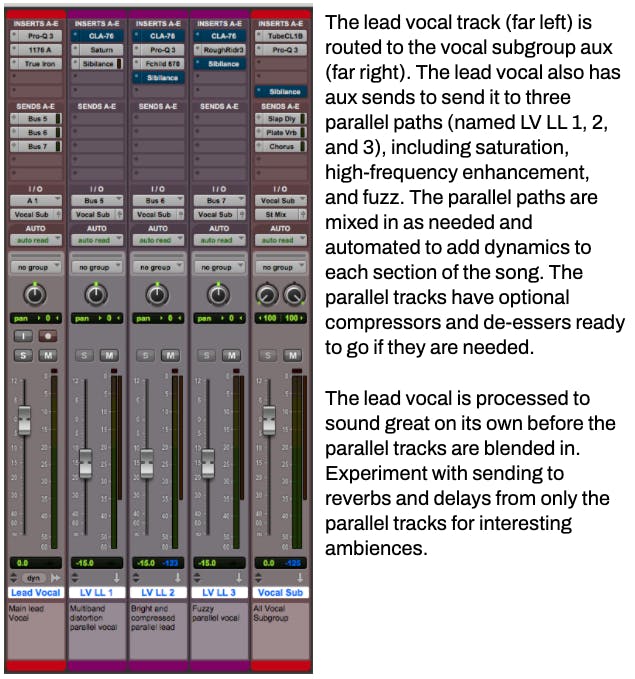
Parallel paths can be created in a mix via a few different methods. You could send or bus your lead vocal to multiple Aux Channels (á la Michael Brauer’s multi-compression method), or you could simply duplicate your lead vocal channel to create the parallel channel. For subgroups, you have two options. You could route all of your drums to a bus, like Bus 1-2, and then create two (or more) Aux Channels that use Bus 1-2 as their input. Alternately, you could route your drums to Bus 1-2 and then use an aux send on each channel to send the same instruments to a new Aux Channel.
– When using aux/bus sends to route your tracks to your parallel effects channel(s), you have a choice of sending the audio pre- or post-fader. Pre-fader keeps the level in the send unaffected by your fader movements, while post-fader sends will follow the volume, mute, and pan automation of the original track. Both methods have their advantages, so try them both to see which works best for you.
– EQing a parallel channel might create some comb filtering that can weaken the signal when you blend the original track with the parallel track. This problem can be avoided by using linear phase EQs on tracks that have parallel routings. Depending on the type and amount of processing you apply, a standard (minimum-phase) EQ may be fine, so be sure to try both types to see which sounds best to you.
– Consider filtering the sends/duplicate tracks so you only process what needs to be processed. If the lead vocal can benefit from being squashed in parallel, try removing the low end, as well as the sibilance from the parallel channel. This way, the parallel won’t add extra mud or harsh sibilance.
Mixing Techniques
Parallel mixing techniques work well for many instruments, but perhaps have the most pronounced effect on vocals. In my article on how to employ Michael Brauer’s multi-buss mixing technique in REAPER, I explain various parallel compression techniques for vocals. Brauer usually employs 6 parallel vocal tracks/auxes/busses: 1 uncompressed and 5(!!!) different flavors of compression. This lets him shape the sound one way for the softer sections of the song, and a different way for the more intense sections, creating dynamics and textural variations between the sections.
You can do the same. Simply create more than one parallel channel and use different blends of the original track with parallel channels during different sections of a song. For instance, blend in a warm parallel channel during the verses and a brighter one during the choruses. Let’s examine a few parallel processing techniques that you can practice and apply to your productions. Use these ideas as starting points for your own recipes.
Add Weight to Vocals
I use two parallel processing tricks to add weight and body to vocals: pitch-shifting the track down by an octave, and using saturation. These methods work if the singer has an especially high voice and the song arrangement doesn’t support them. You’ll know if this is the case if there’s a gap between the instrumental and the vocal throughout the song. This type of processing can also help with a vocal recorded on a microphone that didn’t suit the singer, or if the highpass switch was set too high during tracking.
The first approach involves duplicating the vocal track and pitch shifting the duplicate down by an octave (-12 semitones). Use the best algorithm you have at your disposal— I rely on iZotope’s RX Time&Pitch module. I usually filter the pitch-shifted track to keep only the low mid frequencies that thicken the lead vocal. Blend in this parallel track until it enhances the thin lead vocal without becoming an obvious effect. Adjusting the formant parameter of the pitch shift program can change the character of this double into a more natural, or more “monstrous” pitch-shift effect.
I once applied this trick to a cello, where the arrangement wanted more low-end. This processing added edge and gravitas to the bass frequencies, without being intrusive. The artist liked it so much, she wanted the effect to be more obvious, and the result was similar to having a double bass doubling the cello part. You can hear this effect on Sarah Joy’s “What Child Is This.”
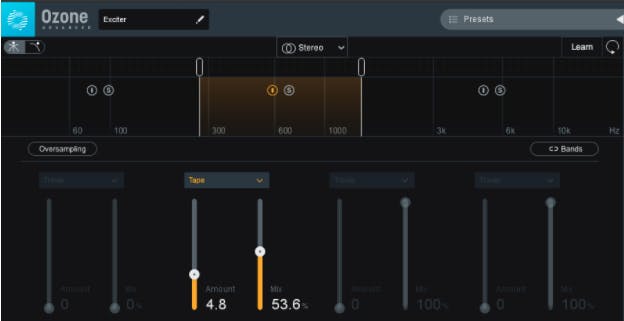
The second method requires an exciter plugin to create some saturation on the parallel channel. My go-to exciters are Plugin Alliance’s Black Box Analog Design HG-2MS and iZotope’s Exciter. Izotope includes their exciter as part of their Neutron and Ozone bundles, where Neutron’s module offers you 3 separate bands of exciter/saturation, and Ozone’s Exciter provides 4 bands.
For parallel saturation on vocals, I instantiate the exciter on the parallel channel and focus on the low mids. Make them bloom, make them big, and then…filter the track so you only keep what you need to thicken the vocals. Blend this parallel track with the original to taste. Compressing the vocal before the exciter will create a consistent amount of saturation, while leaving the compressor out may cause less saturation on the soft moments and more saturation during the louder sections. Try compression after the saturation to bring even more intensity to the vocal!
Modern Vocal Polish
This effect will add width and a modern touch to the sound of the lead vocal, which generally works best during choruses. Again, you can duplicate the lead vocal track or send/bus it to a new parallel Aux Channel. High-pass the parallel vocal channel until it loses most of its body and then apply a chorus, flanger, or phaser. I tend to use Soundtoys’ Microshift since it’s designed specifically for this effect. Try mono and stereo effects for a more focused or a wider sound. A compressor before the effect will create a consistent effect level that can bolster the power of the lead vocal and bring up the softer words.
Special Delay Channels
Here are two parallel vocal effects tracks that I keep set up in my template to add depth to my vocals. The first is the “Devlay” effect that I borrowed from Devin Townsend. The second “Swell” effect is borrowed from Graham Cochrane. Create one or both of these effects in your session and blend it in with the vocals to see how it affects your mix.
Here’s how to set up these tracks.
The Devlay effect track is meant to add motion, width, and excitement to the vocals in your mix. The devlay track works best on sustained vocals. It can make 4 harmony vocals sound like there are many more people singing. Choir, anybody? I use iZotope’s Nectar 3 for this, as it does everything I need to in one plugin.
Start with the deesser module. You don’t want to bring sibilance into the mix here. Then use the EQ module to remove the lows and highs. I high-pass up to 430 Hz, and low-pass at 6750 Hz. Unlink the delay and set 300ms on the left and 500ms on the right. 40% feedback on the left, 30% feedback on the right. I leave the modulation and saturation turned off. It’s important for both sides of the delay to end at the same time, so tweak the delay feedback values if necessary.
Lastly, set the reverb module highpass to 570Hz and the lowpass at 4kHz. Set the decay at 5 seconds and the width and saturation to 100%. Set the reverb module’s mix slider to whatever sounds right for your mix. I tweak some of the reverb settings as needed. The reverb’s mission is to kill off some transients, soften the vocals, and wash away the obviousness of the delays.
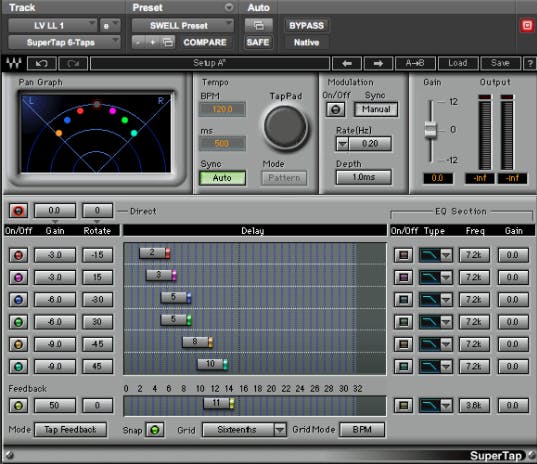
The Swell track is purely to add movement under the vocals. This works especially well for staccato vocals. You’re going to need a multitap delay plugin, such as Waves’ SuperTap Delay or Reaper’s ReaDelay. Make sure you cut the highs and lows to help the delays fit better in the mix. You might also try a de-esser before the delay plugin to reduce echoes on the sibilant bits.
In SuperTap, set the grid to sixteenths and make sure the plugin is set to Auto Sync to ensure the delays match the tempo of the song. Turn off the direct signal and turn on all six delay taps. The first two have the gain set to -3, the second two at -6, the last two at -9. Rotation (panning) is set to 0 for the first set, -45 for the third and sixth taps, and 45 for the fourth and fifth ones. The delay taps are set from first to last: 2, 3, 5, 5, 8, and 10. Set the Feedback gain to 50 and the delay to 11.
Here’s how to use Reaper’s ReaDelay for the Swell effect:
Bring the Dry fader all the way down and create 6 taps. Here’s what to put in the Length(musical) boxes, starting with tap 1: 1, 1.5, 2.5, 2.5, 4, 5. I set the feedback for all six taps to -9dB. Volume for the first two taps is set to -3, the second two at -6, the last two at -9. Next to the Volume value box, there’s a pan slider. The first two taps are centered, the third and sixth ones are hard left, while the fourth and fifth ones are hard right.
The end result is so similar that it doesn’t make a difference when it’s tucked in the mix. It’s highly unlikely you’ll use these effects tracks in solo.
Vocal Brightener
The gist of the vocal brightener track is to add clear, bright highs to the vocals with a parallel channel. This method avoids overprocessing the main vocals to avoid adding harshness or weird artifacts. We want to create a parallel vocal that provides consistently present high-frequency content. This is accomplished most simply by high-pass filtering the parallel lead vocal and squashing it severely with your favorite vocal compressor, like an 1176. Blend this bright vocal with the original vocal to taste.
Of course, there are more sophisticated ways to accomplish this same thing and I like to use a method where the parallel vocal gets compressed with a frequency-sensitive compressor, like FabFilter’s Pro-C 2. Here is how I set the Pro-C2.
Click on the sidechain tab at the bottom of the plugin window and click on IN. Set the highpass filter to around 750Hz. Then hover on the mid-band and click the auto button to set it to manual. Set the bell filter to around 8Khz with a boost of around 7dB and compress the signal until you get close to 20dB of gain reduction. The result should be a vocal with a similar tonal quality as the unprocessed one but with a much more controlled top end. Blend this with the original vocal to taste and de-ess as needed.
If you don’t have a plugin with a sidechain EQ, you can still get a similar effect. First, insert an EQ and boost the high frequencies using a shelf. Then insert a compressor set to slow attack and medium release and set it for 10 to 20 dB of compression. Insert another EQ after the compressor and apply the opposite EQ from your first EQ—that is, use the same high shelf to reduce the highs as needed. Finally, use a deesser to tame any stray sibilants.
The parallel vocal channel can be slightly brighter than the original signal or it might sound like a fly buzzing by itself, but in both cases, it can add an interesting sheen to an otherwise dull vocal sound. As a bonus, try sending this parallel vocal signal to your main vocal reverb!
Conclusion
Vocals can benefit greatly from parallel processing because of how in-tune our brain is with the natural sound of the human voice. Keep the original vocals au naturel, without heavy EQ and compression, and instead, do all the extreme processing on parallel channels to maintain the tone and dynamics of the vocal whilst reaping the benefits of heavy signal processing. Remember to feature the original vocal and blend in the parallel vocal as an added flavor.
Remember, you’re in the music BUSINESS, so treat your clients right.
Have fun!
______________________
Read our other articles for more information on these topics:
Pro Mixing: Parallel and Serial Effects


