
There are two basic reasons to compress a vocal. One is to control the loud moments and prevent overloads and the second is to even out the vocal so that the low-level details, like soft words and breaths, become more audible. The first is a bit aggressive, and the second is more transparent. Both approaches assume you’re hearing the vocal accurately. If your monitors or headphones have a frequency response bump in the 2–5 kHz range (common in many consumer headphones) you’ll over-compress the very frequencies that make a vocal cut through a mix. SoundID Reference calibrates your monitoring so the compression decisions you make are based on what’s actually happening.
Here’s how to achieve each one:
Compression to Control Loud Moments
You may not want to commit to compressing a vocal while tracking, but you still want to protect your interface or A-D converter from overloading on loud bits. A compressor/limiter can be used to simply control loud moments.
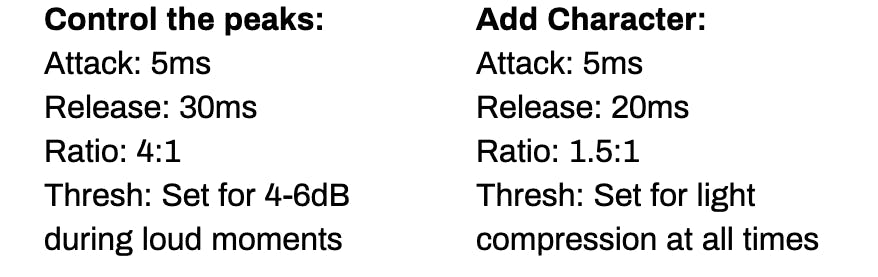
- Set a moderately fast attack time, between 1 and 10 milliseconds
- Set a moderate release time, between 30 and 50 milliseconds
- Use a ratio from 4:1 up to 10:1
- Set your threshold so that the compressor only kicks in during loud phrases and provides as much as 6 or 7 dB of compression.
Warning: A slower attack time will let the start of each word punch through, then clamp down on the sustain, which can create an unnatural “pumping” effect where the beginning of each phrase jumps out. Slower release times may keep the vocal suppressed into the start of the next phrase. If you want to go deeper on how attack and release shape vocal tone, The Pro Audio Files has an excellent breakdown of when to go fast vs. slow.
Vocal Compression for Interest and Character
- Set a moderately fast attack time, between 1 and 10 milliseconds
- Set a moderate release time, between 20 and 50 milliseconds
- Use a ratio from 1.5:1 up to 3:1
- Lower the threshold until the vocal is being compressed about 3 to 4 dB during loud moments.
- For a consistent vocal tone, make sure that the vocal is being compressed a little bit even during quiet passages. This may require balancing the threshold against the ratio.
Tip: To make a smoother vocal, use a faster attack (1 ms) and slower release (100 ms). For more detail and accents, try a slightly slower attack (20 ms) and a quicker release (15 ms). Note: very fast release times under 20 ms can introduce pumping on sustained notes — start at 40 ms and reduce from there. For a practical deep-dive on how attack times create or destroy punch in vocals and drums, Korneff Audio’s guide to transients and compression is worth the read.
Vocal Compressor Quick Settings
Continue reading and learning:
Pro Mastering Tips: Compression Pt. I
Pro Mastering Tips: Compression Pt. II, Multiband Compression
Pro Mastering Tips: Compression Pt. III, Mid-Side Compression


