I’m sorry to report that at some point in the future, one of your monitor speakers will die. Depending on its monetary value and age, it may not be worthwhile to fix or replace it to complete a working stereo pair. Besides, you may be tired of their sound and ready for a change. I usually relegate such casualties to the spare parts bin but there are some interesting ways forward for these fallen audio soldiers!
Here are some ideas to use that remaining orphaned loudspeaker monitor for special sonic treatments that are easy to set up and could become a unique part of your sound palette!
Adding More Snares to Snare Drums
Sometimes when mixing songs you didn’t track yourself, you get badly recorded drums—especially snare drums it seems. The track is labeled “snare” but all you’ve got to work with is a dull thump and no snare bottom mic track either. The top mic should pick up the stick hitting the head for the sharp attacks along with the drum’s tone, body, and resonances. But a lot of the time—especially for hard-hitting drummers—the sound of the snare wires rattling is hardly picked up at all by a top mic. The mic is on top of the drum and the preamp gain is set based upon the attack’s peak level to avoid digital overload.
Close-miking only the top head of a snare can create two problems. First, the drum will sound dry and small with no sustain or sense of space. Second, you can’t hear the rattle of the strainer wires. Of course, you can replace or augment the snare track with a sample but this could be a song you’re trying to keep natural and the drummer and music might be very dynamic. Now is a great time to make use of that spare speaker—to create the missing bottom snare mic.
In your mix, set up an aux send from the original snare drum track and output that aux bus to an output of your interface or mixer. Route that signal to a spare, small powered speaker or into a power amp then to a small passive speaker. 5-inch cube speakers or any bookshelf-sized speaker will work well for this.
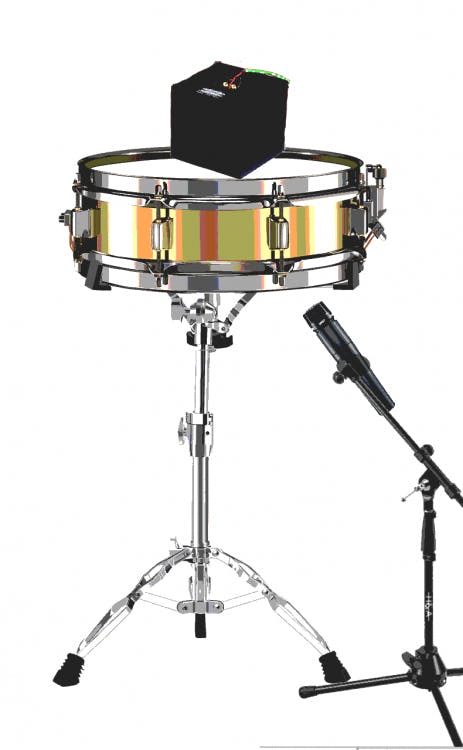
Set up a decent sounding snare drum on its stand in the studio’s live room, vocal booth, or a closet. I would then put my small, 5-inch Yamaha speaker right on top of the snare drum—right on the top head with the speaker facing down. The weight of the speaker will dampen the drum, which is OK because we are just looking to vibrate the snare wires and mic the bottom of the snare. When the snare track plays through the speaker, the speaker will excite the snare drum as if a drummer were actually hitting it.
It would be even better to space the speaker a few inches above the drum’s top head so it does not dampen the snare drum head. Back in the day, I would use the plastic protective ring from a two-inch reel of tape as a spacer and then strap the speaker down to the drum’s shell with gaffer’s tape. A larger speaker, like an NS-10, can simply rest across the snare’s rim. Thin strips of wood could also support a speaker above the head.
Next, put your favorite bottom snare drum mic on the bottom of the drum and bring it up in the mix on a new input channel. While sending the original snare’s audio out to the aux send bus, slowly add in the new bottom snare microphone signal. Now you have the original top snare mic track and a newly-created, real bottom snare mic track.
You may want to try a noise gate on the aux send signal to the speaker if leakage causes too much extra snare buzzing in between snare hits. You should also experiment with EQ and/or flipping polarity on the bottom snare mic—one way will sound better than another. Not much of this snare buzz is required to vibe up that dull snare. Remember to print this sound to a track in your session!
Sympathetic Vibrations
Another creative use for a spare speaker is to energize the strings inside of a piano.
Any piano is fine—a grand piano or even an old spinet or upright. Follow the same procedure of setting up an aux send bus to drive the speaker. You’ll need the piano to be in a very quiet, sound-isolated space for this recording to work well.
I use no-residue tape such as used on recording consoles or painter’s tape to hold down the piano keys in the key of the song. You can experiment with this but I usually begin by taping down all the octaves of the root key of the song. I’ve also tried experimenting with forming chords. You can also put something heavy on the piano’s sustain pedal (also known as the damper pedal) to hold it down so that the damper is held up and off the strings. With the damper pedal held down, all of the strings will vibrate sympathetically together..
When you place the speaker inside the piano and right up on the soundboard, you’ll hear it vibrating the harp and strings. Of course, you’ll have to place a couple of microphones over the harp and strings of the piano and add them to your mix on a new stereo track. I would usually send the bass, guitars, and keyboard tracks to the speaker, but you could send only vocals for a very interesting vocal effect. This ethereal effect sounds very cool in sparsely arranged songs with lots of air and space.
I know some engineers who process percussion tracks in this way for smooth jazz songs. They are looking for the resonance of the strings which adds a subtle tonality to the percussion tracks. Percussive instruments work well because of the bright attack of those instruments.
Adding Unique Room Ambience
A very old trick used to this day is adding real room ambience to certain elements in your mix. Place a speaker, or even a pair of speakers, out in a room, hallway, or stairwell and then pick up this new reverb sound with one or more mics—a basic echo chamber setup. Some mixers routinely set up a pair of speakers fed from a stereo aux send just to add a sense of real room to sounds that are too dry or were recorded direct only. If you have a good sounding live room where you mix, this is a big winner!
You’ll be capturing and adding the unique room sound of that studio to your mix. Try different pairs of microphones and different mic placements for different tones. For instance, point the microphones into the corners of the room, away from the monitors, for a more diffuse and dark tone. Try ribbon mics for their warm tonality or a spaced pair of small-diaphragm omni mics for less coloration, but lots of ambience.
This works great for entire drum kits. Set up individual aux sends on the kick, snare, overheads, etc., and you can add room sound to certain parts of the kit in any proportion you like. If the room sound is bright, sending the overheads with loud cymbals might be too much! On the other hand, adding some extra bright room sound might sound awesome on just the tom-tom tracks. This technique of re-miking dry recorded drums was used a lot during the mixing of AC/DC’s Back In Black album. Adding room sound to programmed drum machines almost convinces your ear that they are real and not artificial samples!
I also like using this effect on guitar tracks where you might have two rhythm guitars (double-tracked). Simply “return” a mono room sound opposite to where the original signal is panned in the mix, to add an unusually tight delay and coloration. Acoustic guitars can be set further back in a mix with the right amount of natural stereo room added. This type of effect doesn’t smear the sound as much as reverb does, it simply adds dimension and early reflections.
Any space is usable. I only have a small storage room with a very high ceiling. I’ve mounted a Shure SM57 near the top of the room for one sound and I sometimes put another mic much closer to the speaker. I get ‘quirky’ but not big room sounds with this rig. If your room is small, try putting an omni mic right against a wall to create a boundary mic that picks up a full and natural room sound. Heavy compression on a room mic can also exaggerate the amount of space picked up.

A Speaker For A Microphone
Using a speaker as a microphone is not a new idea. When working on the Beatles’ “Paperback Writer”, Geoff Emerick in April 1966 at Abbey Road Studios recorded Paul McCartney’s new Rickenbacker bass guitar and amp using a speaker for a microphone. It was placed right up and close on the bass amp’s speaker cone. Engineer Ken Townsend came up with wiring a mic cable to this speaker and, lo and behold, that song’s bass sound ended up being one of its striking features, as I remember. However, Abbey Road management subsequently reprimanded Townsend for miss-matching impedances—hahaha! Speaker drivers are very low impedance compared to studio microphones. You may have to pad the mic input from the speaker as speakers can output much hotter signals than microphones!
To do this trick you have to wire the speaker terminals to a short mic cable. Solder a wire from pin 2 of a male XLR connector to one terminal of the speaker. Solder pins 1 and 3 together on the XLR and then connect them with a wire to the other terminal on the speaker. It doesn’t matter wich terminal is pin 2, but don’t send phantom power to the speaker!
I’ve used old 4.5-inch Auratone speakers to record kick drums. The small speaker gets a low midrange sound quality when placed close to the kick drum. Moving further away produces a more hollow sound which is good for special effects. You can try this “microphone” on different sources such as electric guitar amps.
Lately, I’ve been using the woofer out of the ubiquitous NS-10M since I usually find those Yamahas around the studio in various stages of disrepair—mostly blown tweeters. The 8-inch Yamaha speaker produces a lower tone – almost a TR-808 (drum machine) sound with a long decay time. Again, be careful as this speaker will send a very hot signal to your mic preamp!
After soldering a mic cable to the woofer, I prop it up on tape boxes and place it about a foot in front at an angle since air blasts from the drum can cause trouble. These “microphones” are not going to give you anything above about 2 kHz so you’ll have to mix in a real microphone for the rest of the drum’s sound. Brittany Howard used a spare NS-10 woofer as her vocal mic at the suggestion of Blake Mills for the Alabama Shakes’ song “Guess Who.”
Using actual hardware and acoustics to affect sound is a tried and true method and can greatly personalize your mixes and productions. Great and unique sounds come from experimenting with the tools you have in unthought-of ways. This is one of the creative and fun parts of music production. So when a speaker or a compressor—any piece of audio gear breaks, don’t toss it out! Experiment with it—take the time to see what it can still do! You’ll be surprised!