Modern vocal reverb provides a sense of space around a vocal that can help the vocal sit inside a track. Often we don’t want a reverb that draws attention to itself, but rather creates a “cloud of sustain” that fills in the space around all the instruments with the tonality of the vocal. You may add other effects to a particular vocal, but this reverb is the foundation for vocal sound in many top EM and pop records. Fortunately, you can create this effect with almost any reverb plugin, and here are a couple of ideas to get you started.
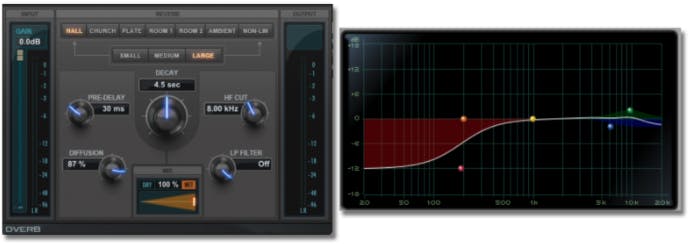
1. Choose a reverb plugin. Any plate, hall, chamber, room, or other space will do, just avoid nonlinear, small rooms, or spring settings for now. For instance, I usually start with any stereo plate reverb setting. I would suggest using a send to send the vocal to a reverb plugin on an aux track so that you can adjust the reverb independently of the vocal track.
The key to this effect is using a very long reverb at a low volume level. I usually start by setting the reverb time (also called decay or RT60) to between 6 and 8 seconds. Then I set the pre-delay to between 30ms and 60ms—the actual time doesn’t really matter, but try a few different times to see if one feels better for you.
2. Send the vocal to the reverb until the vocal is swimming in reverb. Lower the reverb aux fader until you barely notice the reverb. You should hear a nice even sustain on the vocal, but you shouldn’t notice obvious reverb. The ideal level for this effect is where you barely notice the reverb when it’s playing, but when you mute the reverb aux, the vocal sounds too dry.
3. EQ the Reverb if it sounds too cloudy or boomy. Place an EQ after the reverb and roll off frequencies below 300Hz. If the reverb sounds too sizzly, roll off the high frequencies above 2 or 3kHz. For a more silky reverb, try boosting the EQ above 4kHz.
Bonus Tip
Duplicate your lead vocal track, compress it very hard and roll off all the low-end below 500Hz. Don’t send this channel to your mix bus, but send this channel, instead of your main lead vocal channel to the reverb aux. This will create a reverb that has a different frequency response and dynamic range than your vocal track so it will not compete with your vocal, but will still create a modern ambience.
The louder the reverb is in your mix, the more noticeable it will be as an effect. Play with the length, volume, and EQ of the reverb until you find the proper balance that creates just the amount of space around your vocal without calling attention to the reverb itself. For an even more spacious reverb, try adding a stereo imager after the reverb.