


Intro
If you’ve spent time learning about audio production, you’ve probably heard of bit depths, sample rates, mic preamps, gain staging, digital-to-analog converters (DACs), etc. Individually these concepts are covered in depth across the web and throughout our blog, but sometimes it can be hard to really understand how they all come together.
Let’s consider the following scenario: I’m recording a vocal track in my DAW, adding some compression to it, and then listening back through my speakers. Throughout this process the number of transformations of energy/information alone is remarkable. Air pressure becomes electrical voltage, voltage is captured in a digital format, that digital information is manipulated, converted back to an analog electrical signal, and eventually back into moving air through our speakers or headphones.
An analysis of what’s happening at every point in that audio chain can make you feel more confident in what you are doing when you record, and solidify your technical foundation for talking about gear and the recording process.
Rather than diving into each relevant technical topic in that audio chain, this article takes a step back, helping you connect the dots throughout the entire journey of an audio signal, from the initial acoustic sound to the moment you hear it played back. Along the way, we’ll point you towards additional detailed resources so you can further explore any stage of the chain. Let’s jump in!
The Chain from 30,000ft
In the scenario I mentioned earlier, most home studios and even some smaller commercial studios will have the following setup:
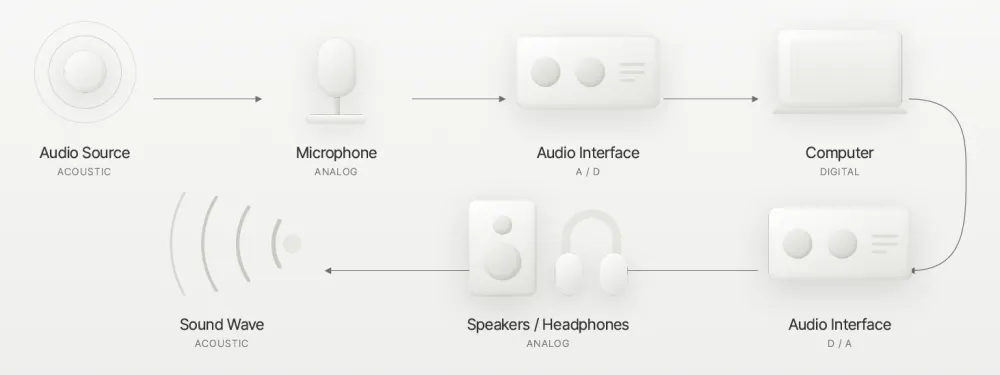
What exactly is happening here? I have a microphone, an audio interface, a computer running a DAW, and speakers, but how are these all working together?
Now let’s trace each step of the chain
Audio Source
The very beginning of the chain starts with our actual audio source, which in our case is a vocalist. Through the exhaling of air through the singer’s vocal cords, actual physical, mechanical waves are created that move throughout the air in the room. This wave will actually make the medium it crosses through vibrate as it traverses that medium – which could be air, an object, or a liquid, but in our case we are considering how sound moves through air (our medium).
The pitch that sound makes is directly influenced by how fast that medium is vibrating, or in other words how fast the particles of that medium are being compressed and rarefied (de-compressed) by a mechanical wave. And since humans can hear pitch between 20Hz-20,000Hz, any medium that is compressed and de-compressed between 20 to 20,000 times per second will make a sound we can hear, assuming it’s loud enough.
So now we know that when our singer creates sound, various particles in the air in our room are compressing and de-compressing. But the challenge is: how do we capture these movements of air particles? That is where our microphone comes in.
Microphone
There is a physical property discovered by Michael Faraday that when a magnet moves through a metallic coil, the magnetic field in the coil changes, and consequently produces an electric signal.
One of my favorite microphones is my Shure SM7B dynamic mic, and this is exactly how it works. It has a diaphragm attached to a metallic coil (called a voice coil), placed within a magnetic ring. Since we know acoustic waves actually make objects vibrate, when I sing in the direction of my microphone’s diaphragm, I actually make it vibrate, making it oscillate back and forth. And since my diaphragm is attached to the coil, the coil itself now moves back and forth in relation to the magnet around it. According to Faraday’s Law, this creates an electrical signal.
This is a simple demonstration of how a dynamic microphone is able to convert – or more technically correct to transduce – acoustic sound into an electric signal. However there are so many kinds of microphones and technical factors to consider when choosing what microphone will be best for what you are trying to accomplish such as diaphragm size, dynamic vs condenser vs ribbon, polar pattern, frequency response, etc.
If you’re feeling overwhelmed by all those terms or not sure where to start, fear not! We have articles that can help sort through all those terms and bring some clarity. See our Microphone Polar Patterns Decoded and Choosing Your First Mic articles.
To get our mic’s signal to our computer, we connect it to an Audio Interface.
Audio Interface
An Audio Interface for recording has 2 parts: the Pre-Amp and the Analog to Digital Converter, also known as the ADC. Let’s take a look at each.
The Pre-Amp
Although an acoustic wave is physically moving the diaphragm back and forth, think about how little the diaphragm is actually moving just from us speaking into it. Because of this, the voltage of our dynamic microphone’s signal is very low.
This very low amount of voltage is what’s called a “Mic Level” signal, typically falling within -60 dBu to -40 dBu, while most studio audio equipment is actually designed to operate at Pro Line Level of +4dBu. Since signals output by microphones fall somewhere between ~0.78-7.75mVrms, our mic signal needs to be amplified hundreds to thousands of times before it reaches Pro Line Level of ~1.228Vrms. That is exactly what the Pre-Amp in your Audio Interface is for. It boosts the signal from Mic Level to Line Level.
For a deeper understanding of Pre-Amps and a guide on knowing if it makes sense to invest in one separate from the one built into your Audio Interface, please see our article Mic Preamps: Are They Really Needed?
The Analog to Digital Converter (ADC)
Once the microphone signal has been amplified to line level, it reaches the Analog-to-Digital Converter (ADC). While analog signals are continuous, for a signal to be stored digitally, it needs to be sampled. What does that mean? Well a sample is just a measurement of amplitude, at a specific moment of time. To measure the signal coming through, we need to sample it multiple times, with a steady time interval between each sample measurement.
The purpose of the ADC is to bridge these two worlds, converting the continuously varying signal into digital values that can be stored and manipulated by a computer. Two key concepts determine how accurately this process represents the original signal:
Sample Rate, which determines how frequently the voltage is measured;
Bit Depth, which determines how many discrete values the measured voltage can be rounded to.
Recap thus far
Let’s take a minute to think about what has happened so far in our audio chain. We started with acoustic, physical sound, found a way to convert it to an electric signal using a microphone, boosted that signal through our pre-amp and then captured it using the ADC from our Audio Interface, representing our audio through strings of 1s and 0s – pretty cool! So far the following conversions of energy/information have already occured:
Mechanical Waves > Electrical > Digital
We’re halfway there. Let’s keep working through the chain!
In the DAW
Now we have converted our amplified electrical signal into a series of strings of 1s and 0s. But why is this helpful? Well, 1s and 0s are very easy to manipulate. This means that our computers allow us to edit, manipulate and process audio in ways that could be expensive, difficult, or impossible in the analog world.
Let’s say I am not happy with a take because my timing was a bit off. Rather than re-record the whole take, through digital processes, I can adjust the timing of my audio take. Or by inserting a compressor plugin, my DAW performs calculations on my stored audio data to reduce the levels of signals that exceed a set threshold. To clarify, I am oversimplifying this process, but think about it: once audio is accurately represented by a string of 1s and 0s, if you change those 1s and 0s to other values, you will change what that audio sounds like.
Of course, you as the user are not interacting with audio or audio processing at the binary level, but rather are loading plugins, pushing buttons, faders, knobs, etc. and your computer is handling the underlying mathematical operations for you.
Back to the Audio Interface
Now that I have manipulated my signal in the digital realm by compressing it I want to listen to it. So my signal needs to be converted back to an Analog signal which will directly influence the movement of the woofer and tweeter of my speaker. That’s where the Digital to Analog Converter (DAC) comes in.
The Digital to Analog Converter (DAC)
The DAC is also handled by our Audio Interface and is essentially the reverse of the ADC, taking our digital signal and turning it back into an analog electrical signal so that it can drive our speakers or headphones.
The DAC process is actually quite complex and there are multiple architectures of circuits and processes for this such as R-2R Ladder and Delta-Sigma. However, from a practical studio perspective the important takeaway is that its role in our audio chain is to convert stored digital amplitude values into smooth, continuously varying voltage levels. This will ensure smooth movement of our speaker woofers and tweeters.
Speakers
Our Audio Interface’s DAC outputs a signal at Pro Line Level but for that to actually drive a speaker, the signal needs to be converted to Speaker Level. That is where the Speaker Amp comes in. When we are dealing with passive speakers, the speaker itself doesn’t have an Amp, so we need an external one. However if our speakers are active, it has a perfectly paired Amp built into it.
Side note: to learn more about Active and Passive speakers and studio monitors, check out our article Studio Monitors: Everything You Need To Know.
We saw earlier how according to Faraday’s Law a magnet moving through a metallic coil creates electrical current. The opposite principle is also true: when an electrical signal is applied to a coil of wire placed within a magnetic field, the changing current creates a changing magnetic force that moves the coil. So a speaker operates using the same electromagnetic principles as a dynamic microphone, but optimized for energy output instead of capture.
So as our speaker signal increases in voltage into the positive range, the speaker cone is driven forward and as it decreases in voltage into the negative range, the speaker cone is driven backward.
Sound Waves
Most near-field studio monitors are composed of woofers, responsible for lower frequency reproduction, and tweeters, responsible for higher-frequency reproduction. As both the tweeter and woofer move back and forth, they actually move the air in front of them, creating an acoustic wave that propagates through the air. This in turn makes its way to the hair cells in our cochlea (in our ears), creating small electrical signals from our ears to our brain, allowing us to perceive those air movements as sound.
Conclusion
Recording a vocal and adding some compression to it is something you might do all the time, but understanding what exactly is happening under the hood can unlock a whole new level of appreciation for the technology you are working with, and a deeper knowledge of things that you might have just heard of but only vaguely know what they mean, such as Mic or Line Level, a Pre-Amp, a DAC, etc.
Understanding the audio chain in your home studio can be a real asset when troubleshooting issues, give you confidence in configuring certain parameters in your DAW or Audio Interface Software, and your overall reliability as a producer or engineer.
Real World Lesson: Why “Fix It In Post” Fails
Something I’ve learned from understanding the chain better is the following: the earlier in the chain that you change something, the bigger impact it will have on the final result. Not happy with how your voice sounds? Well, you could buy a nicer interface with a better ADC or add a fancy tube pre-amp to your chain, but that will make a much smaller difference than resolving issues earlier in the chain.
Maybe your gain-staging isn’t optimized. Maybe your mic doesn’t suit your voice. Or worse maybe your room is not acoustically treated. Or maybe the key of the song isn’t the best for you and you should consider transposing the entire song. Or maybe the timbre of your voice doesn’t suit this specific song.
So, although you can fix many things once they’re in your DAW such as timing and tuning, sometimes the detailed work of meticulously fixing every little detail takes 100x the time it would take to just pull out your mic again and re-record a better take.
Some of the work I do is what’s called Score Sound Design, and the exact same principle applies there. You can take something as uninteresting as the sound of a pen click and turn it into a low-end sub boom through all sorts of digital signal processing (DSP) tricks and fancy plugins. But there is a limit to how much you can manipulate sound that isn’t interesting from the very source and force it to be unique and appealing.
What I’ve learned from being around incredible sound designers is that more work earlier on means less work later on. So, rather than viewing the recording stage as merely a way to capture sound, they treat it as part of the creative process itself.
So, if you discover an intriguing sound, you could just point any mic at it and record it, and then put in hours of work in your DAW elevating it to sound unique and interesting. But better yet is to ask yourself right at the start: is there a way I can make this more interesting? Don’t just pluck a guitar in the usual way. Instead strike the strings with drum sticks, mallets, brushes, hot rods; play it with a violin bow, bowing extremely slowly or fast, or with extreme dynamics; completely change the tuning of the strings; replace the strings with non-guitar strings; record at an extremely high sample rate so you can pitch it down multiple octaves or play it in slow motion; try various mic placements; try different mics, including less common ones like contact mics; record at 32-bit float so you can record extremely quiet and subtle sounds, knowing you’ll be able to increase the gain and compress the signal immensely without introducing digital noise; etc.
Some of the most interesting and beautiful pads I’ve ever heard were created by taking thick wind chimes held vertically with the lower half placed under water and the upper half above water, slowly bowed by a violin bow recorded with a stereo hydrophone (underwater mic) placed in the water. The sound that was naturally created at the source (the very beginning of the chain) was so interesting, that the process in the DAW was not to “fix” the sound and make it usable. It already was interesting and unique, so the DAW was just used to elevate it from something great to something truly amazing.
So the great sound that sits in the DAW with 1 plugin on it, is infinitely better, more unique, and harder to replicate than the mediocre sound with all the fanciest plugins applied to it.
Understanding the journey from acoustic sound to your DAW and back will not immediately make your production, sound design, or recordings sound better. But it will inform your decisions and help you know where to invest your time during every stage of the process. And that is what distinguishes beginners from pros.


