
Gain staging or gain structure is a fundamental aspect of audio production that influences the overall quality of a recording. It is a process that involves budgeting and adjusting levels throughout a recording and mixing workflow to ensure optimal sound quality. This Sonarworks article provides an overview of gain staging, covering optimal recording levels, the importance of gain staging in the digital audio workstations (DAWs) paradigm, common mistakes to avoid, and the relevance of calibrated monitoring.
Introduction
In the world of audio production, gain staging is often overlooked by beginners and even some seasoned engineers. It is one of those topics that everyone claims to understand, yet it remains one of the most common sources of distortion, noise, dull mixes, and “why does this sound bad even though nothing is clipping?” moments. The irony is that modern digital systems offer enormous headroom and flexibility, but misuse of gain staging can still sabotage a production long before the mix bus. Understanding how to manage levels properly can be the difference between a professional-sounding mix and one that is muddied and unclear. Gain staging encompasses every step of the audio production process, from recording to mixing, and plays a vital role in achieving clarity and balance in your audio projects.
Understanding Gain Staging
Key points that often get misunderstood:
- Gain staging is not about making things loud
- Gain staging is not about avoiding clipping only
- Gain staging is about preserving signal integrity, headroom, and resolution
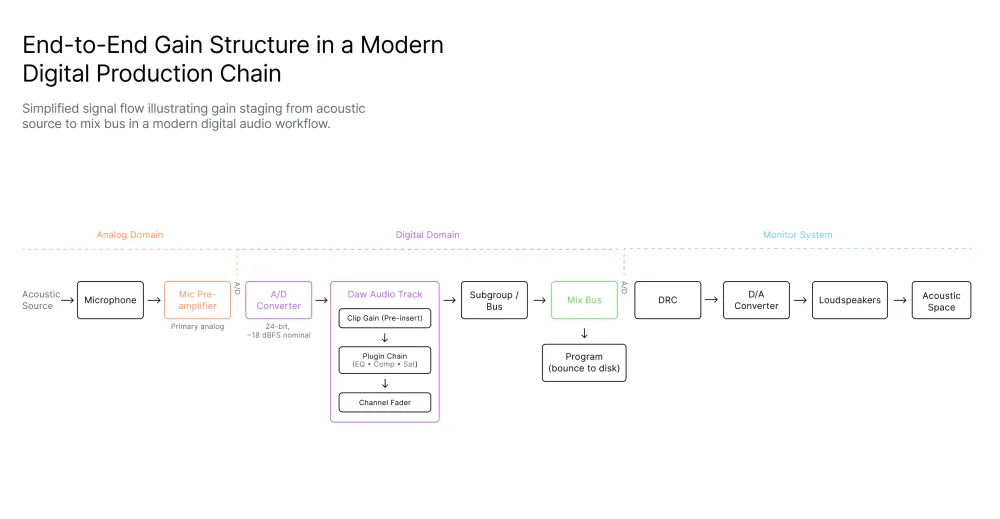
Gain staging refers to the process of managing the levels of audio signals throughout the production chain. This includes input levels from microphones, instrument line levels, levels within the DAW, and output levels to monitors. Proper gain staging helps prevent distortion, maintains audio integrity, and ensures that mixing engineers have the headroom necessary for applying processes and effects to the audio without compromising quality.
Optimal Recording Levels – Nominal Levels
Recording levels are essentially the amplitude levels of the audio when it is captured. It is crucial to find a balance that ensures signals are strong enough for having a good signal to noise ratio but not so strong that they cause distortion or clipping. Clipping occurs when the audio signal exceeds the maximum level that can be recorded, resulting in a harsh, distorted sound that is often irreversible.
Most audio interfaces and digital audio workstations recommend recording levels between -18 dBFS and -12 dBFS. This range provides a good balance, ensuring that the signal is strong enough to be usable without risking distortion. It allows for a wide dynamic range and preserves the nuances of the performance. This level is usually referred to as the Nominal Level for that piece of equipment.
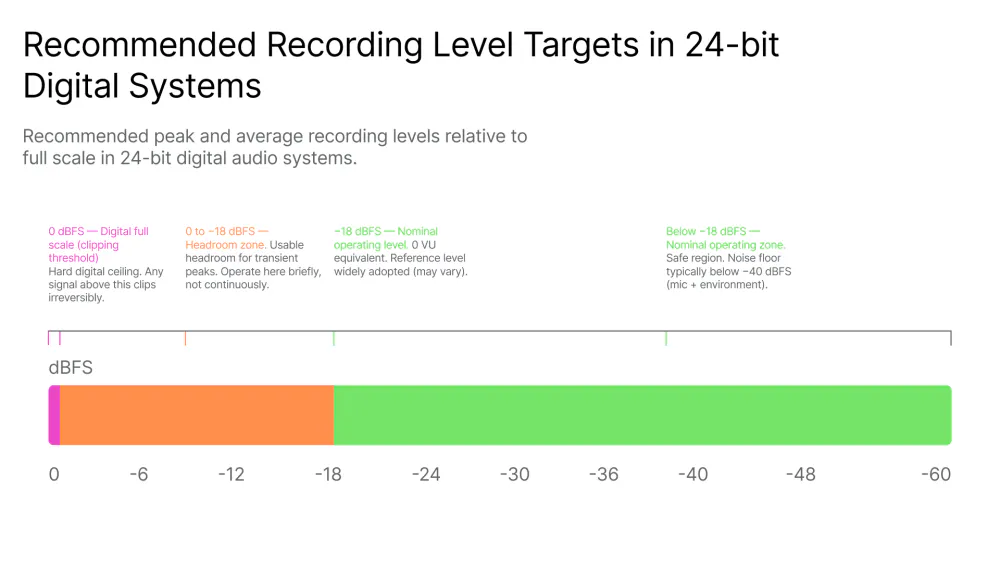
Headroom is the difference between either the peak level of the audio signal at its maximum peak and the maximum level the system can handle without distortion, or signal-agnostic wise, the difference between the nominal level (as recommended level by the manufacturer) and again the maximum level the system can handle without distortion. Maintaining headroom is critically important, especially when instruments or vocal performances might have transients—sudden spikes in volume. By allowing some headroom, producers can avoid unwanted clipping and distortion during both the recording and mixing processes.
Gain Staging in DAWs
When audio is imported into a DAW, it is essential to continue managing gain levels. Each track should be adjusted to sit well within the overall mix rather than competing with one another. The aim should be for levels to be balanced, with no single track dominating unless intended. A great tool for this is clip gain.
Many DAWs offer built-in plugins that help with gain staging. EQs, compressors, and limiters all have gain controls that can dramatically influence the levels. It’s crucial to monitor levels when applying such effects, as they can significantly increase or decrease gain, thus altering the gain structure.
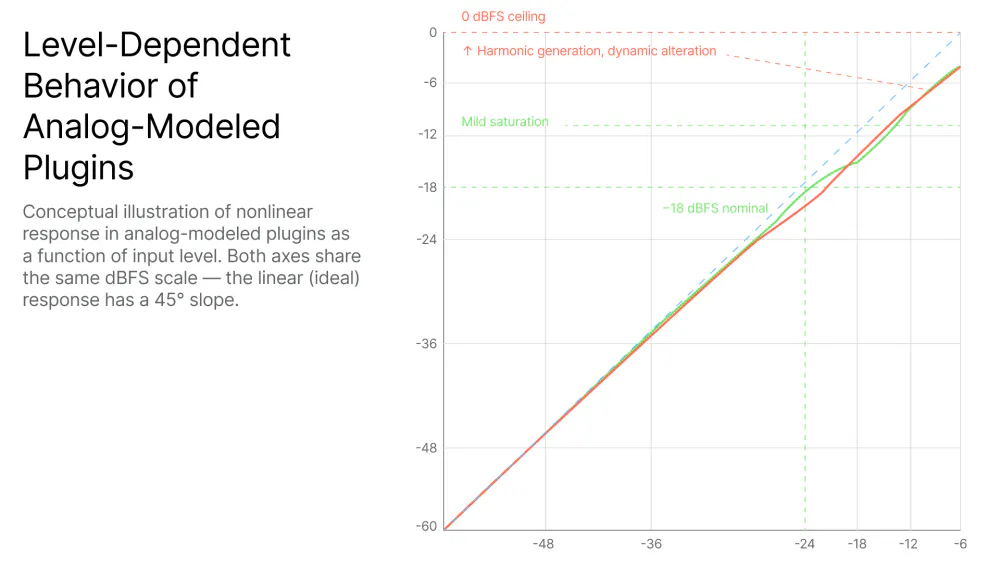
In digital audio, gain staging practices differ slightly from analog. Digital systems can handle a wider dynamic range, especially in the modern 32bit float engines quite ubiquitous nowadays. A modern misunderstanding is the belief that floating-point processing has made gain staging irrelevant. While floating point effectively protects against catastrophic digital clipping inside the DAW, it does not guarantee the intended musical plugin behavior, especially true for nonlinear plugins that rely in harmonic distortion generation; moreover, digital floating point architecture does not guarantee stable dynamics, consistent monitoring perception, nor a predictable summing behavior.

While analog systems inherently have a much higher and noticeable noise floor (hiss) but can also produce pleasing distortion when pushed, digital systems present almost unmeasurable noise floor but require strict adherence to proper gain staging to maintain clarity during recording and mixing. The aftermath of this is that even if today´s digital technology allows for far more flexible and unorthodox practices regarding gain structure, engineers who still respect old-school gain staging techniques, far from obsolete, end up with a much better-quality audio product.
The Importance of Calibrated Monitoring
Loud Monitoring Hides Bad Gain Staging. Loudness is not solely about the level; it’s about the psychoacoustically perceived sound levels. Perception can be affected, among other variables, by frequency content, allowing certain sounds to seem louder than others. Calibrated monitoring (both level and frequency) ensures that what an engineer hears from monitors accurately represents the audio being produced.
When monitors are too loud:
- Everything sounds exciting
- Compression feels unnecessary
- Distortion feels “energetic”
- Low-level detail disappears
Calibrated monitors help to reveal issues that are not always apparent through uncalibrated headphones or speakers. This includes masking, tonal imbalances, phase issues, and improper gain staging. By ensuring monitors are set correctly, engineers can make informed decisions during both the recording, mixing and mastering phases of audio production.
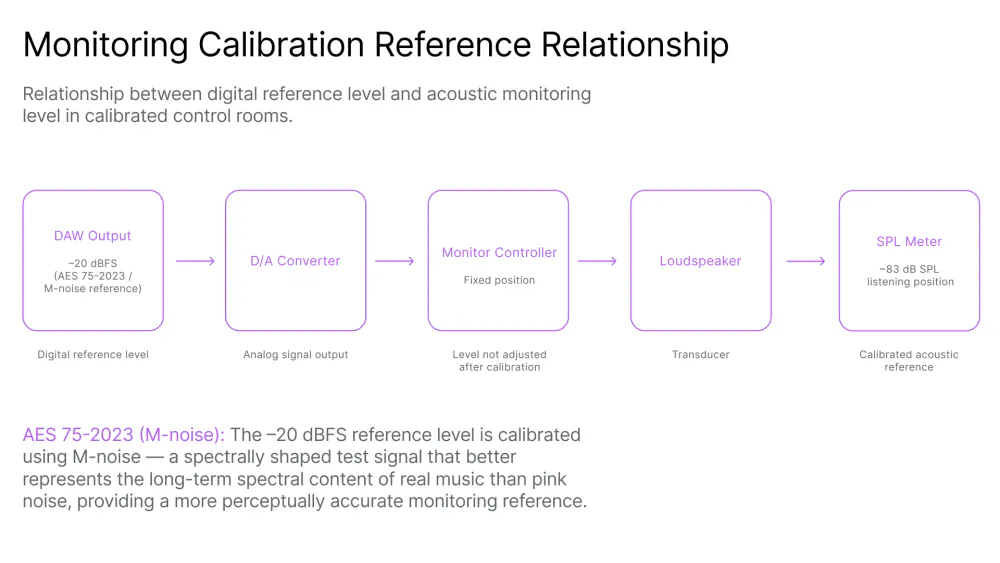
Setting up a calibrated monitoring environment involves measuring sound levels within the acoustic space and adjusting the monitor response through digital processing to ensure a known response. This is known as Digital Room Correction (DRC). Software tools like Sonarworks Sound Id and room analysis can help identify and solve common problems, ensuring proper and confident monitoring.
Once the monitor system response is known, a common reference for level calibration is the nominal level of music playback or AES-75-2023 noise is 83dB SPL C / slow, this level should be lower (78-80 dB SPL) for smaller rooms.
Common Mistakes in Gain Staging
Mistake 1: Recording Too Hot “Just in Case”
Fear of noise is outdated. Fear of distortion should not be.
Mistake 2: Confusing Headroom with Weakness
Leaving headroom is not indecision—it’s professionalism.
Mistake 3: Using Faders to Fix Input Problems
Faders are for balance, not damage control.
Mistake 4: Slamming Plugins for “Vibe”
Vibe comes from intent, not overload.
Mistake 5: Ignoring Output Levels
If bypassing a plugin makes the mix collapse, it was never helping.
Mistake 6: Monitoring Too Loud
You’re not hearing better — you’re hearing louder.
Mistake 7: Treating Gain Staging as Technical, Not Musical
Gain staging also shapes tone, groove, and feel.
Mistake 8: Treating Gain Staging as a One-Time Step
Gain staging is continuous. Should be monitored and maintained in every part of the chain. Every new plugin, bus, or routing change affects it.
Best Practices for Effective Gain Staging
- Calibrated Monitoring is paramount. Always have a visual precision level representation of the signal through monitoring devices, a.k.a. level meters, that you can trust! Visual input is of utmost importance in order to quantify the signal, hence it is very important for gain staging. Know what you are measuring: where in the chain is the meter inserted, what type of level is the meter showing to you (peak, RMS, LUFS, scales, ballistics, etc). Inform yourself about how to read meters and assess their accuracy and relevance for the task.
That being said, if you monitor aurally at a consistent loudness while producing audio with a good, calibrated reproduction system a.k.a. monitor speakers and room that you can trust, and you do that every day, every session, after a while, you´ll find yourself looking at the meters sparingly, rather as a verification tool than a guide.
- Record conservatively
- Peaks around –10 dBFS or even less, depending on how predictable or not the performance is.
- Focus on tone, not meters
- Normalize with clip gain
- Aim for consistent average levels
- Prepare tracks for plugins
- Insert plugins with matched levels
- Always check input/output
- Only Trust comparisons at equal loudness
- Manage buses early
- Don’t wait until the mix bus clips
- Leave some space everywhere
- Leave headroom
- Mastering is not mixing’s job
- Dynamic mixes translate better
Conclusion
Gain staging in modern digital production is not constrained by technical necessity, but governed by operational discipline. While contemporary DAWs provide substantial numerical headroom, musical outcomes remain sensitive to signal level management at every stage of the production chain.
A systematic gain staging workflow enhances predictability, reduces unnecessary processing, improves translation, and supports consistent decision-making. Ultimately, gain staging is less a technical constraint than a framework for maintaining dynamic intent throughout the production process. It is not about numbers, but about the clarity of judgment.
When gain staging is right:
- You trust what you hear
- Plugins behave predictably
- Mixes come together faster
- Fatigue decreases
- Translation improves
When gain staging is wrong:
- Every move compensates for another
- Loudness replaces balance
- Processing multiplies unnecessarily
- Confidence erodes
The difference between a professional-sounding mix and an amateur one is control and consistency. Great mixes are controlled by design, and gain staging is that design.
Learn more about the subject in our other blog articles:


