
The main principle of top-down mixing is to get good results quickly by minimising unnecessary processing on individual tracks. This is achieved by starting with processing at the top layer of your signal flow. This means the Master Bus. It is tempting to over-process the Master Bus and subgroups at the beginning, in order to get easy-win mixing improvements quickly. There are multiple points to influence the signal before these stages in the signal flow, so it’s important not to paint yourself into a corner here with anything too extreme.
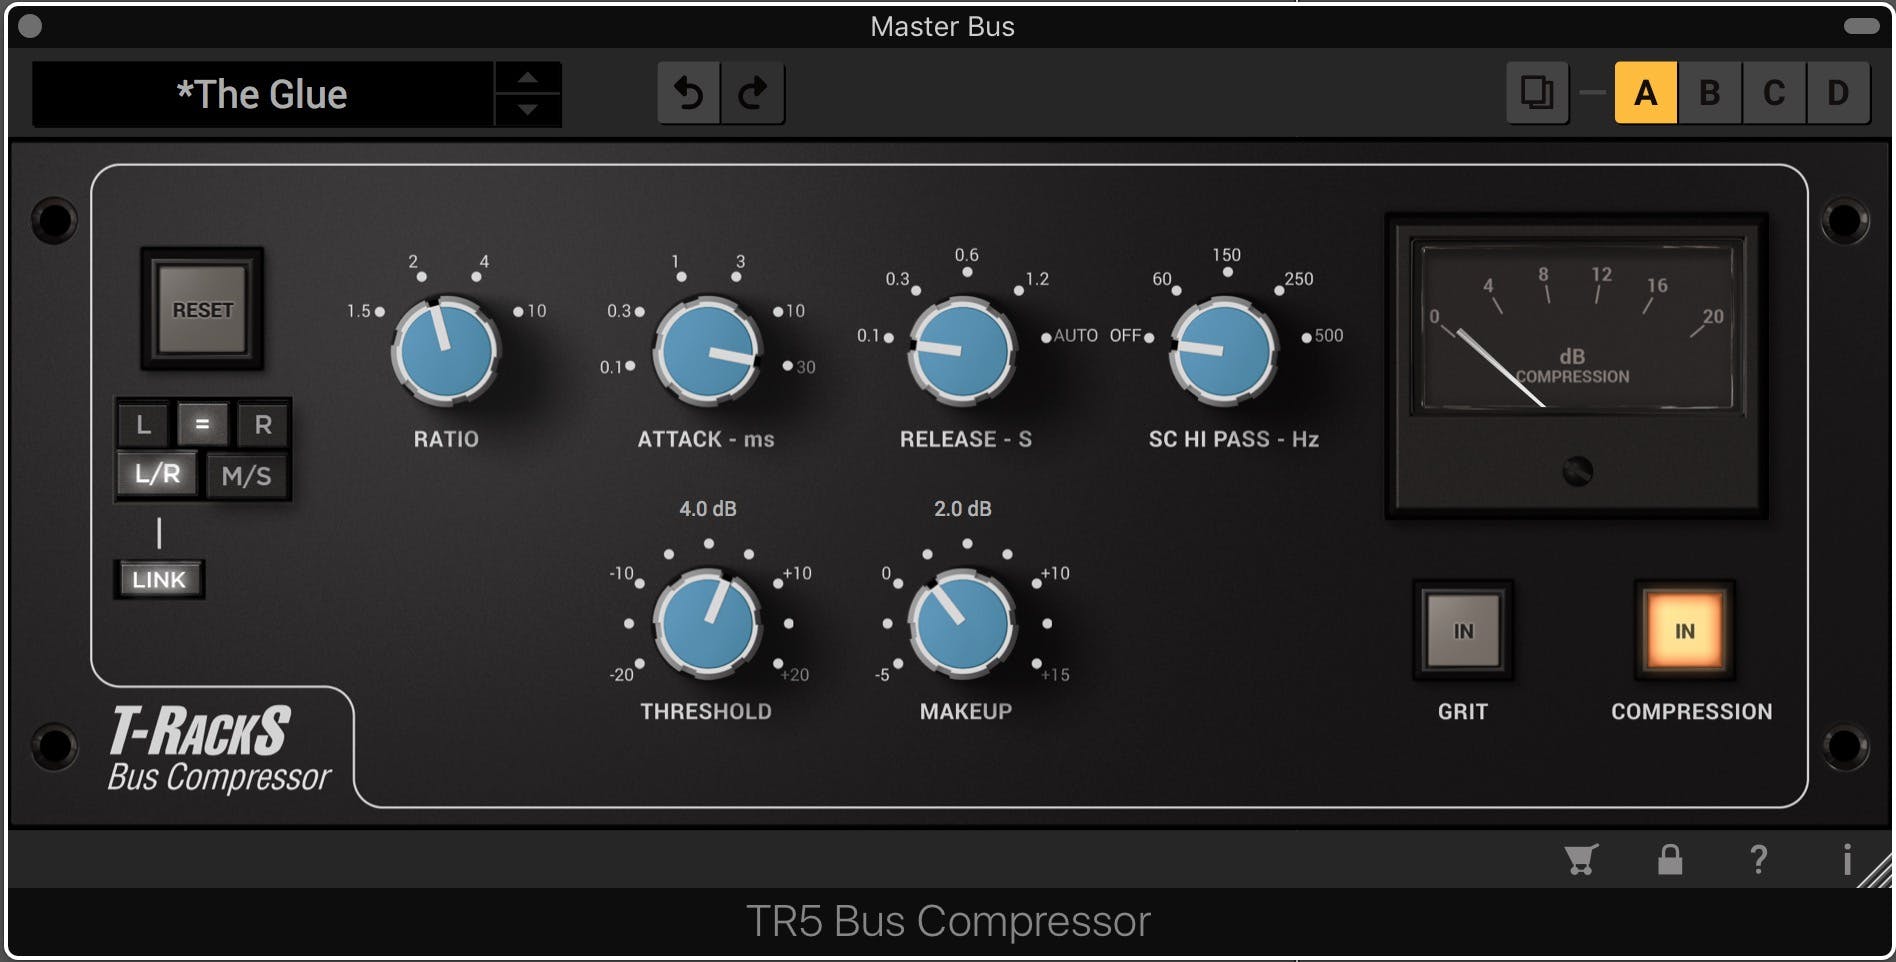
Master Bus Compression
Put simply, compression is a tool to tame the dynamic range of an audio signal. The more commonly used downward compression achieves this by attenuating the amplitude of the signal, based on a user-set ratio, once it rises over a user-defined threshold level. After taming the loudest parts in the signal, the overall level is then raised via a make-up gain knob, effectively increasing the perceived volume of the overall signal. In other words, compression makes your music sound louder. The harder you set compressors to clamp down on the audio, the more headroom you have to raise the overall level. It is easy to overdo it.
Upward compression does the opposite and processes the quietest part of the signal by raising the audio below the user-defined threshold. In this case, no makeup gain is required. Both types of compression achieve the same results, reducing the distance between the loudest and quietest parts. Downward compression does this by lowering audio above the threshold setting, upward compression by raising the audio below it.
Regardless of whether we master our own music or not, mixing into some master bus compression has become a common and accepted practice. Used conservatively at this stage, it is not about maximizing level, but more about taming peaks and subtly evening out the dynamics. The more stages in your signal flow you use compression, the less hard any individual compressor needs to work, and the more natural it will sound. A subtle amount of track compression (if necessary) into subgroup compression into master bus compression is a great formula for a full yet still dynamic sounding premastered mix.
If you do choose to mix into some master bus compression, it is a good idea to set it up early in your mix. That way you are always working with it and it won’t suddenly change your sound, as is likely to happen if you only add it on at the end.
Some people feel strongly about using two (or more) compressors in series on the master bus, each set with unique attack and release time values. The attack time determines how quickly the compression kicks in once the signal crosses the threshold. Release time determines how long it takes for the signal to revert back to its original level once it falls in level and no longer crosses the threshold.
When working with multiple compressors, the first is often a FET style compressor, set with a very fast attack to catch transients. And the second, a VCA based model with a slower time constant to even out the levels more generally. Whether you use one or two, the trick is to use a gentle ratio setting. This determines how much the signal will be compressed once it crosses the threshold. A ratio of 2:1 at this stage is subtle and transparent. Adjust the thresholds to get them triggering a DB or two of gain reduction. Don’t overdo it. There’s plenty of time for that later at the mastering stage.
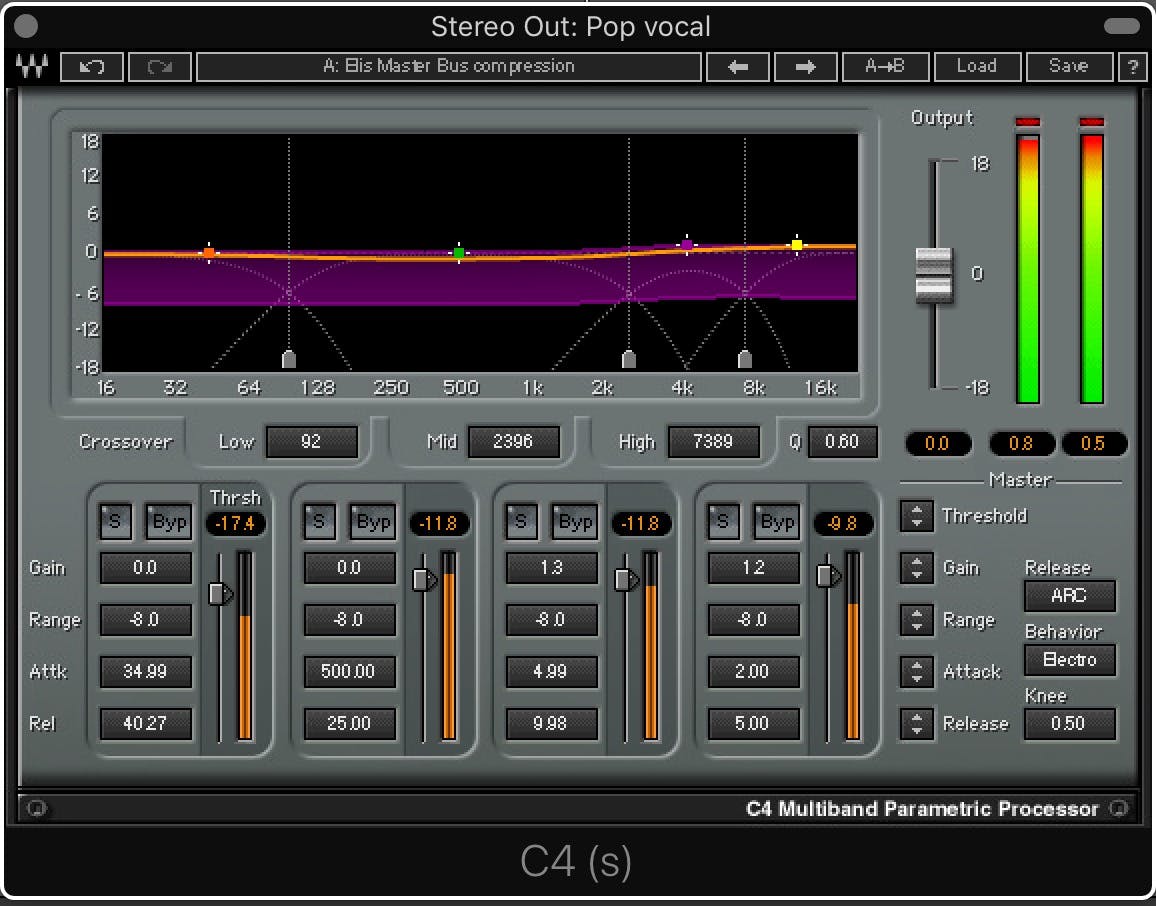
Multiband Compression
While the above method of master bus compression is effective, it also presents potential problems. Often low-frequency content, like kick drums and basses, will trigger the compressor(s) and pull down the gain of everything happening at the same time, even if they might not need compressing. Slower attack times can compensate for this, but then you don’t get the peaks being evened out. I describe this situation as only a “potential” problem because this doesn’t apply to every style of music, and sometimes this type of compression effect can be desirable.
Multiband compressors solve this problem by splitting the audio signal into multiple bands, each with independent compression controls. Four separate bands are common, but newer plug-ins often offer independent compression settings for six or even eight individual frequency ranges.
The two primary decisions to make when starting out with a multiband compressor on the master bus are how many bands to use (you don’t necessarily need to use all 4, 6, or 8, available bands), and where to set the crossover points between the different bands. Most multiband compressors offer the possibility of soloing the individual bands. Soloing them while adjusting the crossover points will help in understanding what content is present in each part of the frequency spectrum and the type of compression they may need.
Sometimes fewer wider bands will do the job, other times multiple narrower bands can track the signal more accurately. It all depends on the program material of course.
Here are some general tips for initial settings. Most multiband compressor plug-ins allow the user to set values evenly across all bands. Start by pulling all the thresholds down together until they start triggering lightly. You will likely find they are not all triggering equally. This is normal. Go into the individual threshold controls next and tweak them until each band is triggering a couple of dB of gain reduction. Use a gentle starting ratio. 2:1 is very safe and conservative.
Use a slower attack time for the lower range so that the bass and kick drum transients aren’t grabbed too aggressively. Use quicker attack times in the higher ranges so sharp transient peaks are controlled. Start by setting the makeup gain equally across all bands. If you aren’t compressing by more than a couple of dB, you don’t need more than a couple of dB of makeup gain. For finer control, go into the individual bands to offset the makeup gain in specific ranges if needed.
Saturation
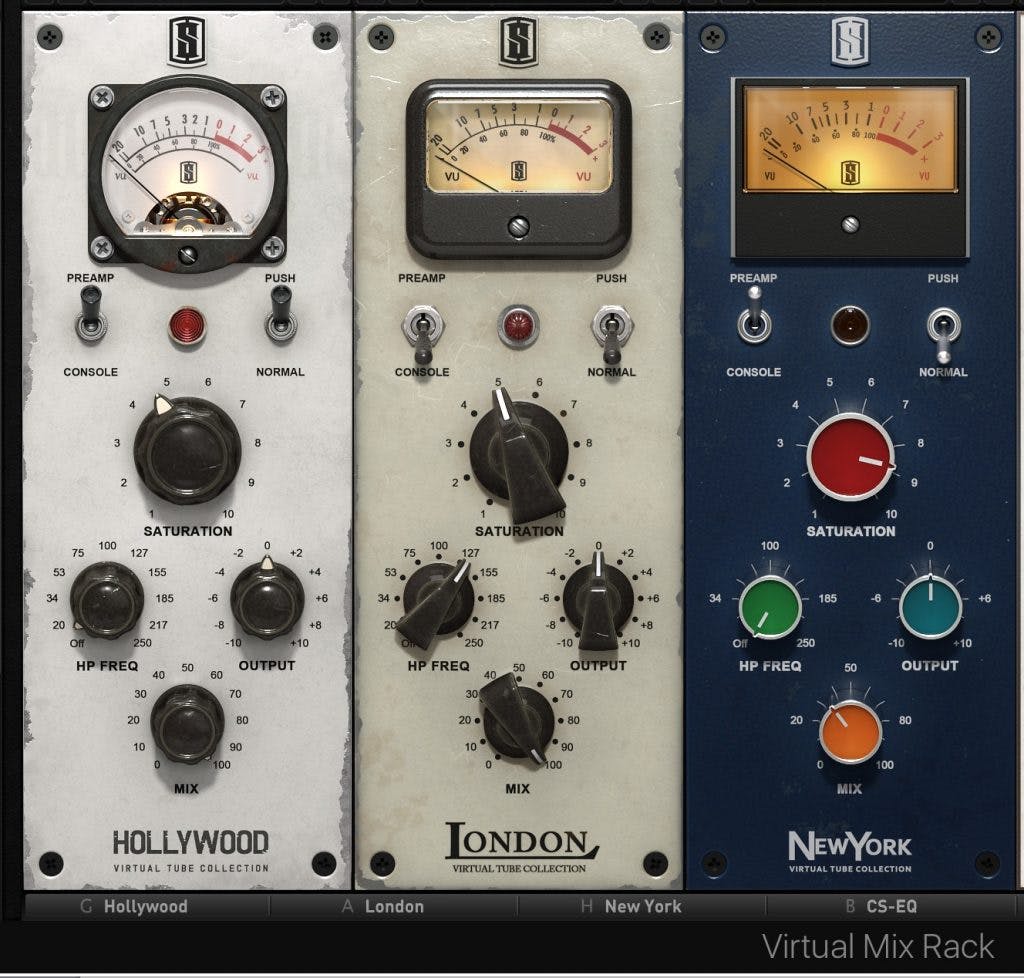
These days the holy grail of “in the box” mixing is the ability to emulate analog circuit components and characteristics. Specifically, console inputs, tubes, transformers, tape machines, and tape saturation, are emulated to add harmonic distortion, phasing, crosstalk, and other hardware-based anomalies. These can range from subtle and barely noticeable to exaggerated and too extreme.
With some gentle Master Bus compression in place, I am an advocate of deviating from the top-down dogma and starting off the signal flow on each channel strip or subgroup with a subtle amount of analog emulation. An accumulation of subtle differences results in a not so subtle difference to the track overall. In other words, a little, compounded across most if not all tracks and/or subgroups, goes a long way.
Single purpose plug-ins like this need to be simple to use. Too many options make it too easy to overcook the effect before it is fed into more processing downstream. I find myself often turning to the Hollywood, London, & New York preamp emulations included in the Slate Virtual Mix Rack. It’s simple to dial in the right amount without overdoing it. The inclusion of a Mix knob is a nice bonus that allows for a wider range of color by pushing the saturation and resultant harmonic distortion and then dialing only some of it in. As an added bonus, you get an expandable channel strip-style mix rack in place for further effects processing.
Softube’s Tape emulates three different tape machines, and you don’t need to go any further than the amount knob to dial in some nice thick and fat tape saturation to your tracks. McDSP’s AC 101 and AC 202 are also trusty and faithful analog circuit emulations with control over frequency bumps, compression effects, and more.
If you don’t own any of these analog emulation plug-ins, chances are that you have either compressor, EQ, or channel strip plug-ins that emulate the transformer characteristics of the hardware they model. For example, most Pultech, Neve, SSL, and 1176 emulations have input and output stages that can be controlled independently. Often, just running the signal through them at an optimal level (easily controlled by the input, output, and sometimes drive stages) without any of the actual processing functions enabled, yields similar results.
Whichever you choose, a little analog modeling on each channel goes a long way. At this point, with some analog modeling and mix bus compression in place, make sure to listen through to your song again with all tracks playing. You may find you need to subtly re-adjust some of the fader levels. That’s fine; we’re still in the “big picture” phase of the mix at this point. The compression and analog modeling should add a nice thick cohesiveness to all the individual elements. Your mix will start sounding like a summed unified “whole” at this point, rather than simply multiple individual tracks playing back at the same time.
Recomended articles:


