Part 1 of this series on mastering compression covered the traditional application of transparent compression. That type of compression produces the “glue” effect that makes music feel a bit more cohesive, dense, and more detailed. This article will present multiband compression techniques, which can range from transparent to extremely aggressive. Mid-side compressors deserve their own article, so that will be covered in part III. While I don’t consider multiband and mid-side processors to be my main mastering tools, I do use them frequently to solve problems during mastering.
Inherent Danger
Before getting into using these processors, let’s discuss the dangers of multiband devices. Multiband processors, by definition, must separate a mix into more than one frequency band, process the audio, and then reassemble the individual bands back into one signal. This process is never completely transparent and may add distortion and other artifacts that change the sound or feel of a mix, even with no compression or adjustments applied. Listen specifically for these changes and audition more than one brand and model of multiband processor to find one or more that suit your particular taste and needs.
Another, perhaps more important danger to consider is that multiband processing is capable of producing extreme changes to a mix. As always, the Peter Parker (Spider-Man) principle applies: “With great power comes great responsibility.” I know more than one mastering engineer who shies away from multiband processors because their clients have rejected masters that were too different from their original mix. Solve problems, don’t create new ones!
Reasons for Using Multiband Dynamics
So, knowing that there is danger in using this type of advanced signal processing for mastering, why would we use it at all? We can sometimes enhance a mix with these processors in a way that outweighs the distortions that are caused. Multiband compressors can help with problems that happen only occasionally during a song, like certain bass notes that poke out, or extreme problems that occur in a very specific frequency range like harsh high-frequencies.
Additionally, some genres, like EDM, attain part of their overall sound from extreme processing that is only possible from these multiband processors. In this article, we will cover the typical uses of these processors as they are used for mastering, not production, but feel free to extend the applications discussed here to your productions and mixes.
Let’s take a look at some typical problems encountered during mastering and how multiband, and mid-side processors can solve the problems. Here are some of these typical situations:
- A mix where the kick (or low-end) causes a bus compressor to over-compress
- An excellent mix where the vocal is simply too loud
- An excellent mix where the bass is too loud
- An excellent mix with some slight sibilance problems or harsh moments
The Kick or Low-End is Driving the Compressor
Often in dance or club genres, we want to slightly compress the song, but the pounding low-end drives the compressor over the threshold, causing the whole mix to dip in level with every kick drum hit. As mentioned in part I of this article, a common method to deal with this is to use a high-pass filter in the sidechain, or detector circuit of the compressor. The high-pass sidechain filter removes the low-end from the signal that the compressor’s analyzer, or brain, so that the compressor reacts more to the mid- and high-frequency content instead of the bass. Then we can get a smoother compression effect.
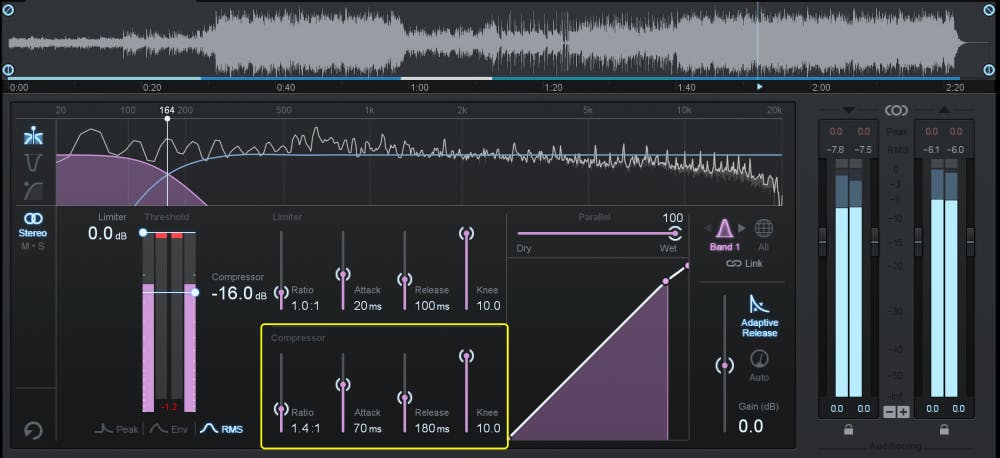
Instead of a sidechain filter, we could approach this problem with a 2-band compressor. Multiband compressors often allow you to turn off or delete unused bands and I would use a plugin like Izotope’s Ozone 9 Dynamics and set it for two bands of compression. One compressor to control the low frequencies, probably under 150Hz, and one compressor for the rest of the track. First, I would set both compressors to the same ratio (around 1.3:1), attack (70 – 100 ms), and release (100ms). Then I would leave the low-frequency threshold at maximum and lower the threshold on the higher band until I achieve about 2 dB of compression. I may decide to use a very slight compression on the low-band as well, and you could adjust that to taste. Just be careful that the attack time is not too fast to let the punch of the kick drum through.
Any release time from 75msec up to even 250msec could work well for the low band, just listen to see if you are changing the “pump” of the track to sound more or less aggressive. With only 1 to 2dB of gain reduction, you probably won’t notice a significant difference in release times, but with 4dB or more, you will certainly notice changes. The same can be said for attack times. With low ratios and only a couple dB of gain reduction, the attack time may not matter that much, but if you start getting into 4dB or more of compression, you should audition attack times that are slightly faster or slower to find the ideal setting. For setting attack time, listen for the punch of the drums to see if you are affecting their impact. Be wary of times below 40 milliseconds for sure!
The Vocal or Lead Instrument is too Loud
I find this to be one of the most common problems with the songs I am sent to master. Unfortunately, a lead vocal covers so much of the frequency spectrum that treating the vocal will inevitably affect many other elements of the mix. It is almost always best to try to get a new mix of the song with a more appropriate vocal level, but sometimes that is not possible and sometimes the vocal only needs to be moderately finessed to polish an otherwise good mix.
In the case of only needing to tuck a vocal back into a mix, a similar method to the example above is appropriate. This time, use a three-band compressor with the middle band set to cover from about 250Hz up to about 5kHz. Start with a low ratio (1.5:1), a moderate attack (30-50ms), and a moderate release (100-200ms). Then set the threshold so that when the singer is loud, the compressor pulls 2 to 3 dB of compression and when the singer is soft, 1dB or less of gain reduction takes place. You may have to play with the ratio and threshold to achieve this effect.
With very low ratios (under 1.5:1) you can also probably get away with faster attack times that will even more aggressively push the vocal back into the mix, but be careful that your fast attack isn’t killing the punch of the snare drum or other rhythm instruments. By leaving the low-end uncompressed, the overall power of the mix is retained and the mid-band compression is often not very noticeable. The low-frequency band can still be used to control the bass and the high band may also be useful to control sibilance, as described later in this article.
The Kick or Low-End is Overwhelming the Mix
If you find that you can’t get enough level out of your master before it distorts or if the vocal just won’t pop through, the mix may simply have too much low-end. Sometimes multiband compression works better than EQ to treat this problem. Set up a two-band compressor, but this time set the high-band compressor’s threshold to maximum (no compression) and then work on the compressor for the low-band.
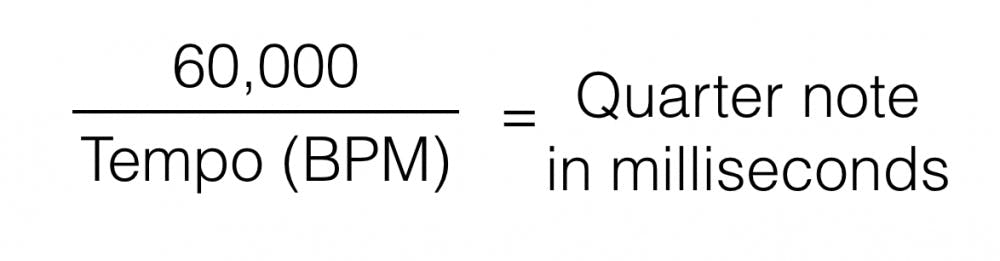
For mid-tempo trap songs with long 808-type bass notes, you may extend your release time to 250 milliseconds or more. A quarter note at 70 beats-per-minute is 857 milliseconds, so try that and then cut it in half and then in half again until the compressor releases in a musical way. When the compression releases in time with the track, it can enhance the groove of the song.
Tempo based compression
Some mixers and mastering engineers may want to match the release time of a compressor to the tempo of the track, especially when using extreme amounts of compression to strongly affect the groove of a track. Here is how to find the release time based on the tempo.
First, figure out the tempo of the song by using an app like BeatMirror or BPM or a desktop app like MixMeister BPM Analyzer.
Next, get out your calculator and divide 60,000 by the tempo to get a quarter note value in milliseconds. So, for a tempo of 70 BPM:

Hot Notes in a Mix
Occasionally, I get a song to master, often an acoustic track, where one note on the bass, acoustic guitar, or piano really pops out. Perhaps it was a setup problem with the instrument or a resonant frequency in the live room or just a problem that occurred from some sloppy mix processing. Setup a multiband compressor with three bands. Leave two bands bypassed and tune the middle band to catch the resonant note. Oftentimes this note is an open string on a guitar or bass, so learning what key the song is in can help locate the offending note and its frequency. Alternatively, soloing one band on the multiband compressor can help you tune in the appropriate frequency range. A narrow frequency band for the active compressor is probably appropriate for this case.
Once the note or frequency range has been determined, the compressor can be set with a medium attack time, probably between 20 and 50 milliseconds and a moderately slow release time between 50 and 250 milliseconds. Start with a ratio around 4:1 and set the threshold to react only when the hot note hits. Once the compressor is working, play with the attack, release, and ratio for an effective and unobtrusive reduction of that note. Sit back and listen carefully for any reduction in volume of other elements in the same frequency range, like a drum or lead melody that you may not have been paying attention to while you dialed in the compressor.
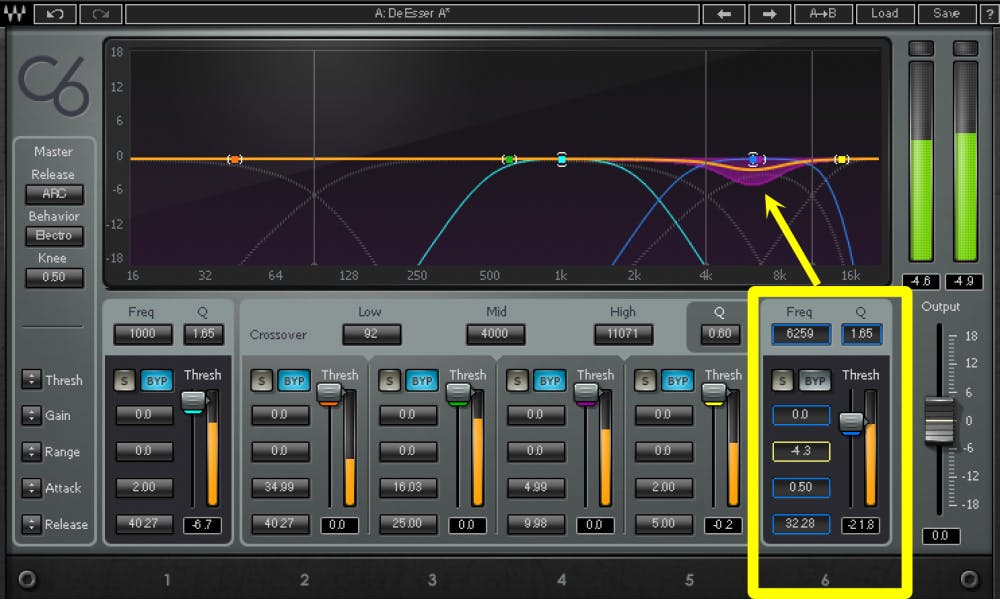
Sibilance or Harshness in a Mix
This problem is similar to the low-frequency problem, but obviously in the high frequencies. Set up a two- or even three-band compressor. Next, bypass the lowest and highest bands and set the middle band to the frequency range you wish to affect, probably somewhere between 2kHz and 8kHz. For sibilance problems, we want to use fast attack and release times so the compressor kicks quickly in and out. Start with <1 to 5ms attack time and the release time to around 25ms. Start with a high ratio, perhaps even 10:1, and set the threshold so that you only catch the harsh peaks. You can fine-tune the times and ratio to suit your need and if you see compression to often, definitely try a lower ratio for more transparency. If the compressor causes audible distortion, try a longer release time.
Remember to bypass the bands you are not using so they are not affecting the rest of your mix and solo the band that you are focusing on in order to fine-tune the bandwidth of that compressor band. If you need low-frequency control and also de-harshing/de-essing, you can use a 4-band compressor and engage the lowest band and one of the high bands, but not the mid-band or other high-band. This is a situation where you can get into trouble by tearing apart the original frequency balance of the mix. Be very careful and A-B often to make sure you are not changing things about the mix that you don’t intend to change.
Is Multiband Compression an EQ?
This is a grey area. A multiband compressor certainly affects the volume of different frequency ranges, so it sort of acts like an EQ. Multiband compressors also have individual gain adjustments for each band so, again, it does have unique band-shelf EQ abilities. However, a multiband compressor separates the signal into several bands so that it can process them individually. This process is very different than an EQ process, so choose your weapons wisely. In another article, we will cover dynamic equalizers, which I consider the nicer sister to multiband compressors.
Where and When to use Multiband
Mastering is an art as much as a science and every artist develops their own creative techniques. I lean towards transparent mastering as a style and philosophy, so most of the time I don’t find multiband necessary. If I have a problem like the ones discussed above, I have no problem popping in a multiband compressor to see if it’s the right tool for the job. Also, for electronic or experimental genres, I’m more apt to try a multiband compressor to see if I can further enhance a certain aspect of the mix. These genres often require extreme processing and even multiple layers of extreme processing in order to sound “correct.”
Multiband compressors may have many more parameters than you are used to, so read the manual, check out presets, and ask your peers how they use these processors in their productions and masters. Use and trust your ears, but beware of the possible pitfalls of multiband compression.