Mixing requires a creative sensitivity to a musical message, a technical knowledge of signal processing, and confidence to make decisions. Mixing is also a battle against time. If we spend too much time on the little things (finding tracks and assigning routing) we can easily lose sight of the big things (the sound of the mix)—that’s what we mean by “Don’t miss the forest for the trees.” A few key setup decisions made before we start a mix will provide a foundation that allows us to quickly and effectively build a mix without painting ourselves into a corner.
Organization
Mixing and mastering are my main sources of income, so an efficient workflow saves hours of time each week and allows me to get more work done or have more free time outside of work. Mixing styles are personal but we all develop our own well-defined workflow, so we should make organizing our mixing sessions the first part of our process. Organization is not a shortcut for creativity, but it will help us get to the finish faster. Consistent organization also allows for easy revisions in the future. Should you have to reopen an old session, it should immediately make sense and be easy to navigate.
File Formats
Let’s assume you receive audio files from a client or collaborator—not a DAW session, but it’s common to receive a folder of audio files. The very first thing I want to know is the sample rate of the files. I always work in 32-bit float mix sessions, but I need to know is the sample rate before creating a new project. On a Mac or PC, you can simply right-click on an audio file and select “Get Info” or “Properties” to inspect the file’s sample rate, bit depth, and even if it’s stereo or mono. If for some reason, you receive files at more than one sample rate, you should keep the session at the higher sample rate and let the DAW convert the lower sample rate files when you import them.
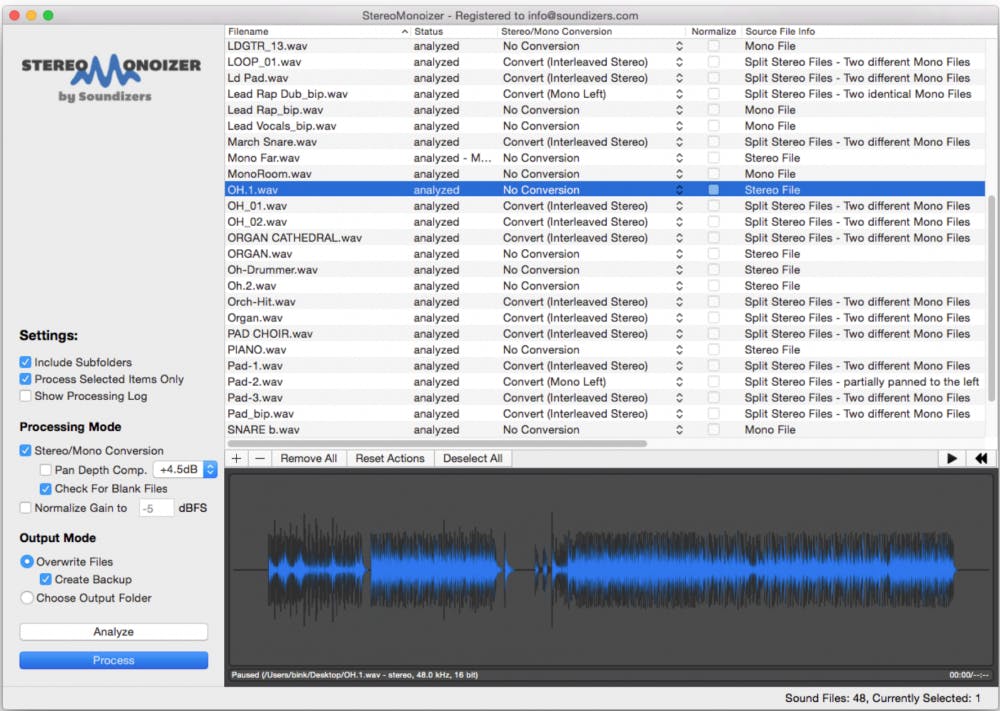
I receive lots of files in the form of stems that have been batch exported from various DAWs and often the files are all delivered as stereo files, even though the original track was mono. I would rather keep mono files mono and stereo files stereo to save on DSP resources and to simplify panning. I use the inexpensive Stereo Monoizer application (Mac/WIn) from Soundizers, which quickly analyzes an entire folder of audio files and determines if the files should remain stereo or be converted to mono. After you approve the analysis, the program exports files that are ready for you to import. This step saves tons of time when setting up a new session.
Contemplating Templates
You may choose to start your new session from a template that contains the mix elements, like bussing and effects, that you may need for your current project. Creating templates is a process unto itself and we provide useful template ideas in this blog post. Regardless of whether I’m starting from a template or a blank project, I import the supplied audio files into a session that I’ve named and saved to my primary work drive. You aren’t still creating sessions on your system drive, are you? I name this session SongName_Mix_Setup. After I’ve completed the setup, I’ll rename the session SongName_Mix_1. I make sure that the DAW copies the files when it imports them so that any audio in the session is actually in the session’s Audio Files folder on my work drive. I only throw away the original files from the client after I have verified that the session plays and I have imported all the tracks I need.
Names
My next step is to rename the audio tracks in the DAW with a concise name. Most DAWs only display a few characters, especially when in narrow view mode, so try to use as few characters as you can get away with. For example, I may receive a file with the name TDP_ElecPiano_Greg.03. I will copy and paste that name to the comment window of the audio track and rename the track E.Pno. I can always refer to the comments field if I need to know the original file name, like when speaking with the client about the tracks.
Layout
My next move is to organize the tracks by instrument type. I always use a similar track order, no matter if I’m programming, tracking, or mixing. This way I can always zoom to the area where a track I’m hunting for is located. My track order looks something like this:
| Monitor and Master Fader | Reference Mix | Print Track | Drums/Percussion | Bass | Ac Guitar | El Guitar | Keyboards | Pad Synths | Sound Effects | Strings and Horns | Solo Instruments | Lead Vocals | Backing Vocals | Printed Vocal Effects | Effect Returns |
The tracks are organized by instrument/bus type and color-coded and you may even organize the tracks in each category the same way every mix. This makes it easy to find elements and also allows all of one category of instrument to be on screen at one time. It also generally reflects how I build my mix, from the drums up.
Nothing we’ve done so far will affect the quality of your mix, but keeping organized like this will free your mind from the clutter of a disorganized session. Now let’s get started with the actual audio setup.
Routing Strategies
Two basic approaches define your mixing style: top-down mixing or bottom-up mixing. There are advantages and disadvantages to both approaches and you should read our blog post about the lesser-known style of top-down mixing to see if it might inspire you. Whichever style you choose, the routing setup should be similar and you will likely develop your own variation of this routing scheme.
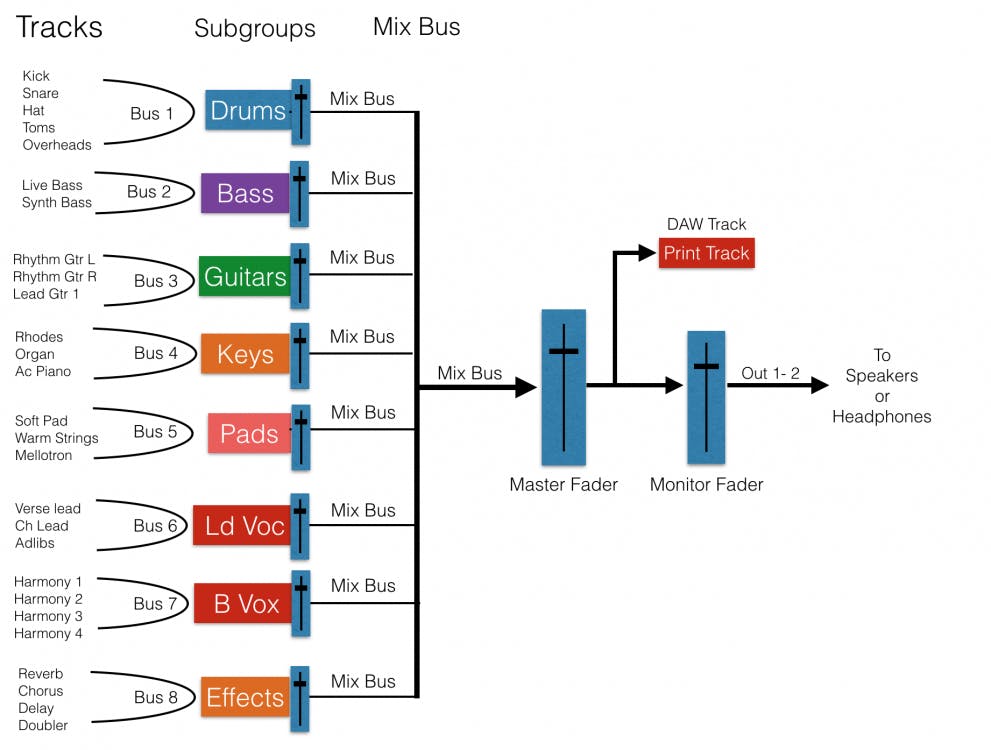
Every session should have a master fader that controls the entire mix and allows you to put processing on the entire mix. I also like to have a separate monitor fader, which can be set up in any DAW. For instance, we have articles about setting this kind of mix and monitor routing in Logic. I also like to create subgroup channels for each instrument group. I usually place the subgroup fader for each group of instruments to the left of all the instruments in that particular group, but you can place them wherever makes sense for your workflow.
My mix routing signal flow would look like the image below. Feel free to add or remove any routing from this, but this is a good basic starting point. Any reference songs in the session would be routed to Out 1-2 so they don’t pass through the master fader.
Ready, Set, Mix!
All this setup may seem like a chore, but it goes quickly and you can even create a template with all the subgroups, effects, and master fader in place. Just open the template, import the audio files, label the tracks, and assign the outputs. The whole setup process takes just a few minutes, and I usually listen to the rough mix and some reference mixes while I set up the session. You can learn a lot more about how to take advantage of subgroups in this blog post.
Once you become accustomed to all this organizing, you’ll find it improves the workflow of the creative mixing process. The less “math” you have to do during a mix to assign routings or locate tracks, the more mind-share you can spend on just mixing. Additionally, I find with this routing setup, I rarely ever touch my monitor controller, as my monitor volume can be quickly adjusted from within my session. Keep these tips in mind and review the articles listed below to get yourself on the way to mixing like a pro!


