
Most DAWs default to routing channels in your mixer directly to a physical/monitor output. This is a simple signal flow that generally works well, but there are advantages to mixing through a master subgroup bus before it reaches the final stereo output. These techniques are representative of the workflow in Logic Pro, but can easily be applied to any DAW.
Easy Summing to Mono to Check Mono Compatibility
It is common practice to incorporate some stereo mix bus processing on the full mix during the mixing process. This is easily done in most DAWs by inserting effects processors on the stereo output channel. What isn’t always easy, however, is momentarily switching between stereo and mono on the final output. A few DAWs, like Cubase Pro and some consoles, like UAD’s Console and some monitor controllers provide for a mono monitor function. Most DAWs do not have convenient built-in studio monitor functions, so we will cover that situation here.
Checking your mix in mono can be an important step of mixing. We hear the term “mono compatibility” often, which means that the mix should sound basically the same in mono as in stereo. A mix will always sound somewhat different in mono, but we don’t want the important instruments or vocals to disappear or weaken too much. Certain effects or stereo processing, like chorus, phasing, flanging, doubling, and stereo imagers can cause certain sounds or frequencies to disappear when the mix is folded down from stereo to mono.
The best way to check for proper mono compatibility is to occasionally toggle your mix back and forth between mono and stereo during the mixing process. The ability to do this easily ensures you don’t get too deep into your mix before realizing there may be problems you need to fix.
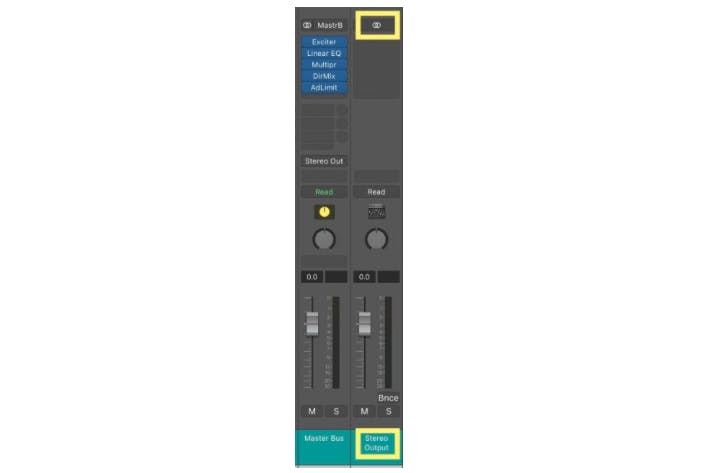
In Logic Pro X, the “Stereo Output” fader is the final output fader, but you should also create a stereo mix bus with a stereo Aux Channel. If you aren’t sure how to do this, we have an article about it. By routing your mix to a dedicated mix bus you can insert your mix processing there and then simply toggle your “Stereo Output” fader between stereo and mono. This way, all your stereo processing is included in the “mono testing” when toggling between mono and stereo. Pro Tools and other DAW users should review this article for more info on setting up mix busses.
Better Gain Staging Into Your Mix Bus Processing
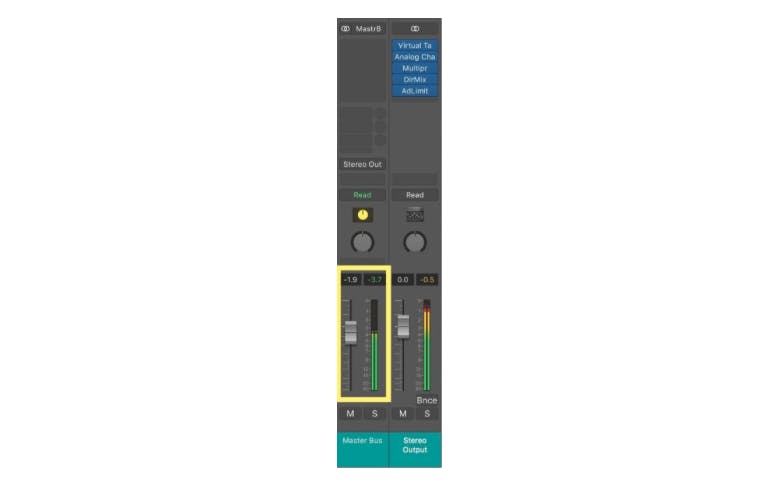
Let’s assume you have a way to check your mix in mono. Let’s also assume you are inserting your mix bus processing on your Stereo Output fader (Logic) or Master Fader (Pro Tools). It can still be beneficial to have a fader that controls the overall level arriving at this Stereo Output or Master Fader. The idea here is that we can control how hard we hit the mix bus processors.
Some plug-ins, (like vintage compressors and tape modeling plug-ins, emulate analog circuitry, including their reaction to input and output levels. This means that if you send more level into a vintage tape machine plugin, it will saturate more than if you send less level into it. You can see (hear) why it is important to have control over the level of the signal that reaches the first plug-in in your final effects chain.
Routing to a mix bus before this processing stage allows you to easily control the level being sent to the first plug-in on the final stereo output channel. Sure, you could simply place a gain-type plug-in in the first slot of your stereo output channel strip to attenuate (or boost) the gain there. But the mix bus approach allows you to visually monitor your full mix levels as you work. Savvy Pro Tools users may know that a Master Fader in Pro Tools already controls the level *before* the plugins, but the procedure described here may still simplify your workflow.
Parallel Process the Entire Mix
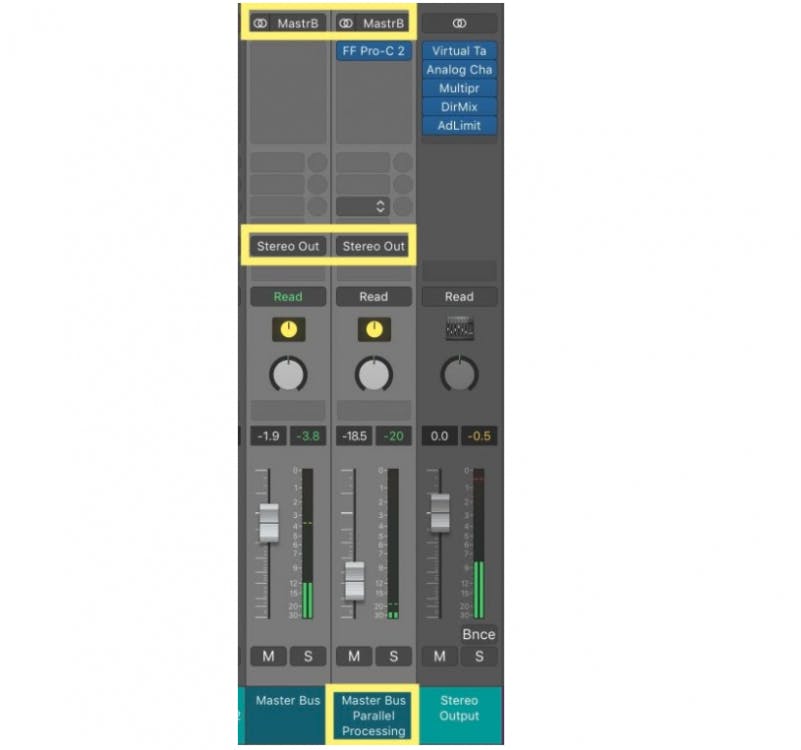
Parallel processing is a great technique that works not only on instrumental or vocal subgroups but in many cases on the full mix. The basic idea is that you create a duplicate audio signal running alongside the original, which you enhance in some way, and then blend in with the original unenhanced signal. Parallel processing can be set up with a send or with duplicate audio tracks or duplicate bus input channels.
When parallel processing the full mix using a master bus one method is to create a send on the master bus, route it to another bus/ aux channel, and then output both the mix bus channel and the parallel mix bus channel to the final stereo output. Another, perhaps simpler method is to create two separate aux channel strips, each set up to receive the mix bus signal as their inputs, and route the output of each to the main stereo output.
Either way, the result is a duplicate audio stream that can be processed and blended with the original mix. For parallel processing a mix bus, you might apply some aggressive FET-style compression to the duplicate signal and then blend only a small amount in with the unprocessed master bus signal to enhance the attack and transients of the percussive elements in the mix. Or you might enhance only the high end of the frequency range on the parallel signal, and blend that in to add some weight and presence to the top end of the mix. Even slight saturation may work well on the parallel mix.
Processing the Entire Mix Except For Specific Tracks
There are times where processing the entire mix may be less effective leaving one or more elements out of the final mix bus processing. It is often helpful to omit the drums from mix bus compression. This way, the powerful kick and sharp snare transients will not trigger the mix compressor. The compressor will instead react to the other elements in the mix, without over-compressing due to the kick and snare peaks.
Another useful scenario is when mixing a music bed track with a voiceover. By routing the voiceover directly to the stereo output, and the music bed elements to a mix bus, only the music will be processed on the mix bus. This is actually just an extremely simple use of subgroups that works well in Logic Pro. In other DAWs, you may use one stereo subgroup for your music elements, a second subgroup for your voiceover, and then combine those subgroups into your final mix bus.
Rerouting the Mix to Alternate Outputs
It is good practice to check your mixes on alternate sets of monitors as you are working. A common scenario is to have a multi-output audio interface with each pair of outputs feeding different sets of monitors. By routing the entire mix to a mix bus in your DAW, it is possible to create several aux channel strips that receive this same mix bus signal. Set the outputs of each channel strip receiving the mix bus signal to send to different outputs on your audio interface, each of which feeds a different pair of monitors or headphones. Mute/unmute them as needed to route the mix through the different outputs.
This is particularly useful if you are using monitor calibration software like Sonarworks Reference 4. You can set up a unique calibration profile for each set of monitors and place them on the corresponding master bus channel strip. For a refresher on implementing these monitor techniques, you can review this article.

External Processing of the Entire Mix
If you process your full mixes with outboard gear, routing to a master bus is invaluable. Route the output of the mix bus to the physical output on your audio interface that is connected to the input of your external processing. Return the signal from the output of the external processing unit back into your DAW on an aux channel strip routed directly to the stereo output. This routing method, like in case II, allows you to optimize the level that you send out to your outboard processor.
Monitoring a Reference Track
It is common practice to occasionally reference a commercial track during a mix. If the reference track is playing back from within your DAW, you don’t want the reference track to pass through your mix bus processing. If you route the entire mix minus the reference track to a mix bus, you can process your mix there, and still route the reference track directly to the stereo output of your DAW. This way your mix gets the intended bus processing, while the reference track does not.
These are just some of the many useful routing benefits available when summing your entire mix to a subgroup before the final output. For more information on routing in specific DAWs, check out our other blog posts:
Logic Audio: Rockstar Monitoring Techniques
Take Advantage of Busses and Subgroups for Great Sounding Mixes


