
As an artist or producer of audio we are blessed with the modern convenience of recording and producing music almost anywhere. We are no longer tethered to a recording facility with a huge analog console, dedicated live rooms and a brilliant mic collection. Wait! We like to record in great sounding studios with great gear! True, but most of us record where we can, when the inspiration strikes and this truly benefits our creative process. The problems of recording in our own spaces mostly have to do with recording unwanted noises along with our voice or instrument. Tiki Horea, a mixing and mastering engineer from Romania, and a frequent contributor to the Sonarworks Blog, has put together a two-part article that will help you deal with removing unwanted audio, as well as distortion and other artifacts from your music. While there are entire careers based around forensic audio repair, all engineers and producers will benefit from Tiki’s tips on removing unwanted sound from our recordings.
Part I of this topic focuses on continuous type noises and Part II highlights intermittent type noises. Also keep in mind that while this article discusses noises present in musical productions, many of the same problems and solutions apply to producing podcasts, audiobooks, movies and multimedia content. Let’s let Tiki take it from here… Adam Kagan – Ed.
We, as engineers, suffer from overanalyzing sound. In contrast, the average listener doesn’t have their aural magnifying glass out all the time. Consequently, noises that poke out to us may simply pass by most listeners without them even noticing anything wrong with the recording. Engineers hear a problem and try to fix it, but we must be aware that there is always a trade-off when applying noise reduction. Sometimes, completely removing the noise means leaving behind unpleasant artifacts and the best solution is simply leaving the noises alone. Other times, the best one can do is try to make the noises less obvious.
Tools of the trade
There are quite a few companies which make noise reduction software. Some focus on automatic cleanup of specific problems, while others cover many situations and require significant experience to master their processes. Here a list of just a few products available:
- Accusonus – ERA
- Antares – SoundSoap (yup, the Auto-Tune guys)
- iZotope – RX7 Bundle
- McDSP – NR800
- Sonnox – Restore Bundle
- Todd AO – Absentia DX
- Waves – Z-Noise, WNS Noise Suppressor, X-Noise, X-Crackle
- Zynaptiq – Zap Bundle, Repair Bundle
For this article, I’ll be focusing on a single tool, namely iZotope’s RX7. In my book, RX7 the best bang-for-the-buck around. Bear in mind, though, that this isn’t an iZotope RX tutorial. I strongly suggest you read the manual as it’ll shine a lot of light on how to best use the software.
Types of noises
Broadly speaking, there are two categories of noises that we would like to deal with, namely continuous and intermittent noises. Continuous noises are typically present throughout the whole program, but are usually more audible during quieter sections, such as the intro and the last few bars of the outro. Intermittent noises are typically short bursts of annoyance that may happen at any time during a program.
Repair
When dealing with a noisy recording, we generally attack the issues in a specific order, similar to peeling an onion. For example, clearing out one noise may reveal some other issue. Dealing with the clicks may let you hear the subtle crackling going on, et cetera.
Here’s a general processing order for noise reduction in mastering:
- Automatic declicking
- Manual declicking
- Removing plosives, thumps
- Decrackling
- Declipping (to remove digital distortion)
- Broadband noise reduction
Here are the types of noises that we will address and RX7’s suggested tool/module for each problem:
- Fret and string noise from guitars – Spectral Repair (Attenuate)
- Metronome bleed – De-bleed, Spectral Repair (Attenuate)
- Mic stand bumps – De-plosive, Spectral Repair (Attenuate)
- Squeaky chairs or jewelry jingling – Spectral Repair (Attenuate)
- Drumsticks clicks or cough while cymbals are ringing out – Spectral Repair (Attenuate or Replace)
- Mouth noises on vocal or dialog track – Mouth De-click
- Audio dropouts – Delete (for short gaps), Spectral Repair (Replace)
- Air conditioning hum – De-hum, Spectral De-noise / Voice De-noise
- Guitar amp or lighting buzz – De-hum, Spectral De-noise
- Preamp hiss – Spectral De-noise
Spectral editing
This is where it’s at if you want to do detailed, nigh invisible restoration work. Spectral editing provides a visual representation of audio and allows visual-based editing similar to image editing in Photoshop®, but for sound.
Below is RX7’s 3D representation of the audio where the horizontal axis represents TIME and the vertical axis shows FREQUENCY. The intensity of the colors represents AMPLITUDE. The large window displays the audio and the right side of the application lets us select a repair module to bring up its control window.
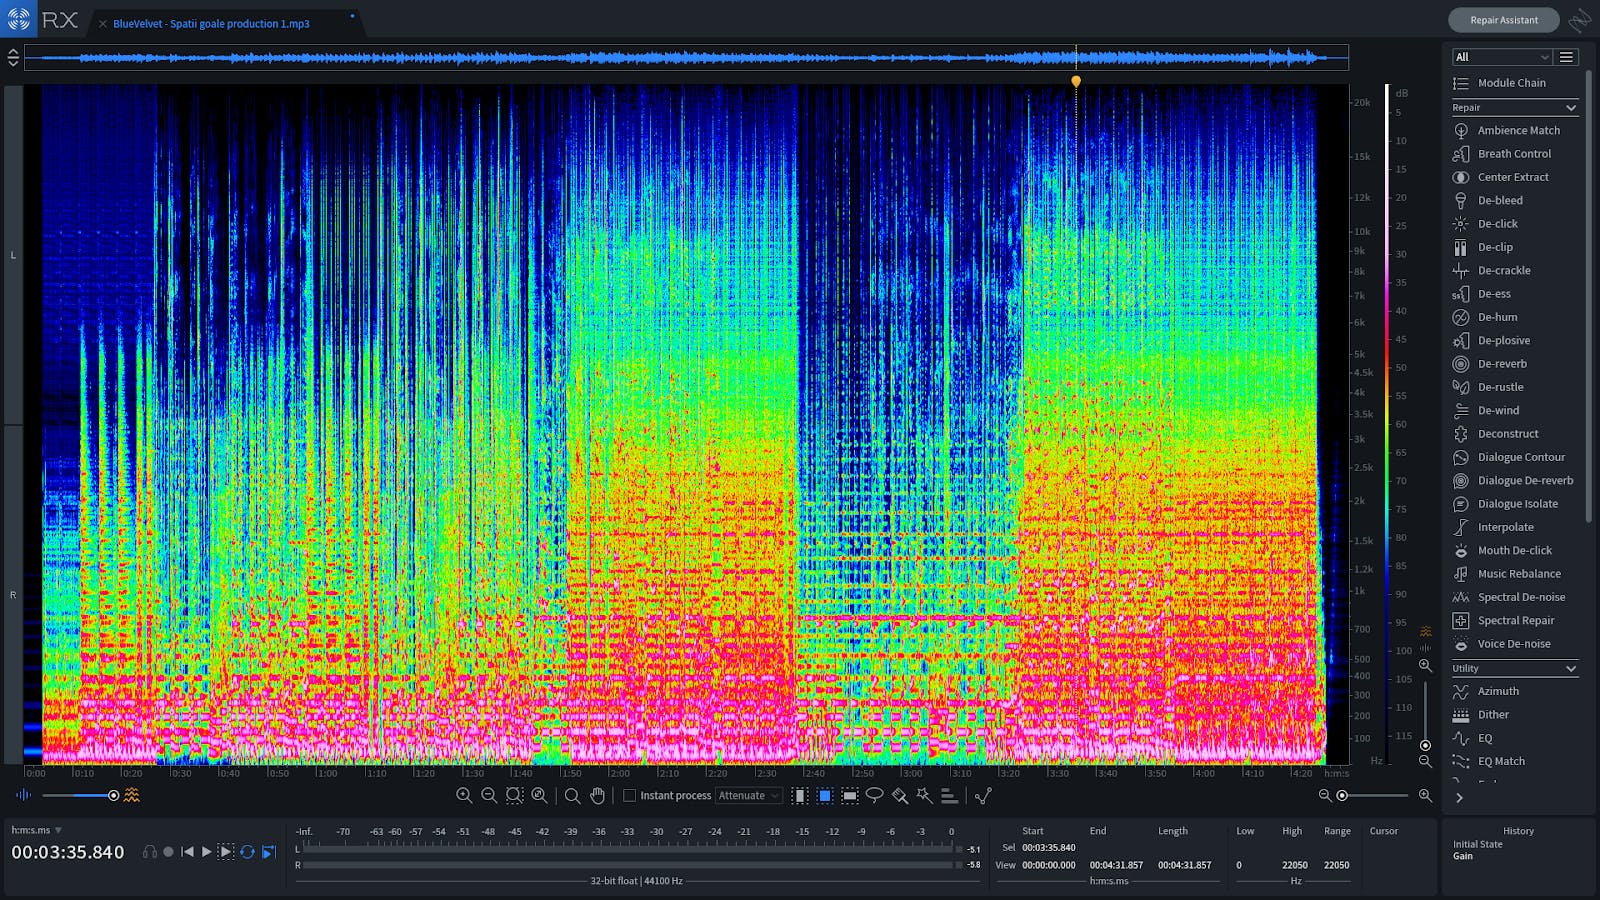
A typical audio editor window only lets you deal with time and, in a cumbersome manner, amplitude. A spectral editor lets you visually see and remove coughs, cat barks, dog meows, clicks, bumps, sneezes, and car horns. Depending on the tools you use and the severity of the problems, you can make noises disappear as if they never happened.
The Spectral Repair module
Before we dive deep into the different types of noises and how you might deal with them, let’s learn how to use the mighty Spectral Repair module. This is the backbone of RX. This tool alone is worth the price of admission for the standard version. For our purposes, we’ll only discuss the Attenuate and Replace modes.

Attenuate
You’ll want to use the Attenuate mode whenever noise is a fundamental part of the musical sound, like in the case of drum hits. It’s also good for when the undesired noise is not completely covering up the desired audio. Attenuate brings down the level of the noise you selected to where it disappears into the background sounds.
The Attenuate mode’s essential controls are:
- Strength – adjusts the amount of attenuation.
- Before/after weighting – this important control gives weight to the audio before or after your selection. Start with it set so that the before and after selections are each about the same size of your problem selection.
For example: If there is a click you want to attenuate and immediately after it there’s a snare drum hit, you’ll want to move the before/after weighting slider to the left. This will tell the module you want to use the data from before the click to interpolate the repair data, effectively ignoring the snare hit to the right.
- Direction of interpolation – lets you choose where the data used in the repair process is located in relation to your selection. The 3 direction modes are self-explanatory.
- Surrounding region length – allows you to define how much of the data around your selection will be used for interpolation.
Replace
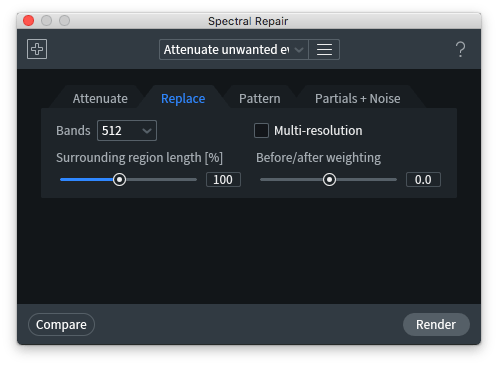
Replace mode replaces the selected missing audio region with data interpolated from the surrounding region. This mode is the one usually used to replace dropouts.
The Replace mode’s essential controls are:
- Before/after weighting – just as with the Attenuate mode, this is incredibly important; this control gives weight to the audio before or after your selection.
- Surrounding region length – allows you to define how much of the data around your selection will be used for interpolation.
Broadband noise
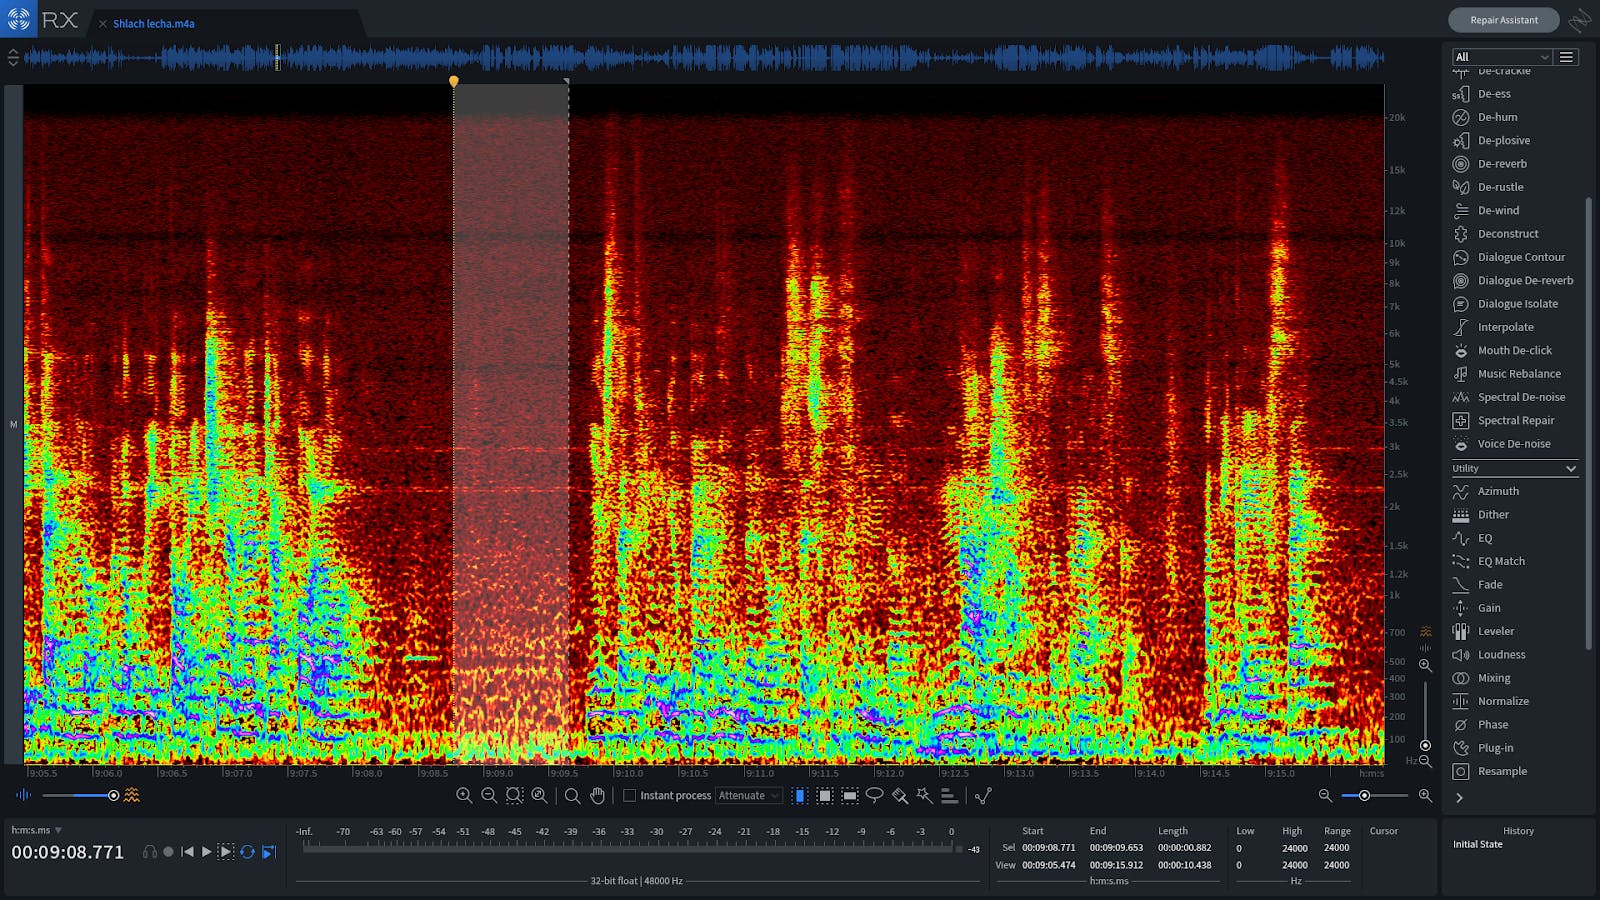
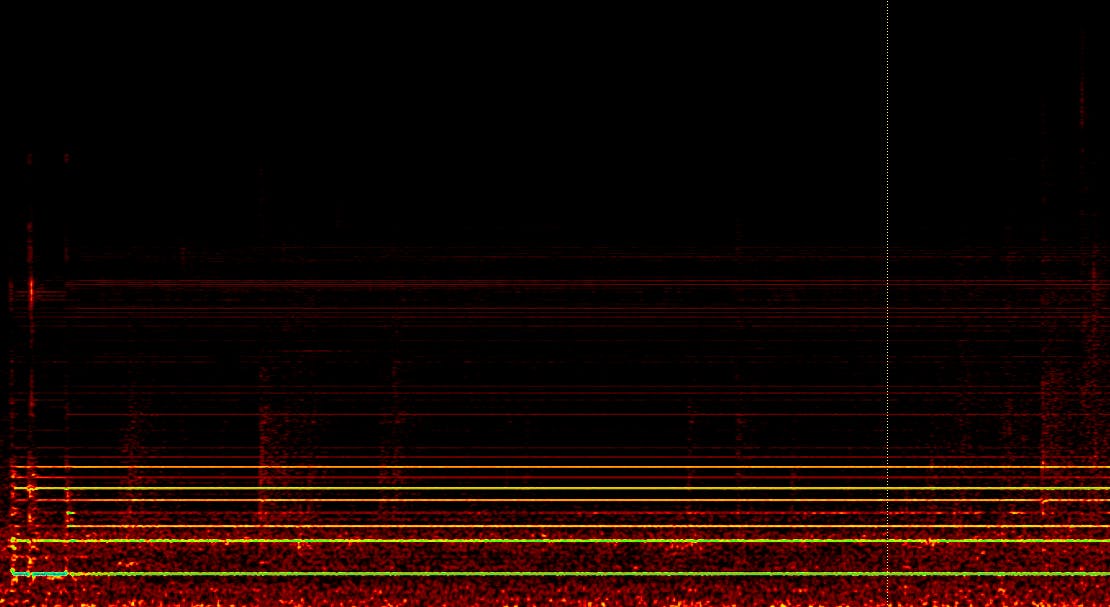
RX7 has two broadband noise reduction modules: one dedicated to denoising voices (Voice De-noise), and a second one meant for denoising everything else (Spectral De-noise). When dealing with anything other than vocals, you’ll want to use the Spectral De-noise module to capture a ‘fingerprint’ of the noise.
Look for a place that’s just the broadband noise, without any of the audio you desire to keep. A few seconds of noise should be enough for RX to use as a fingerprint. Following that, open the appropriate De-noise module. These screenshots are of a dialog audio clip, so the Voice De-Noise module is best suited for the job.
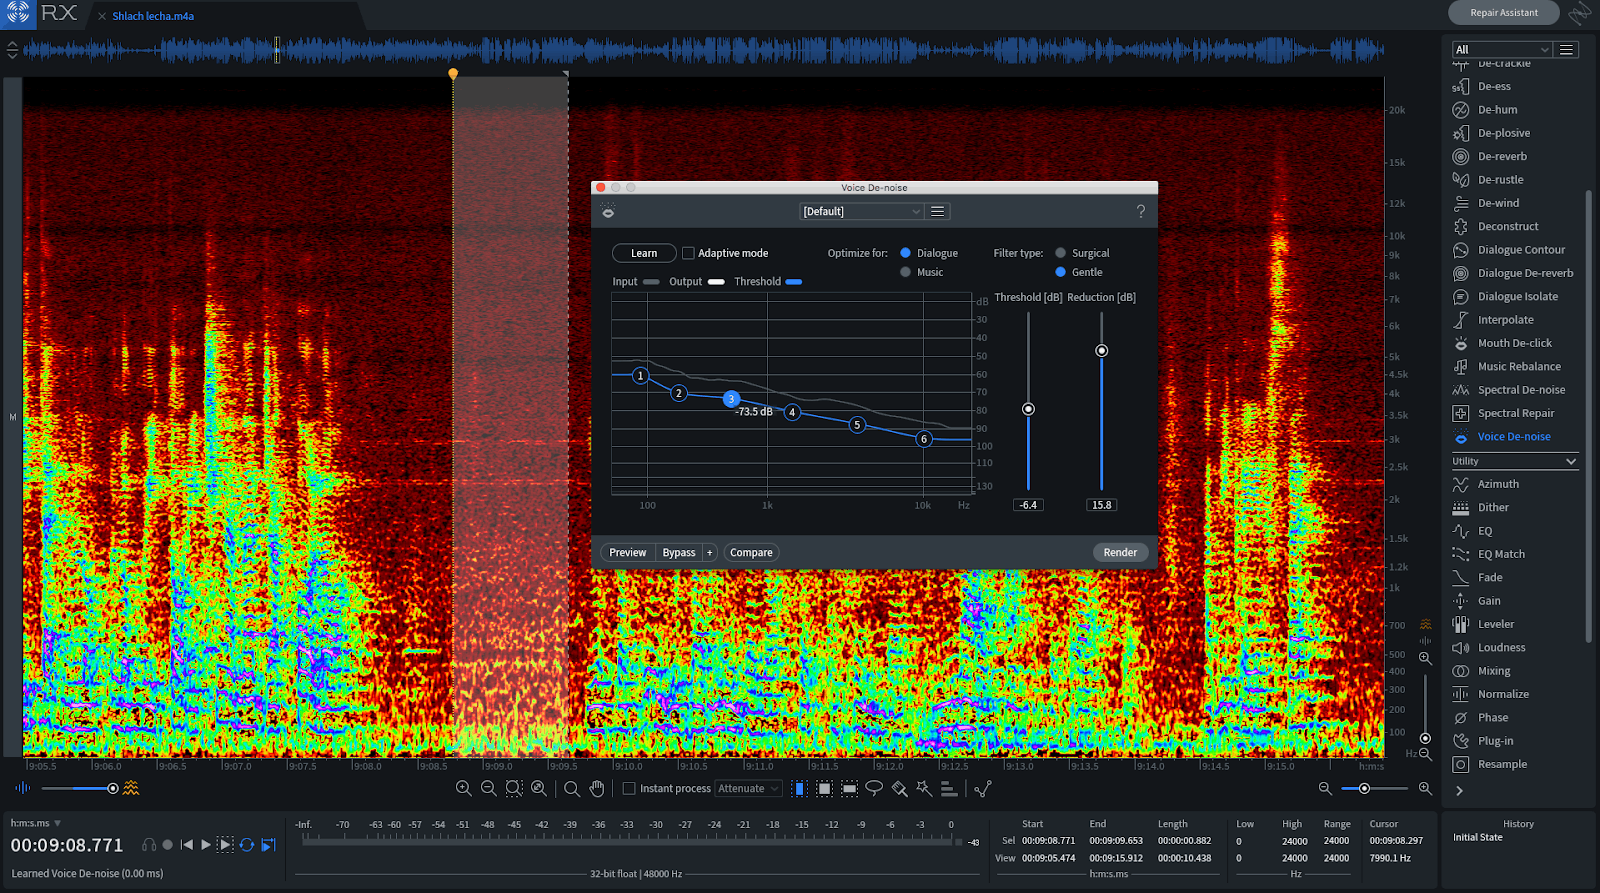
To remove the background noise select an area of only noise (selection shown above) and simply click the LEARN button, adjust the threshold and reduction sliders and you’re off to the races.
Be sure you check the sibilance (“S” sounds) of the vocal before and after the noise reduction. If the “S” is significantly weaker after the broadband noise reduction, then you are hearing that damage has been done to the high frequency content of the material you’re working on. Also check for any reverb tails or notes that should ring out to see if they have been affected by the noise reduction process. If you hear problems, simply readjust the threshold and reduction sliders and try again.
Buzz
The intro, the sweet, quiet, pensive bridge, or the very last second of a track can all fall victim to the obnoxiously loud guitar amp buzz.
The ideal way to deal with this during mastering is to ask the client for the isolated guitar track so you can get a clean noise fingerprint..
Failing that, you will hopefully find SOME unwanted buzz, by itself, somewhere during the song. Most likely the buzz can be heard at the very beginning or end of the recording. If the client added fade-ins and -outs, you’ll possibly have a hard time finding that noise-unicorn, but hey…don’t give up.
To remove buzz, simply follow the same steps for Spectral De-noise as in the section above. Try to only process the sections of the song where you can actually hear the buzz. Be sure that you can’t hear any artifacts of the noise reduction process or tonal differences between different sections of the song.
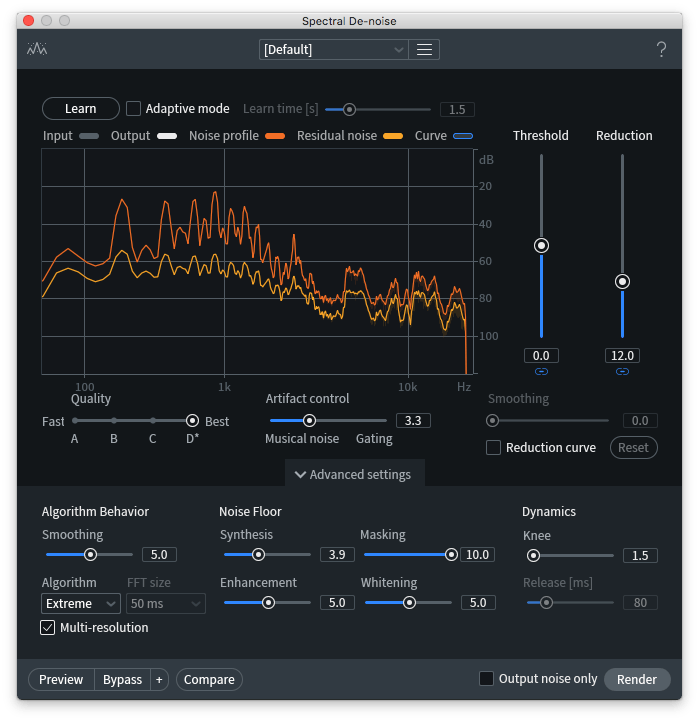
If the transients seem a bit dull or softer after processing, click on “Advanced Settings” and make sure the “Multi-resolution” box is ticked. If that doesn’t improve the results, try increasing the “Synthesis” value. That should do it. I find that the Adaptive mode doesn’t work well when working with music.
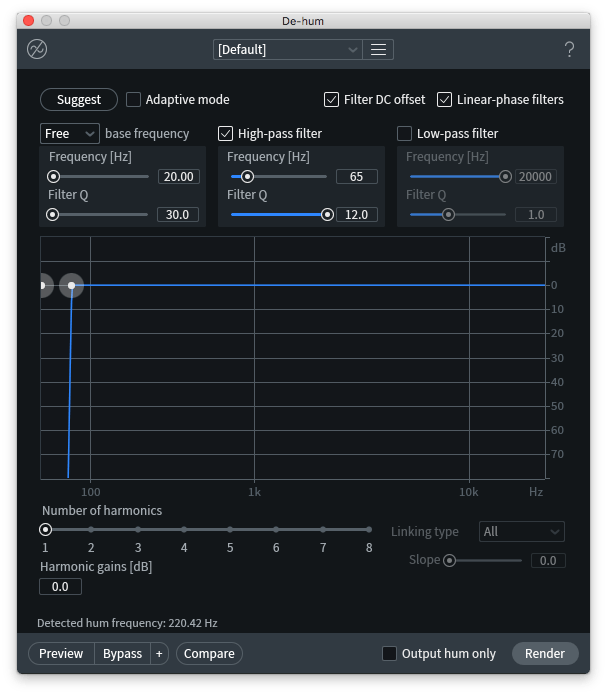
Hum
The two most common hum issues are caused by:
- Power line frequency hum (50Hz for most of the world, 60Hz for USA and Asia)
- Air conditioning units quietly humming away in while the singer is doing their thing
To see where the hum resides, right-click the numbers to the right of the spectrogram. In the “frequency scale” menu, choose “extended log”. You’ll usually see the hum somewhere under 70Hz (probably right around 50Hz or 60Hz), although harmonics of the hum frequency may also be present.
iZotope RX7’s effective De-hum module has a plethora of options for you to tweak, but you’ll most likely use the “Suggest” function when starting out. Select a bit of audio that contains only hum, click Suggest and you’re golden. Be careful that your selection does not include a sustained note or De-hum will think that note is part of the hum signature.
Alternatively, use the high pass filter to remove audio above the hum frequency. Make sure to check the “linear phase filters” box. Adjust the high pass filter’s frequency fader close to where your hum resides and press “Preview”. If needed, adjust the Q of the high pass filter so that it removes only as much as needed. Press Render and you’re done!
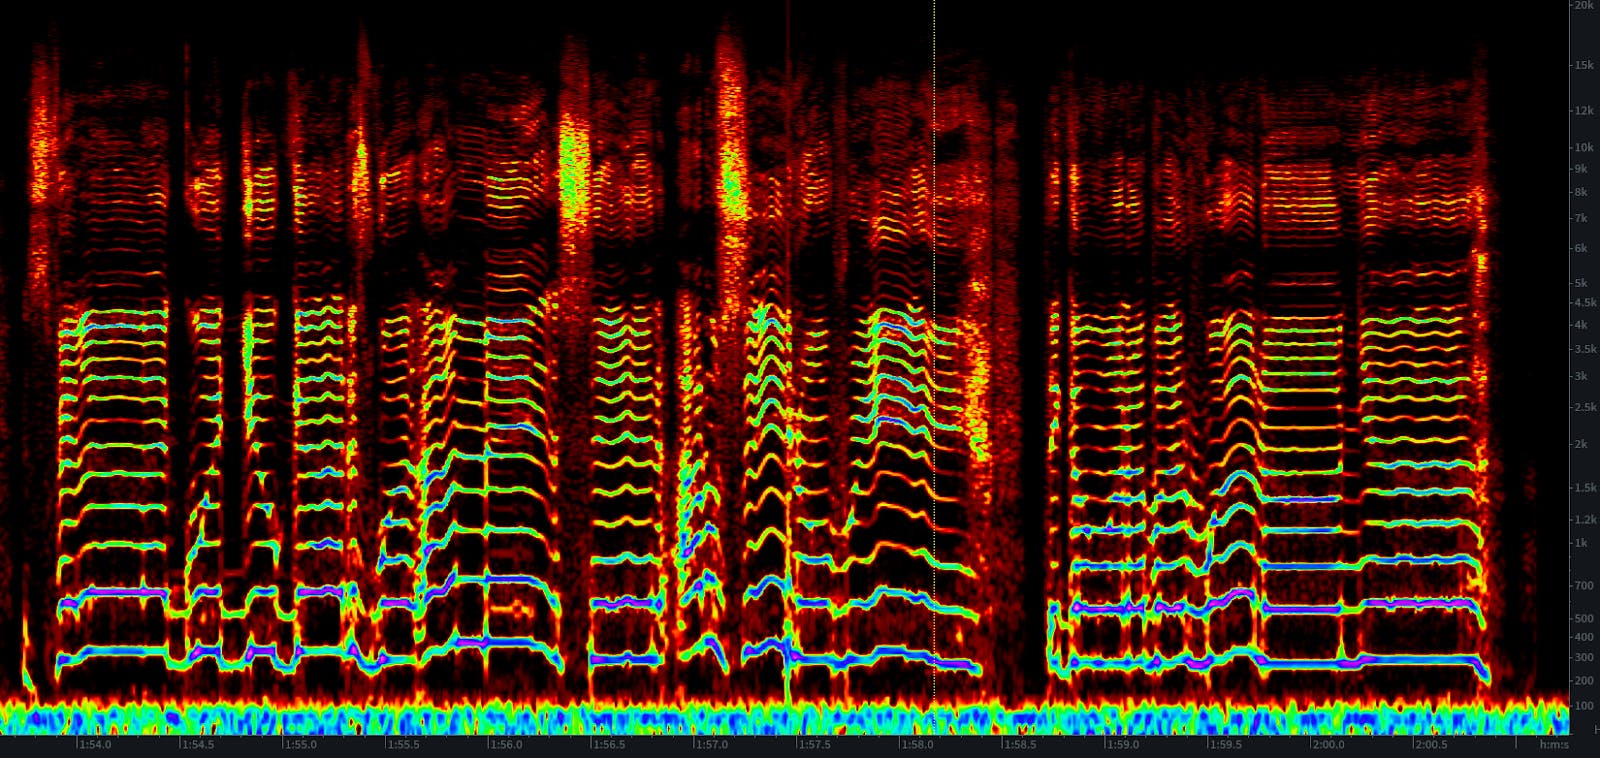
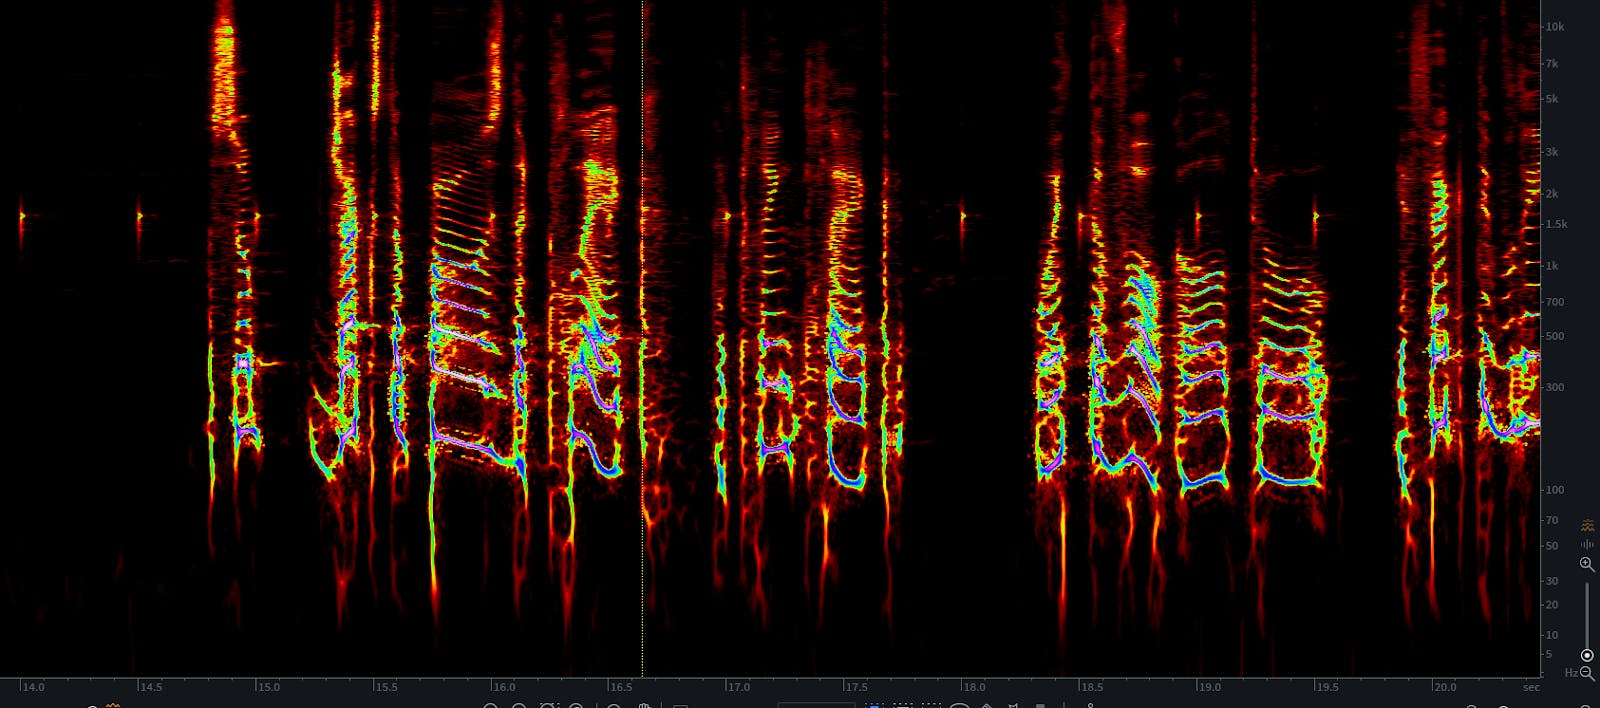
Bleed
Those little candle lights just above the middle of the image are a metronome bleeding into the microphone while the actor was recording dialog. As you can see, they’re present while he’s talking, not just between his lines. He’s got a deep voice and the click sits right on top of his voice.
The first line of defense (or offense, in this case) against bleed will be the De-bleed module, which is a bit more involved to use, so bear with me.
This module has to learn the bleed relationship between two tracks/files. The bleed source track contains ONLY the bleed audio. The active track has the bleed from the source track, as well as the audio you wish to keep.
- You need to open both tracks in the RX standalone application.
- Both files need to be at the same sample rate in order to be able to use De-bleed.
- The tracks need to be time aligned within a few ms of each other (Consolidate regions in your DAW before exporting to RX7).
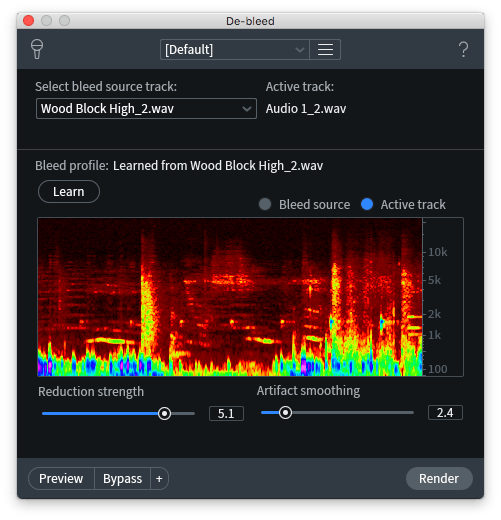
Here’s your workflow for RX7:
- Import both audio files/tracks.
- Open the De-bleed module.
- Make sure the “Active Track” name is the file you wish to clean.
- Select the bleed source track file from the “Select bleed source track” menu.
- In the Active Track tab, make a selection where the bleed is most glaring.
- Click “Learn”.
- Select part of/all of the Active Track and press Render.
You may have to run multiple passes of De-bleed to get the result you want. As with many noise reduction processes, less aggressive settings used multiple times tend to yield better results.
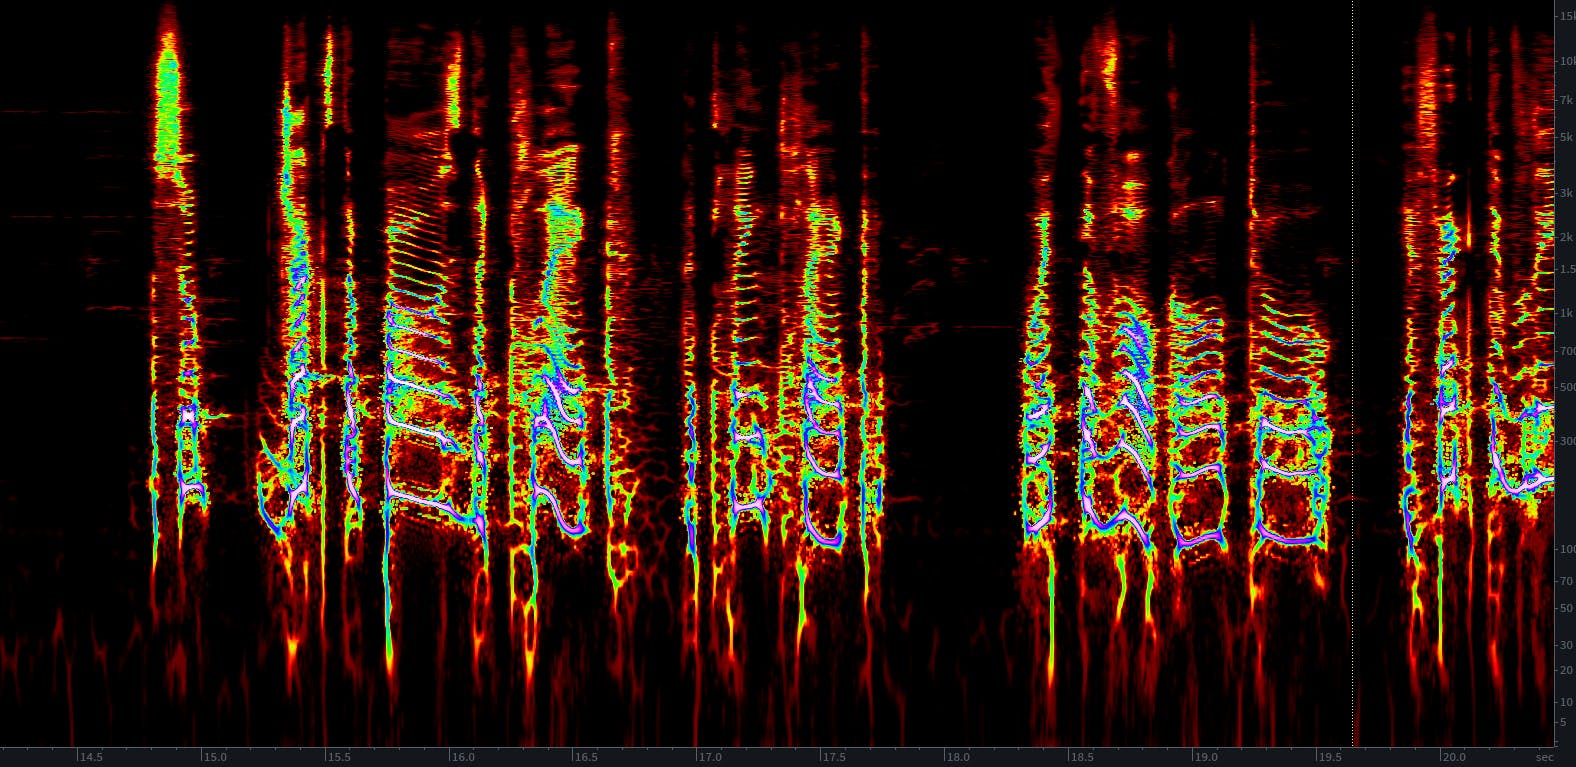
We can see in this image that the candle lights (metronome) are gone. If De-bleed doesn’t help you enough, try using Spectral Repair as well.
Tips for RX7
- Always preview using “output noise/clicks/crackle only” before processing/rendering. This will allow you to hear if any useful information is going to be removed along with the noise. For example, you only want the clicks removed, not the final note of the cello.
- Hover over any control in the standalone RX7 application to view a tooltip providing a quick overview of its function.
- If you see an issue on the spectrogram, but you don’t hear a noise, leave it be.
Either it’s being masked by something else, or it’s a display error, or you just can’t hear it. It’s fine to not have a visually perfect spectrogram.
- The waveform display mode is best until you hear an issue, then switch to the spectrogram display to fix it. Once you’ve finished, change back to the waveform mode. You can switch between display modes by adjusting the slider at the bottom left corner of the window.
- If you are sending your mixes off to be mastered by someone else, make sure not to trim, nor fade the beginning or end of your song too closely. Leave the engineer a few seconds of noise at the top and tail to use for broadband noise reduction.
- Noise will only be noticed during the quiet sections of most songs. Once the full band kicks in, most, if not all issues will be masked by the instruments.
These tips should get you started repairing common problems in your mixes. Be sure to continue reading Part II to learn more about repairing intermittent problems, like clipping, clicks, pops and dropouts.


