This article is the second part of the story of recording and mixing professional-sounding vocal tracks, free from background noises, clicks, and pops. In the previous article, we discussed setting up an effective recording environment and how to choose and use the appropriate mic and pop filter. Here we will discuss editing tools and techniques to use while preparing and mixing the final tracks.
Editing and crossfade techniques to avoid clicks/pops:
The engineer’s regrettable responsibility
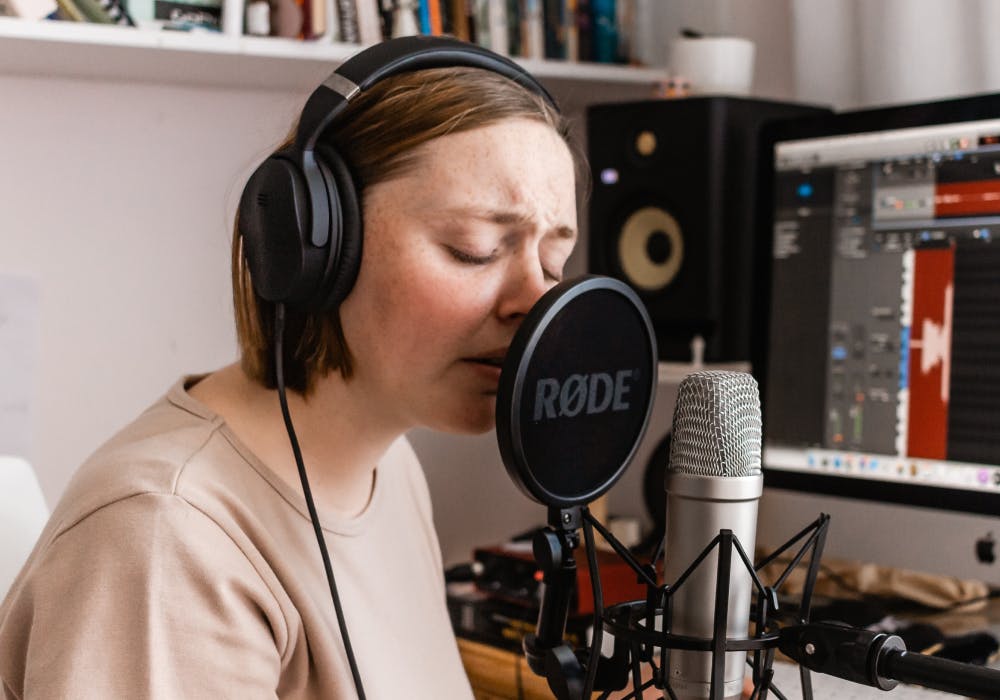
TIP: Headphones are useful while editing because they provide a more detailed audio experience compared to speakers.
An essential element of vocal editing is cleaning vocal takes. The goal is to remove any distracting sounds and artifacts. These can occur between phrases and words, or even during the performance. Ambient noises, drinking, coughing, headphone spill, and mouth noises should be removed or reduced without affecting the natural qualities of the vocal performance.
Simply cutting out noises between words can cause new clicks and pops, so we add fades at the beginning and end of all audio regions to avoid creating clicks and pops. Additionally, whenever two audio regions overlap or butt against each other, they should be joined with a crossfade. This may sound like tedious work, but you will quickly become efficient at it. Alternatively, you could outsource this whole process to an assistant or intern.
Breaths
During editing or mixing, you may feel the need to remove or reduce a singer’s breaths that happen between phrases and words. Remember that breaths are natural and can add a sense of emotion or a rhythmic element to a vocal performance. However, compression and other mix processing may increase the volume of breaths to where they distract from the vocal performance. The producer and singer may have a preference for keeping or omitting breaths. In either case, you should have some techniques to mitigate the problem.
To remove breaths, you can simply cut out the region before and after phrases. This will abruptly remove all the sound on the vocal track between the words, so care must be taken to avoid unnatural breaks or new artifacts like clicks and pops. In the next section, we’ll discuss how to smooth over these transitions.
Another option is to use volume automation or clip gain to remove or reduce any sounds between vocal phrases. This can sound more natural than cutting out regions but requires more time and care. The automation method makes it easy to fine-tune the volume of each breath and automation can be applied before your plugins (clip automation) or after your plugins (volume automation).

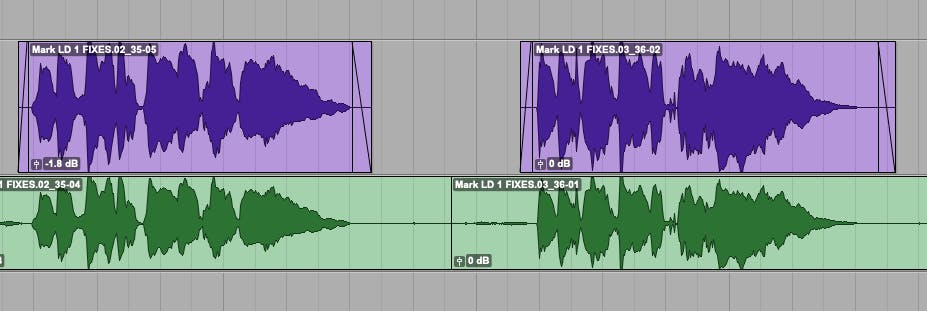
Fades transition from digital silence into or out of an audio clip, while crossfades are overlapping fades between two overlapping regions.
Fades between an audio region and silence are used to prevent clicks and pops at region boundaries.
Fade shape refers to how the volume transitions to and from silence. Common fade shapes can be linear (sometimes called equal gain), or some type of curve, including equal power, logarithmic, or s-shape.
Linear (Equal Gain)
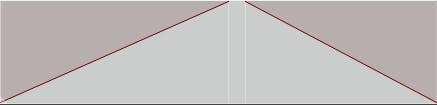
Often the default shape is the linear fade, which fades in or out in a straight line. A linear fade curve sounds like a rapid change in volume at the start, followed by a more gradual change towards the end. This is called an equal gain fade.
Logarithmic (Equal power)

This shape more closely matches human hearing and sounds consistent and smooth because of the perceived volume increasing/decreasing over the whole duration of the fade. This is called an equal power fade. Because of its properties, the log fade is often used for the fade-out at the end of a song.
Exponential

The exponential curve shape can be thought of as being the inverse of the log one. An exponential fade-in slowly increases in volume, then it increases rapidly at the end of the fade. For fade-outs, the volume drops quickly at first and more slowly over the duration of the fade. A crossfade in this shape produces a noticeable dip in the middle, which may sound awkward in some situations.
S-curve
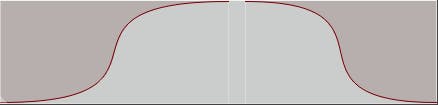
The S-curve shape combines the qualities of the other curves. There are two types of S-curves.
The traditional S-curve fade-in starts with an exponential curve at the beginning and then becomes more logarithmic from the middle to the end. The fade-out reverses this behavior, going from log to linear as the fade progresses.
The second type of S-curve is useful for long crossfades. It’s smooth and allows both crossfades to be heard for as long as possible. At the beginning of each crossfade, the first sound quickly drops to 50% while the second one rises just as fast. Then, the change in sound gradually slows, and both sounds will seem to be at the same level for most of the crossfade.
You should spend some time in your DAW learning to quickly add fades to region boundaries and become familiar with the sounds of different types of crossfades. Each DAW provides commands for adding fades and a preference for setting a default shape. A preference may also be set to automatically create fades when recording or creating new or splitting audio clips. Some DAWS even provide commands to batch-create or remove fades on several selected regions or an entire track. REAPER even has an option to automatically add fades to every audio item which reduces the chances of clicks and pops when editing. Check to see which automatic fade options your DAW provides.
Tools for Removing Noises
Even after thoughtfully setting up the recording space, carefully optimizing recording levels and mic technique, and properly comping and editing the audio clips, you may still hear some clicks and pops due to mouth noises, background noises, or digital artifacts caused by tuners, time-stretching tools, or many other causes. Sometimes these noises don’t become audible until the vocal track(s) and mix bus have been heavily processed during the mix. Below are some tips to help deal with these problems, even if the noises occur during vocal phrases.
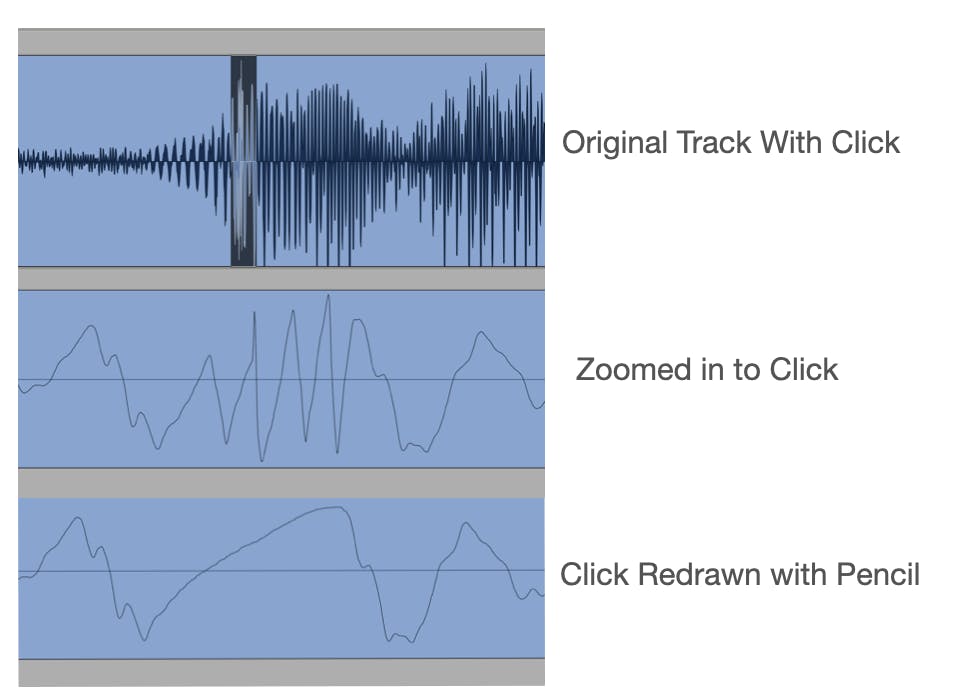
Manually remove clicks in Pro Tools
Many DAWs such as Pro Tools, REAPER, and Logic Pro feature a pencil/draw tool that lets you manually remove clicks. For DAW-specific instruction, I suggest looking for a video tutorial on the topic, but here is how it’s done in Pro Tools.
- Zoom way in on the waveform to get a closer look at the noise you want to remove. You might want to increase the height of the track you’re editing, too [Ctrl/Cmnd + Up/Down].
- With a little practice, you should be able to quickly find the area where the waveform is shaped like a few sharp peaks and valleys.
- Select the pencil/draw tool [F10].
- Use the pencil tool to draw a smooth line over the click or noise you want to remove. Make sure the line covers the entire duration of the click with no jagged edges where the new line meets the old waveform.
Note: It’s important to be careful and precise when using the pencil tool to remove noise manually, as it can be easy to accidentally remove too much audio or introduce artifacts. It’s always a good idea to make a backup of your original audio file before making any edits. Sample editing with the pencil tool is a destructive process, so beware.
Noise Reduction Processors
iZotope, Antares, Waves, Acon Digital, and other companies make noise-reduction software tools with various tools to help you manually clean undesirable sounds. These tools help remove clicks, distortion, background noise, and even intrusive noises like cell phone rings, planes flying by, or even feedback from monitors. These manual tools require a bit of study and experience to get the most out of them, but there are some automated solutions to make your life easier. Many of the automated processors will simply clean up the audio by removing background noise and offensive plosives or distortion while leaving the vocal or instrument untouched. However, you may not be able to specify which problems you wish to address or leave alone.
Izotope RX
iZotope’s flagship plugin suite, RX, has a few automatic tools that work wonders. For our purposes, we’ll focus on one: Mouth De-click, which is available as a plugin in RX Standard and Advanced. This means you can run it in real-time in your DAW session, instead of as a standalone processor.
Mouth De-click was introduced specifically because the voice-over artists’ community needed something more effective than the more generic de-click, de-pop, and de-crackle options that iZotope also offers. Its preset menu offers settings for different scenarios, like random discontinuity, random thumps, short digital clicks, and more. Just select one of these presets and take a look at the controls to get an idea of how the plug-in parameters affect the sound.
The Frequency Skew slider helps you target the specific type of artifact you want to remove. If you have a high digital tick, you can adjust the slider towards the higher frequencies. For a pop, move it a bit lower. And for a thump, go even lower.
The Sensitivity control determines how strong the processor will work, kind of like a compressor’s threshold.
Click Widening helps the whole operation blend smoothly with your track.
If you want to set the Click Widening control to match the width of the click, you can measure how wide the click is by selecting it and checking the “Length” in the bottom-right corner of the window. The top row will display statistics about your selection in the format hr:min:sec.ms.
To hear exactly what the processor is doing, you can use the “Output Clicks Only” feature. Just check that box and play around with the controls to get a feel for how they work.
Izotope’s other offerings, like De-click, De-plosive, and Spectral Repair provide repair tools that can be used as real-time plugins, AudioSuite plugins in Pro Tools, or as modules in RX’s standalone editor.
Waves
Waves’ automated processing offering is Clarity VX and its bigger brother, the Pro version. These plugins use a neural network to clean up your audio, which, in general, means you’ll get pretty good results. Because it uses machine learning, the results can be a bit inconsistent, but you’ll get good results most of the time. Waves also offer their X-Click, X-Crackle, X-Hum, and X-Noise plugins, which provide simple user controls to provide basic noise reduction tools.
Antares
Autotune SoundSoap has been around long enough to be on version 6. SoundSoap can effectively de-hum, de-clip, de-ess, and remove sibilance and background noise in user-selectable frequency ranges. SoundSoap is currently included with the AutoTune Unlimited subscription.
Others
There are many other solutions available, as well from Acon Digital, Sonnox, WaveArts, McDSP, Steinberg, and more. These plugins can remove noise, reduce reverb, and even remove resonant frequencies in a recording.
Don’t overuse noise reduction software!
While noise reduction software is a helpful tool for improving the quality of your vocal recordings, it’s important to be cautious and not go overboard. Here are some things to keep in mind:
- Too much noise reduction can alter the natural quality of a sound, particularly the human voice. Pay close attention to what may be lost or altered by applying too much noise reduction.
- Noise reduction software can create unwanted artifacts in the audio, like “chirping,” phasing, or robotic-sounding glitches, which can distract from the overall quality of the recording.
- Noise reduction algorithms often target high-frequency noises, which can remove some high-frequency details leaving the sound dull or muffled.
- The noise reduction process can be time-consuming, especially if there is a lot of audio to process. You must consider whether the time spent on noise reduction is worth the potential improvement in audio quality.
- Not all noise reduction solutions work well with every type of audio. You should familiarize yourself with a few different tools and learn which tools work best in different cases.
- Noise reduction software can only improve the quality of poorly recorded audio so much. If the original recording is of low quality or has significant issues, noise reduction may not be able to fully fix them. It might be best to re-record the material.
- A little bit of background noise or ambience may be an important element of an audio recording. It’s important to listen to the recording in context before soloing a sound and deciding to clean it. Using noise reduction may remove natural elements and change the artistic intent of the recording.
Finding the right balance between reducing unwanted noise and preserving the natural sound and integrity of the original audio is essential. Trying different settings, using multiple noise reduction techniques, and trusting your ears to make subjective judgments can help you achieve the desired results while avoiding the downsides of overusing noise reduction. As much as possible, ignore the spectrogram and make decisions based on what you hear.
Always check the whole audio track, on headphones, to make sure there are no undesirable effects from the processing.
Conclusion
It’s always best to record as cleanly as possible. If, however, you have to do the cleanup after the fact, use the tools you have at your disposal to get the best result you can, without damaging the quality of the vocals.
Have fun and treat your clients well!


