
Discover how to use the Brauerize technique in REAPER, and if Brauerizing is worth it for modern mixing [free template included]
You’ve probably heard of the Brauerize mixing technique — Michael Brauer’s famous multi-bus compression workflow that involves multiple mix busses and parallel vocal compression. For those who don’t know, Michael Brauer has been mixing records for over four decades, with credits ranging from Aretha Franklin and Luther Vandross, up to Coldplay, James Bay, and Elle King — not to mention Paul McCartney, Bon Jovi, and Level 42. He has been at the top of the mixing shortlist since the late ’70s — working with artists from Bob Dylan and Aretha Franklin to Coldplay, James Bay, and Elle King — and continues to have hits today.
Among engineers, he is well-known for pioneering a mixing technique that has become known as Brauerizing. You might’ve read through various blog and forum posts, watched videos, and ended up thinking, “Is it worth all the effort for me to set up a template to try this technique?” You’re the only one who can answer that question. Personally, I think it’s a worthwhile investment of your time if you’re open to stretching how you think about mixing.
What is the Brauerize Mixing Technique?
During a mixing session, Michael Brauer was tasked by the client to add a lot more low-end to the mix. As he added more bass, the vocals dipped; as he increased the vocal levels, the bass went down. He eventually managed to deliver what the client wanted, but Brauer realized it was time he rethought how he mixed.
He realized that, even though he had compressors on every channel as part of the channel strip (he was mixing on an SSL 4000), there was still one stereo bus compressor across the entire mix. This meant that changing the level of one instrument would cause the mix bus compressor to affect other elements of the mix.
The studio he was working out of at the time upgraded to an SSL 6000 post-production console. The 6000 has three (ABC) stereo mix subgroups (later, the SSL 9000 with ABCD), which all sum to the master stereo bus. That’s when Brauer had his light-bulb moment. If he could spread a mix over two or three stereo subgroups, he would have more control over the end result. He could compress certain elements more than others, and if he added more low-end to the mix, it might not affect other elements as much.
Subgroups are used to combine elements of a mix that should be treated together—like all the low-end instruments of a mix or all the percussive elements. Grouping instruments like this can glue those instruments together before they hit the main mix bus. This prevents any single instrument or group of instruments from negatively affecting the dynamics of the other tracks in the main mix bus.
This process applies well to dense productions, where you really need to “hype” the energy of a mix. Acoustic or natural-sounding productions often benefit from a traditional mixing approach. This was the seed of what became the Brauerize mixing technique.
Step-by-Step: Setting Up the Brauerize Mixing Technique in REAPER
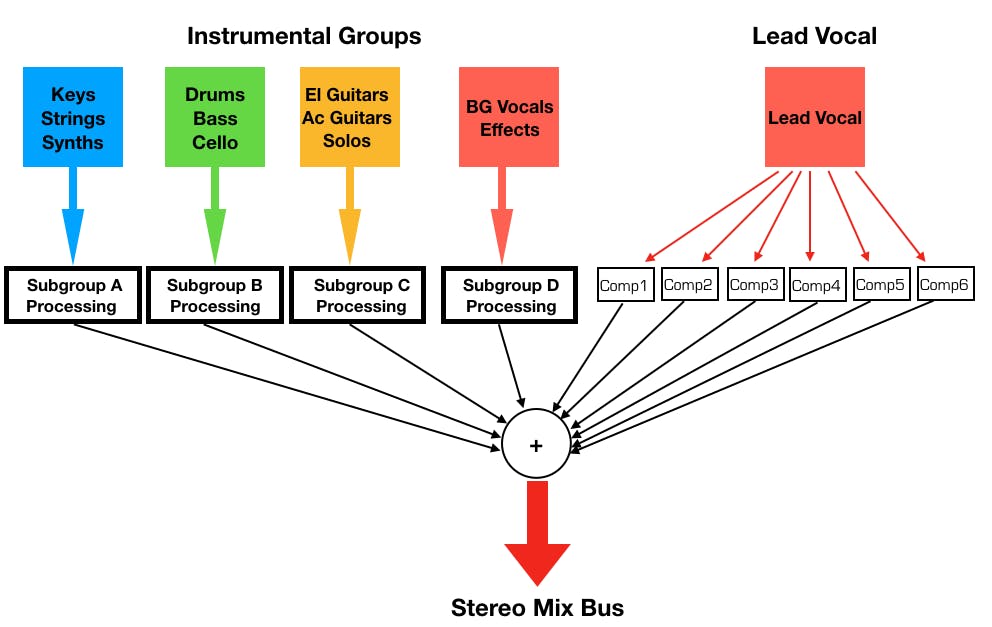
Here’s how to set up the Brauerize mixing technique in REAPER. In Michael Brauer’s technique, various tracks, except for the lead vocal, are sent to four subgroup buses to allow for the mix elements to move and breathe. His subgroups are named A, B, C, D, but you can name them however you like. Here is how he groups his tracks.
Bus A: Sounds that are in the upper midrange of a song, like keys, synths, and percussion.
Bus B: Tracks that form the foundation of the song, such as drums, bass, cello, low percussion, etc.
Bus C: Mix elements that provide midrange energy and whose volume will be automated a lot, such as guitars.
Bus D: Elements that aren’t played staccato need the warmth of a tube compressor, and could benefit from being widened. Think ambience, keys, strings, pads, background vocals, vocal and instrument spatial and time effects
1176: This extra stereo bus can be used when a track might need extra bite, thickness, and vibe.
In Brauer’s setup, each bus is processed with specific compressors and/or EQs, and these processors are calibrated exactly the same way for every mix, hence the idea of creating a template. In addition to these four mix groups, Brauer multi-compresses his lead vocal with 5 aux channels, each of which contains a unique compressor. These can be mixed and matched with the uncompressed vocal to create a special vocal tone for each section of a song. I’ll give you some calibration tips later in this article.
Each of the A, B, C, and D bus processing applies slight compression and tone-shaping to its tracks, which provides a sense of movement for the entire subgroup. The different groups provide a variety of tonal and dynamic options. The same goes for the vocal compression channels—you could have the vocal be looser, cleaner, and more dynamic in the verses, and tighter, more distorted in the choruses. This is easily achievable using the multiple vocal buses with automation.
Here are some diagrams to help you visualize the routing setups used in Brauerizing.
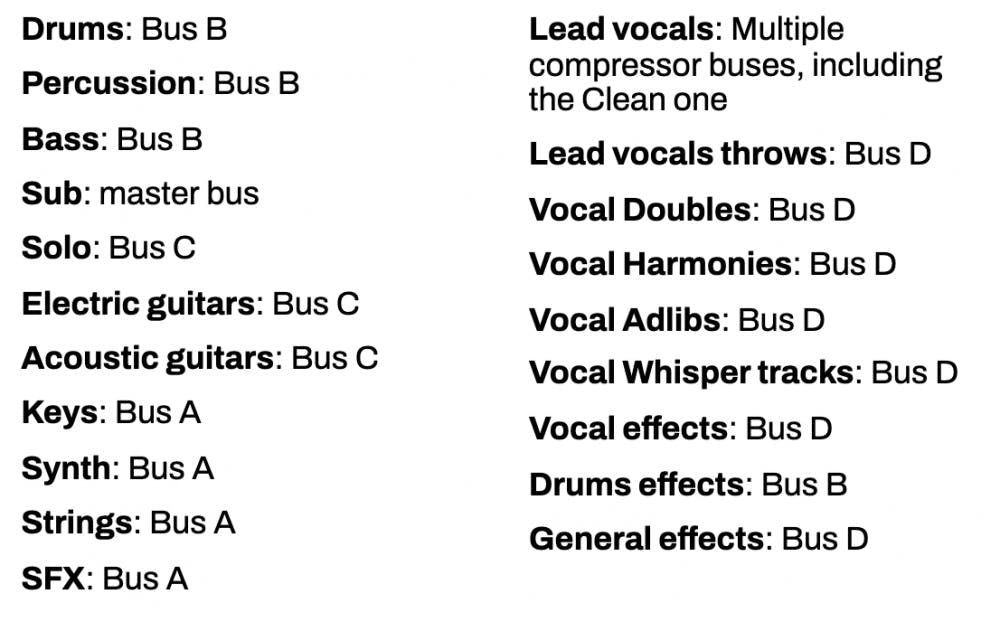
Which Instruments Go Where?
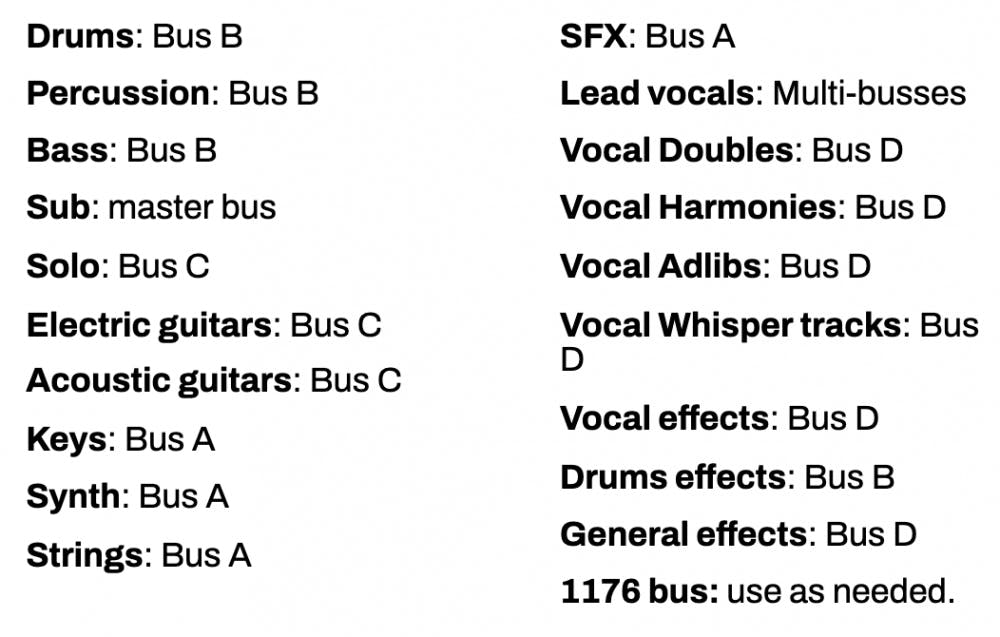
Remember that neither the lettered busses nor the vocal compressor ones are working in parallel to their source tracks. All tracks are assigned to subgroup busses but not directly to the L/R master bus. My exception to this routing is for the Sub track (as listed below). Below is a short list of how I bus the mix elements. I generally group the individual tracks in a parent folder, which acts as an instrument bus. I then send the instrument bus to either bus A, B, C or D. Feel free to do your own thing!
Here’s how to do it in REAPER.
Note: Brauerizing was developed using analog consoles and often rare or expensive analog hardware. A similar process can be emulated in a DAW using plugins and in-the-box routing/bussing. In-the-box Brauerizing requires precise delay compensation by your DAW. REAPER does this well as long as your plugins properly report their latency to the DAW. If latency is not correctly compensated, you may encounter phase and comb-filter problems that can result in weak or unnatural sounds.
Below is a description of each bus and some particular plugin options. There are many plugin models that can be substituted for a given processor, but try to maintain the same style if you choose to substitute one brand/model for another. Additionally, Brauer does not stereo-link his compressors, so be sure to use multi-mono or separate instances of your plugins to maintain this independence. Using multiple mono plugins is described later in this article.
Bus A (the upper midrange bus):
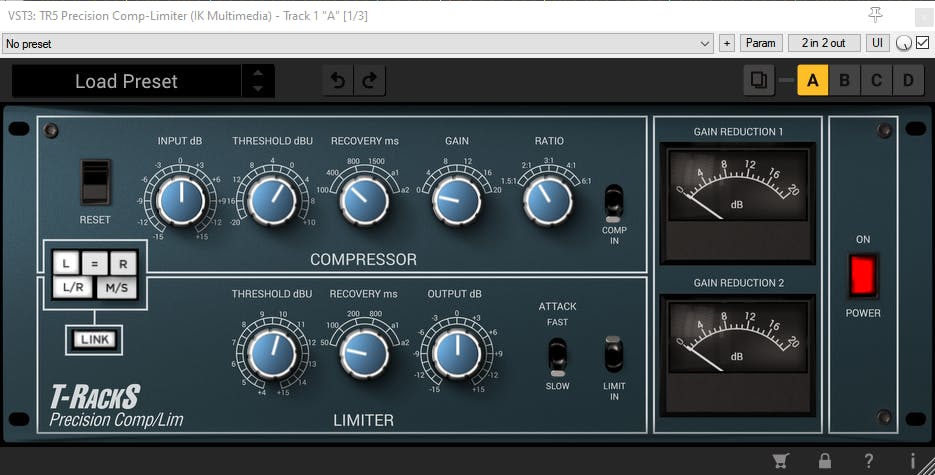
Brauer uses a Neve 33609 and a Pultec EQP-1a3 on Bus A. Fortunately, these units have been modeled by quite a few companies, so we can get very close to his settings.
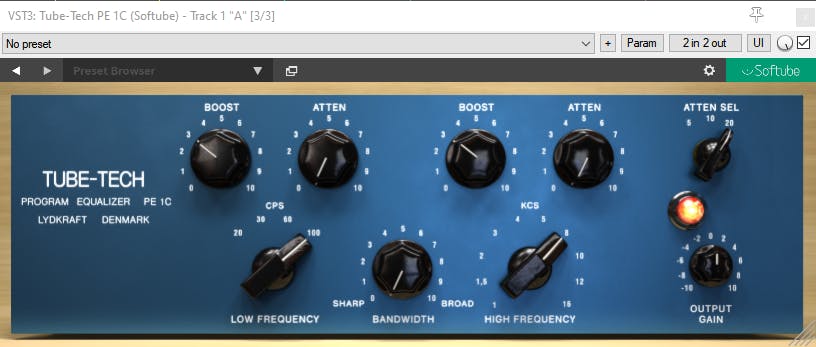
I decided to use two (unlinked) IK Multimedia’s Precision Comp/Lim and Softube’s Tube-Tech PE1C. The plugins and their calibrated settings are pictured below.
Bus B (the anchor instruments):
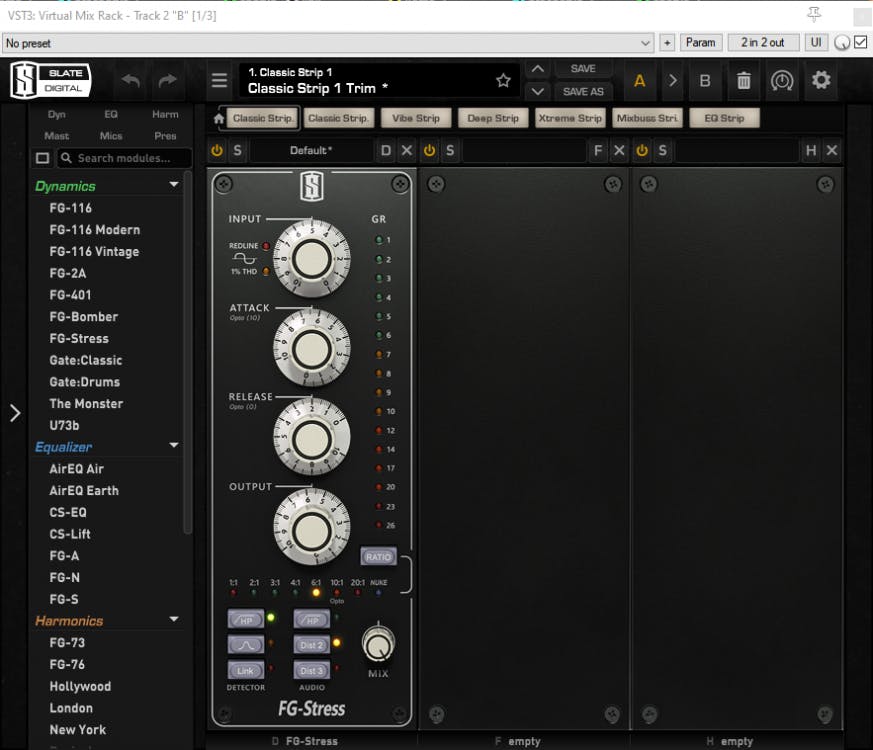
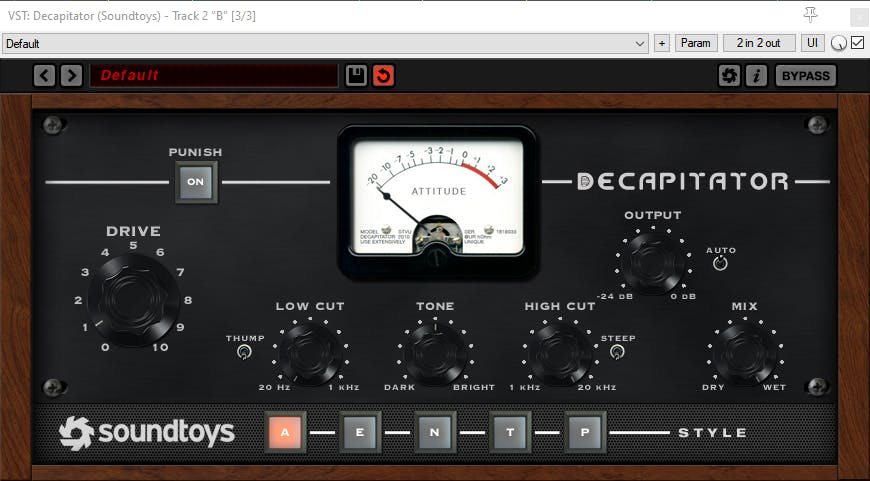
Brauer employs two Distressors on Bus B. I went with Slate’s Virtual Mix Rack FG-Stress. Additionally, since the FG-Stress lacks the British mode Brauer’s units have, I sometimes use Soundtoys’ Decapitator to add some similar distortion to the drums and bass in Bus B.
If you want to EQ the drums and bass, bear in mind that Brauer generally EQs after compression.
FG-Stress needs two mono instances.
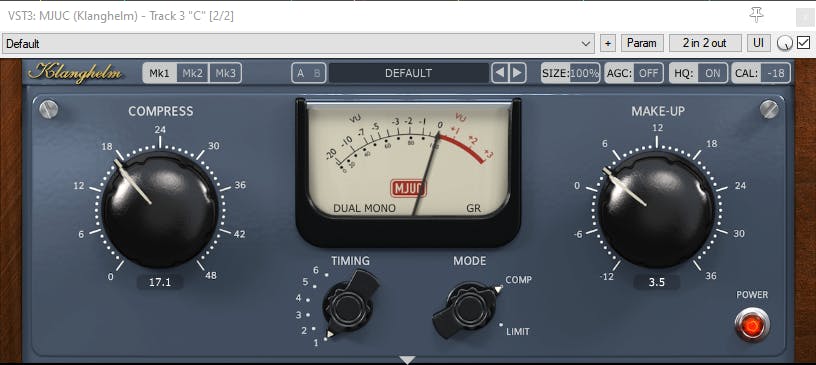
Bus C (the midrange energy bus):
I use Klanghelm’s MJUC to replace Brauer’s Pendulum ES-8. Both are tube-type (Variable Mu®) compressor-limiters in the vein of the Fairchild 660 and 670.
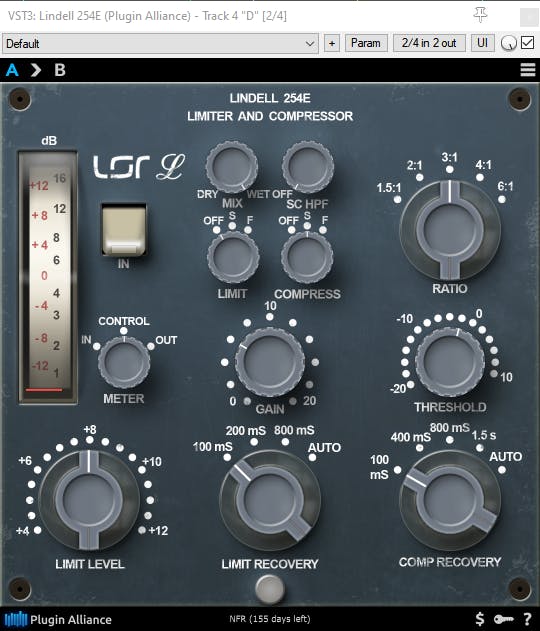
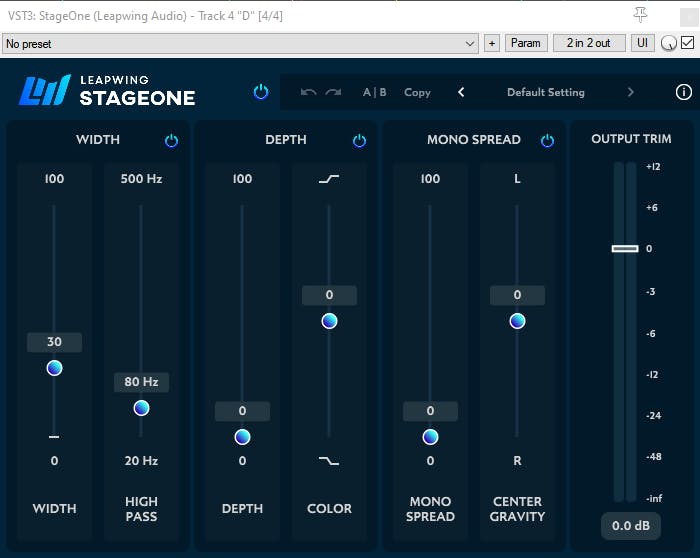
Bus D (the warm and wide bus):
Brauer uses TFPro’s Edward the Compressor set to its VCA mode. This compressor is stereo-linked and also provides a stereo-width enhancer.
I substituted Plugin-Alliance’s Lindell 254E (dual mono instances) for compression and Leapwing Audio’s StageOne for stereo widening. The Lindell 254E plugin emulates the hardware Neve 2254/E compressor-limiter, a colorful, class A, VCA type compressor.
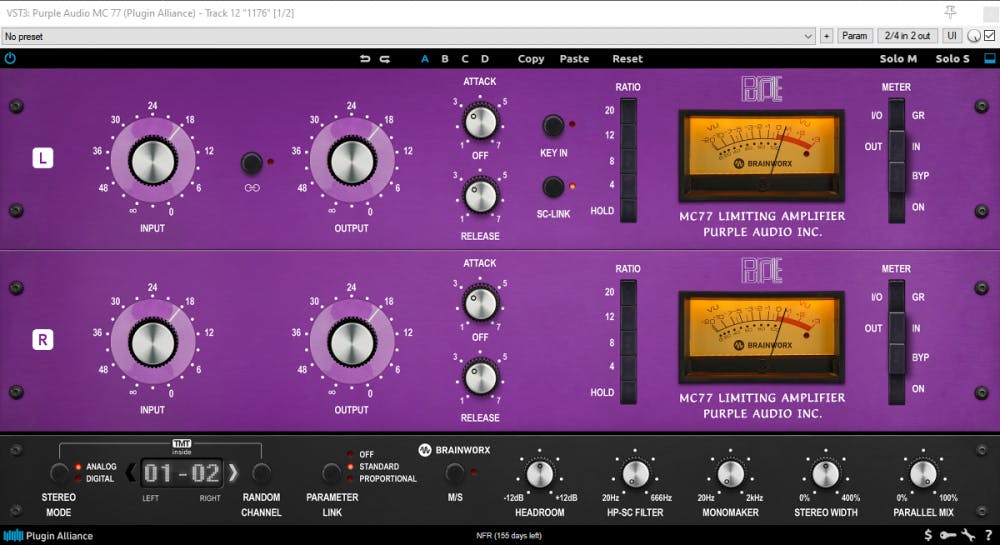
1176 Bus (an additional bus for bite):
This bus dirties, thickens, and adds bite and is used as another mix subgroup. I use dual-mono Plugin-Alliance Purple Audio MC77s for their tone.
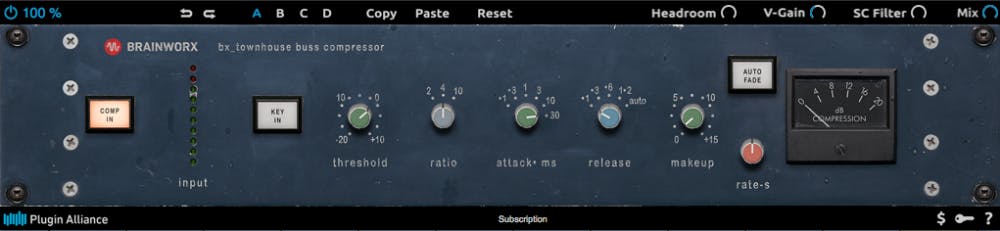
Master L/R bus (the final stereo mix):
Brauer (sometimes) uses an outboard SSL Master bus compressor. I decided to go with the Plugin-Alliance bx_townhouse plugin because of its versatility and vibe.
Vocal Multi-buss Setup
The ABCD busses described above are used for the instruments and even background vocals, but the lead vocal gets a special set of busses for itself. The lead vocal is routed to all the vocal busses and these individual channels can be mixed and matched to create a special sound for each section of a song. Here are Brauer’s compressor choices, and my choice of plugin option.
- Clean: no compression at this stage of the chain
- Empirical Labs Distressor (hardware): Slate Virtual Mix Rack FG-Stress. Settings: opto, fast Attack, fast Release
- UA 1176 (hardware): Plugin Alliance Purple Audio MC77. Settings: look for punch and aggression; all-buttons-in, slow Attack, fast Release
- Gates STA Level (hardware): I’m currently using Softube’s Tube-Tech CL1B. However, I’m eyeing Arturia’s Comp TUBE-STA, which emulates the famed Gates STA-Level. Any LA2A emulation works here. Settings: medium Attack (Double mode), fast Release
- Federal AM864 (hardware): The Federal is a tube/vari-mu compressor, which means I’ll use Klanghelm’s MJUC, set to MK2 for a similar, but slightly modern sound. Settings: slower Attack, faster Release, 4:1 ratio.
- Fairchild 660 (hardware): This is an extremely rare Fairchild opto-compressor for which I substituted the MJUC set to MK1 for a vintage vibe. Settings: high input level, Timing 1 (fast Attack/Release).
Free Plugin Alternatives for Brauerizing (2026 Update)
Not everyone has access to rare analog gear or premium plugins — but the good news is you can get very close using REAPER’s built-in tools and high-quality free options available today. Here’s a current list of substitutes:
- Bus A (Upper Midrange – keys, synths, percussion):
- REAPER ReaComp → clean, versatile compressor with sidechain options.
- Ignite Amps PTEQ-X (free) → excellent Pultec-style EQ for midrange shaping.
- Bus B (Foundation – drums, bass, low end):
- REAPER ReaComp (dual mono setup).
- Softube Saturation Knob (free) → adds the grit/distortion Brauer often gets from Distressors.
- Bus C (Midrange Energy – guitars, transient-rich instruments):
- Klanghelm MJUC jr. (free) → smooth vari-mu compression with vintage character.
- Tip: MJUC jr. lacks input control, so pair with REAPER Volume Utility to trim/boost the signal for calibration.
- Bus D (Warmth & Width – pads, ambience, background vocals):
- Klanghelm MJUC jr. again works well here.
- JS: Stereo Width (stock in REAPER) → subtle widening without over-phase issues.
- 1176 Bus (Extra Bite & Aggression):
- Analog Obsession Fetish 1176 (free, updated regularly via Patreon) → authentic FET character.
- Set up in dual-mono mode for unlinked compression.
Calibration & Best Practices
- Aim for 1–3 dB of gain reduction across all buses (instrument groups, vocals, and 1176).
- Avoid heavy compression at this stage — Brauerizing relies on gentle movement and tone-shaping, not smashing dynamics.
- Always check for proper latency compensation in REAPER when stacking multiple free plugins.
Calibrating the Busses
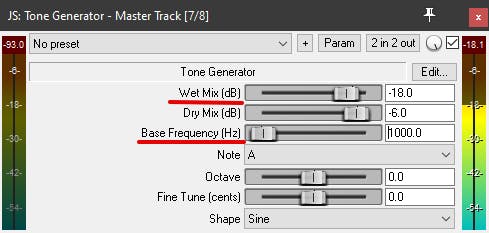
The Brauerizing technique takes advantage of the idea of template-based mixing, so we want to create a template with a consistent starting place. Therefore, we need to calibrate the plugins on our busses so that their initial setting adds color and vibe without smashing our groups. To calibrate the bus processors, you’ll need a Tone Generator and a VU meter. Luckily, REAPER already comes with a tone generator, so look for it under FX. TBProAudio has a great free VU meter called mvMeter. Once you’ve installed it, open it on your master bus. During calibration, bypass any plugins before the meter: you want to see only what the plugin you’re calibrating is doing.
Calibrating Bus A
- Insert the tone generator on a mono track set to output to Bus A and set the base frequency = 1000 and wet mix: -18
- Bypass the Softube Tube-Tech PE 1C plugin.
- Open the IK Multimedia Precision Comp-Limiter.
- The Gain knob should be at 0. Bring the Threshold back 1 “click”.
- mvMeter on your master track should read +1dB.
- Bring the PE 1C online and select 100 on the Low-Frequency knob and 8 for the High-Frequency one.
- Set the Tone Generator’s Baseline Frequency to 100 and turn the PE1C’s Low-Frequency Boost knob until mvMeter reads +1dB.
- Now set the Tone Generator’s Baseline Frequency to 10,000. Turn the High-Frequency Boost knob until the meter reads +1.5dB.
- Set the Tone Generator to 1000 and verify that the mvMeter reads +1dB.
Calibrating Bus B
- Assign the track with the tone generator to Bus B and set the base frequency = 1000 and wet mix: -18.
- Verify the mVmeter reads 0dB with the 1k tone on Bus B.
- Choose the FG-Stress’s ratio and whether you want the British mode active or not. Brauer sets his ratio to 6:1 and has British mode ON.
- Set the attack to 10, which means no compression. Set the release to 2. The Detector should be set to HP. Brauer sets his Audio setting to Dist. 2
- Set the input to 5 and the output to around 5.5. Your goal is to have the VU meter read 0dB.
- Slowly turn the attack knob until the first green LED on the compressor lights up, which should be between 3 and 6.
- If you need extra dirt, you can add a saturation plugin like Soundtoys’ Decapitator or Softube’s Saturation Knob.
Calibrating Bus C
- Assign the track with the tone generator to Bus C and set the base frequency = 1000 and wet mix: -18.
- Verify the mVmeter reads 0dB with the 1k tone on Bus C. Note: I had to use a gain/trim/volume plugin to bring up the level going into MJUC since I decided to leave the Calibration set to -18 for consistency between plugins.
- Set the MJUC plugin to the MK1 model, since that’s the one that emulates an old-school vari-mu limiter.
- Set the timing to 1, and the mode to COMP.
- On the lower left part of MJUC’s VU meter, click on STEREO and choose Dual Mono for unlinked stereo operation. On the right side of the VU meter, make sure you choose GR (gain reduction).
- On the upper right side of the plugin, turn on HQ mode. This ensures the plugin sounds the best it can.
- Turn the Compression knob all the way to the left and set the gain/trim/volume plugin so the VU meter on your master bus reads +1dB.
- Bring up the compression until the MJUC’s meter shows 1dB of gain reduction.
- Set MJUC’s Make-up gain so the VU meter on your master bus reads 0dB.
Calibrating Bus D
Brauer says that there’s no specified calibration for this bus, just do what sounds good. I advise you to calibrate it like the other ones, for consistency’s sake, but it’s not a must.
The 1176 Bus does not need to be calibrated, but try to maintain only a couple dB of compression during use. Settings: all-buttons-in, slow Attack, fast Release.
One more thing before you start calibrating: make sure your headphones and monitoring environment are calibrated, too. Uncorrected frequency response can easily be off by 5–10 dB in certain bands, which means your carefully dialed-in bus compression levels are based on inaccurate monitoring. SoundID Reference provides pre-made headphone profiles and a guided speaker calibration process to flatten your response before you start tuning anything else.
Dual Mono Plugins in REAPER
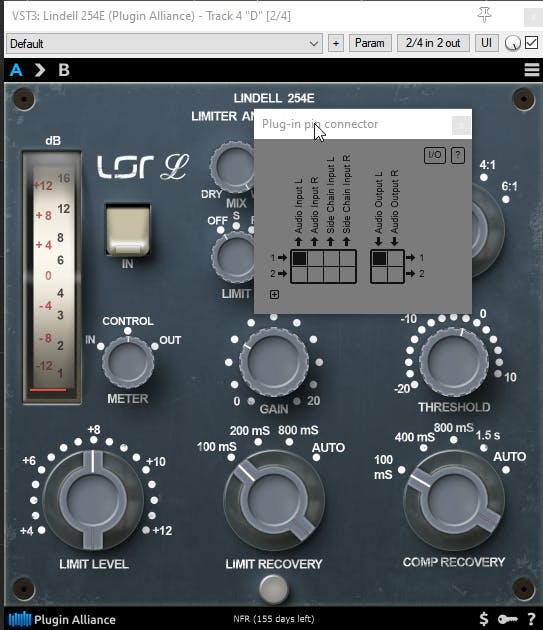
Now that you calibrated the processors, it’s time to duplicate the compressors on buses A, B, C, and D. For stereo busses, Brauer uses unlinked dual-mono compressors, so we want to emulate this with plugins. Many plugins support stereo and dual-mono operation, but at the time of writing this article, REAPER doesn’t readily allow for dual mono plugins. Here’s how to create dual-mono plugins in REAPER.
- Right-click the compressor. Click on Copy FX. Right-click an empty spot in the chain and click on Paste FX.
- Open the first instance of the compressor. In the upper-right corner of the plugin, click on 2 (or 2/4) in 2 out. Make sure this first instance has only Input 1/LEFT and Output 1/LEFT boxes checked.
- Open the second instance, then leave only the Input 2/RIGHT and Output 2/RIGHT boxes checked.
Routing
Remember that neither the lettered busses nor the vocal compressor ones are working in parallel to the tracks. All tracks go to their respective buses, and NOT to the master bus. The only exception I make here is for the Sub track, which I generally want to process by itself. Following is a short list of how I bus the mix elements. I generally group the individual tracks in a parent folder, which acts as an instrument bus. I then send the instrument bus to either bus A, B, C, or D.
Just to be clear, buses A, B, C, D, 1176, as well as the VOX COMPS folder, which houses the vocal parallel compression tracks, all go to the master bus.
Conclusion
Using Brauer’s multiple bus compression technique isn’t straightforward, and it’s quite a different way of mixing than what most of us are used to. Give it a (few) shot(s) and see if it ends up sticking with you. The end result should be mixes that have musical movement, depth, width, and radio readiness, with less effort than before. Just remember that all this routing precision is only as good as your monitoring — if you can’t hear what the buses are actually doing, you’re tuning blind.
In case you didn’t get my message, try to stay between 1 and 3 dB of gain reduction on the bus compressors and the vocal compressors— including the 1176 bus. This amount of compression produces just enough resistance for your mix to remain dynamic, but feel controlled. More extreme compression can destroy the dynamics of a mix.
Is the Brauerize Mixing Technique Worth It in 2026?
The short answer: yes — if you’re mixing dense, modern productions.
Brauerizing shines in genres where energy, movement, and controlled loudness are crucial. Pop, EDM, hip-hop, and cinematic scores all benefit from its ability to keep low-end punchy, vocals forward, and the mix wide without collapsing under heavy bus compression. By splitting instruments into multiple subgroups, you can push elements harder without sacrificing clarity.
That said, Brauerizing isn’t always the right tool. For acoustic, jazz, or singer-songwriter recordings, the technique can feel heavy-handed and introduce unnecessary complexity. In those cases, a more traditional bus or even a minimalist mixing chain may deliver better results.
Expert note from Sonarworks: Brauerizing is powerful, but calibration is key. Without calibrated monitoring, your carefully balanced buses may fall apart when played back on other systems. Ensuring translation across headphones and speakers is what turns a clever routing trick into a professional-grade mix.
FAQ — Brauerize Mixing Technique in REAPER (2026)
Q: What is the Brauerize mixing technique?
A: Brauerizing is Michael Brauer’s signature multi-bus compression workflow. Instead of routing everything through a single stereo bus, mix elements are divided across four main buses (A–D) plus dedicated vocal chains. Each bus uses its own style of compression, giving the mix more width, depth, and energy while preserving dynamics.
Q: How do I set up Brauerize buses in REAPER?
A: In REAPER, create four subgroup buses (A–D), route instruments accordingly, and apply dual-mono compressors to each. Vocals get their own dedicated parallel buses with different compressors. Calibration is essential – REAPER’s built-in Tone Generator and a free VU meter plugin can help align your buses so the template reacts consistently.
Q: Do I need expensive analog gear to Brauerize?
A: No. While Brauer originally developed the method on SSL consoles and rare compressors, you can achieve very similar results entirely in-the-box. REAPER’s stock plugins, plus high-quality free options like Klanghelm MJUCjr, Ignite Amps PTEQ-X, and Analog Obsession Fetish 1176, can recreate the sound and workflow.
Q: Is Brauerizing Mixing Technique still relevant in 2026?
A: Absolutely. With streaming-era loudness standards and the rise of dense digital productions, Brauerizing remains a reliable way to craft mixes that feel powerful yet dynamic. Many engineers now combine it with monitoring calibration tools like SoundID Reference to guarantee their Brauerized mixes translate across playback systems.
Q: How does Brauerizing compare to traditional bus compression?
A: Traditional bus compression applies glue across the entire mix, but it can cause trade-offs (e.g., boosting drums squashes vocals). Brauerizing separates elements into multiple buses, letting you compress drums aggressively without pulling down guitars or vocals. The result is more control, energy, and flexibility – especially useful in modern pop and EDM mixing.
Try For Yourself
How about this: because you’ve read this article, here’s a gift. The Brauerizing REAPER template. Download REAPER template here.
Download the file, open REAPER, go to Options in the top menu, and click on “Show REAPER resource path…”. Go to the ProjectTemplates folder and copy/paste the downloaded .rpp into that folder. From now on, you’ll find this Brauerize template under File > Project Templates.


