Fancy Words
Pretty fancy title, huh? Don’t be intimidated by it. It’s just a dressed-up way of saying “how to use reverbs and delays.” Sure, chorus, flanging, and phase shifting technically fall in the time-based effect category as well, but for this article, we’ll focus on reverbs and delays.
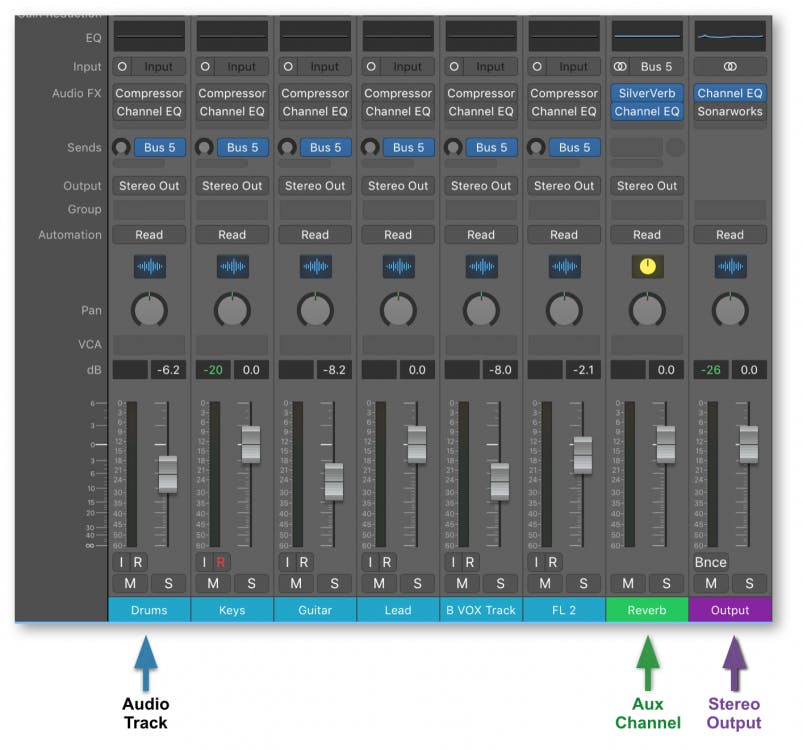
One significant difference between time-based effects (reverbs and delays) and other effects processing like compression and EQ is that we generally don’t insert them onto audio tracks. Instead, we insert time-based effects on Aux tracks and send sounds to them via busses or aux sends (the exact terminology depends on your DAW of choice). In this setup, we have “dry signals” on audio tracks and “wet signals” coming from the Aux Channels and we can blend in as much of the effect as we want.
In practice, your audio tracks output to the mix bus (sometimes called the stereo out). An aux/effects send routes some of an audio track’s signal to an effects channel (usually referred to as an Aux Channel). The Aux Channel is home to the time-based effect, so its input is set to an Aux Bus, and the Aux Channel’s output is assigned to the Mix Bus. If that seems confusing, take a look a the image below.
The Wheels On the Bus
Why do we use these on effects return channel strips instead of inserting them directly into a channel strips effects slot? Reverbs (and delays) require a respectable amount of computer processing power (CPU usage). Using one shared time-based effect saves CPU power.
Consider also the aesthetic use of space in our mixes. Applying the same time-based effect to many channels places everything in the same physical mix space, resulting in a more cohesive blend. All the instruments sound like they are in the same room, hall, or chamber, like a group of musicians actually playing together!
Of course, we can use more than one “space” in a mix. For example, the drums might be in a small room, while the guitars and vocals are in a larger room. The point is, though, that you usually don’t need a special ambience for every track in the mix—share the ambiences you need.
Routing
Mixing with effect sends utilizes the technique known as parallel routing. A signal is split and routed down two or more separate pathways, alongside, or parallel to each other. The multiple pathways ultimately converge and are blended at or before they reach the Stereo Output. The alternative to parallel routing is serial routing, where a signal travels through one effect after another, in a chain. Serial processing is used for processing an instrument with EQ, then compression before sending it on to the mix bus.
Mixing becomes quite interesting when devices usually used as serial processors are used in a parallel fashion and vice versa. You can imagine a couple of reverbs and delays used in parallel, but can you imagine some time-based processors used in series?
Creating Width and Depth in Your Mixes
We often use reverb to move certain sounds further back in a mix, creating a sense of front-to-back depth. Continuing that thought, if we add reverb to a short delay, the delay will sound farther away than the dry signal that was originally sent to the delay. Setting up an effect like this would mean sending the dry vocal channel to an aux channel with a delay feeding into a reverb. Now we have created a parallel path with a set of serial processors!
This combination of serial and parallel routing is a favorite technique of well-known mix engineers, including Bob Clearmountain and Chris Lord-Alge. Lord-Alge refers to this as “mixing with depth” since the delayed signal can be placed further back in the mix by routing it through reverb.
In the images below, we see three examples of routing a vocal and its effects in a mix. Example 1 shows a vocal sending to two parallel effects. The reverb and delay output 100% wet effect signals to the mix bus. Example 2 shows the vocal sending to a parallel path comprised of a delay and a reverb in series. The reverb in ex. 2 outputs a mix of the dry delay signal plus the reverbed delay signal. Example 3 shows the vocal feeding a parallel delay, which feeds a parallel reverb. The input of the reverb in ex. 3 is the 100% wet delay signal, with none of the original, dry vocal.

In example one, there are two aux sends on the vocal channel. In example two, only one send from the vocal channel is used. For example three, there is one send from the vocal to the delay and one send from the delay to the reverb. While none of these routings are inherently complicated, it can be demanding to keep track of the various routings, especially in a large session.
Multi-Effects Plugins
Two popular plugins provide routing options that simulate each of these routing scenarios inside one multi-effect plugin. Waves, in conjunction with Chris Lord-Alge, have developed the CLA Epic plugin to mimic the real-world analog console routings Chris uses in his studio to achieve these multiple signal paths. Apogee, along with Bob Clearmountain developed Clearmountain’s Domain. These plugins model the sounds of some favorite hardware effects processors, but, really, these plugins are more about emulating the workflow of routing time-based effects in series or parallel configurations.
Each plugin provides its own routing and mixing options using clever internal routing structures. CLA Epic provides four delays and four reverbs, all of which can be used simultaneously, while Clearmountain’s Domain provides one delay and three reverbs, along with pitch shifting, de-essing, saturation, and EQ options. Learning the routing options of these plugins is key to taking advantage of their power to create unique parallel and serial effect chains.
Other plugin options exist to create custom signal paths, including Waves StudioRack, Blue Cat Audio’s Patchwork, SoundToys’ Effect Rack, and Slate Digital KiloHearts SnapHeap all allow you to customize sophisticated parallel and serial effects. There are probably many more plugins that provide complex routing possibilities, so keep your mind open for these options.
Plumb New Depths
It is not particularly difficult to replicate the routing of plugins like CLA Epic within our DAWs, using the various serial and routing pathways described earlier. To get started, set up sends on your audio tracks and on your aux channels, to provide flexible routing options as your mix progresses. It’s a drag to work out complex routings while you’re in the mixing mindset, so a little planning will keep the creativity flowing.
By setting up your own custom DAW routing instead of using multi-effect plugins, we are not limited to the predetermined delays and reverb routings of one plugin. We can mix and match third-party effects for greater customization. We can also further enhance our effects with additional tonal, dynamic, or stereo widening processors. A compressor or saturator on the output of a reverb plugin creates an entirely new character.
Our own DAW routing allows us to choose between pre or post-fader sends for greater control over signal flow levels. How about setting a few different bypassed reverbs on each reverb return to easily audition alternate options during a mix? Add some other optional post delay processing options like chorusing, distortion, or filtering to add some texture to the delays. Add these custom routing setups to your mixing templates or save the chains as track presets that can easily be imported to any mix. Anything you can do to speed up your access to different options during mixing will enhance your creativity. (Be sure to review our article about setting up effective templates after you finish this article.)
Instead of always using stereo effects, try setting up some mono delays or reverbs for interesting panning options. Al Schmitt and Elliot Scheiner are known to use several mono reverb chambers panned across a mix to create a panorama of reverbs. How about setting up slaps on one side, spring reverb on the other, like the old Roland RE-201 Space Echo Tape delays? Route the slap delays to a cleaner short reverb at the same time.
For some mono reverb inspiration, check out Steely Dan’s Gaucho album and listen for the mono vocal, guitar, and drum reverbs. And while we’re at it, what about routing reverbs into delays? It may not seem like a typical mixing workflow, but neither was the way The Beatles created Sgt Peppers Lonely Heart Club Band. A reverb sent to a mono delay creates a distant sound without echoing the transient or impact of the original sound. Try it on a ballad vocal!
As you can see, your imagination is the only limit to serial and parallel routing options with delays and reverbs. Try multi-effect plugins from Waves, Apogee, and others, but be sure to master the routing of effects in your DAW to unlock the most creative options.
Check out our other related articles about this topic:
Work Faster and More Efficiently with Templates by Eli Krantzberg
Creating Ambience and Depth with Reverb by Barry Rudolph


