
When you find your track has timing trouble, let it breathe. Okay, I’m paraphrasing, and maybe that wasn’t exactly the original intention of McCartney’s lyric. But it is still sage advice, possibly more important in music production today than ever. In case you missed the meaning of the pun, what I mean is when the musical timing of a session feels stiff, let it breathe!
Timing
Songs, especially before we used DAWs, were often recorded without a metronome or click track. This resulted in slight variations of tempo throughout a song. Arguably, this factor is a significant aspect of a song’s feel and groove. Live bands naturally speed up and slow down a song’s tempo, just as they vary the dynamics, to enhance the feel and energy of a performance. When recording to a click track or creating grid-based productions in a DAW, a song’s tempo and timing are much more consistent, if not perfect. Capturing or creating some of the timing nuances of live recordings will help breathe life into what can otherwise be static metronomic performances.
Playing a part to a click is not the same as having every note quantized, or locked, to a grid. The click is a guide to maintain a relatively consistent tempo, but there is still room for interpretation. Playing specific notes behind or ahead of the click is what creates the feel and groove. The question now becomes, how much natural timing should we preserve and how much should we correct?
There are a few different quantize modes that may help you achieve your goal with fewer mouse clicks. Input quantize automatically corrects note timing as you are recording, so that when you stop and playback your track, the quantize has already been applied. Real-time quantize plays back notes in the proper timing but doesn’t permanently move them. It is like an audition mode for dialing in your quantize settings before you commit to permanently moving the notes. The standard quantize command in your DAW moves the notes to a new location, so what you see is what you hear. All three of these modes have their pros and cons, so play with each mode to see what works best for you.
MIDI Timing
Every MIDI sequencer or drum machine has the ability to quantize a midi performance. The quantize function provides parameters like strength or percentage that control how much the quantize function pulls notes closer to the “perfect” beat. By moving the notes slightly closer to the grid, rather than moving them exactly onto the grid we can retain some of the natural feeling of a performance. Most DAWs also allow for moving only notes that are far off the grid or only notes that are almost perfect. Leaving some notes unchanged maintains a natural feeling.
These quantizing techniques maintain a natural feeling to varying degrees, depending on the sloppiness of the performance. You could also listen to the performance and manually correct only the notes that need fixing by sliding the note closer to or farther from the gridline. Manually quantizing can be time-consuming, so some DAWs provide quantize “feels” that can be applied to a track.
Many hip hop records were created on AKAI MPC, Linn, Emu SP12, and Roland drum machines. These machines input quantized a performance to a specific quantize feel, referred to as the swing, often measured in percent. Drum machines typically line up the first and third sixteenth note exactly on the grid and the 2nd and 4th notes play slightly late, depending on the groove percentage. Many DAWs provide groove templates that recreate the feel of these vintage machines, as well as other common quantize feels, like swing, shuffle, and straight grooves with various amounts of perfection (strength).
A quantization technique that maintains the feel of playing “in-time” but still allows for some natural freedom is to align only the downbeats of each measure or phrase to the grid. This way, the phrasing retains its internal swing, but each phrase starts right on the beat, so all the instruments hit the accents and downbeats together. This method works well for audio regions, but can also be effective for midi performances.

Tempo
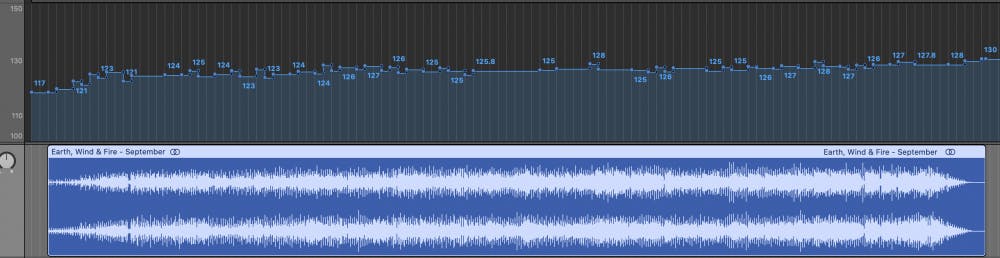
Manipulating how the notes fall on or around the grid is a legitimate way to preserve (or alter) the feel of a live performance. Another time-based consideration of a song is its tempo, or beats-per-minute. Certain genres are defined by their tempo, like house music’s 120 BPM, or reggaeton’s mid-90s BPM. The tempo of some of our favorite recordings was not consistent, but in fact, varied considerably throughout the song. We naturally push the tempo to add excitement during a song’s hook. A band may even speed up a song by several BPM from the start to the end as we build the energy with an audience. Modern programmed music, like techno, may not vary in tempo, but instead will change from straight time to a half-time feel for dramatic changes in energy.
Performing to a grid obviously allows us to edit and overdub easily, but we can preserve musical tempo fluctuations in our DAWs and still take advantage of grid-based editing by using tempo mapping function. We can build a click track from a live performance or a sampled drum loop so that quantized overdubs will match the feel of the original performance. Logic Pro and Ableton can analyze an audio track and build a smart tempo based upon the tempo and rhythms of that track.
Conversely, you may want to program a song from scratch that contains natural tempo changes. A typical scenario would be something like gradual slow down (ritardando) over the last few bars of a song for dramatic effect. Every DAW will allow you to create a tempo map where ritardandos and accelerandos can be programmed. The click (and, by extension, your performance) will follow the tempo changes as they occur.

To enhance the dynamics of a click-based song, consider programming subtle tempo changes at key parts of your arrangement. For example, increase the tempo of each chorus by 1 or 2 BPM compared to the verses to boost excitement. Rather than an instant tempo change at each section, try creating a tempo curve that lasts a few beats at the end of a section. Abrupt tempo changes have one effect, while tempo curves produce a different effect.

Audio Timing
Working with MIDI, it’s easy to experiment with these sorts of subtle tempo changes recording your parts. When tracking live audio try to set up the tempo changes in advance, this will avoid unnecessary time compression/expansion. If you decide to alter the tempo after recording, audio can be manipulated using built-in DAW utilities like Logic’s Flex Time, Pro Tools Elastic Time, or Ableton’s Warping, Cubase’s Time Warp, or Studio One’s Timestrech/Bend.
Do yourself a favor and before you start your next song, think about integrating the tempo and quantizing ideas discussed here. Now you have methods to work with a click and still retain a human feel. Quantizing music, as with tuning, is a tool that must be used appropriately. If a performance sounds good, it is good. Try to avoid automatically quantizing everything, unless your style of music requires that kind of machine-like precision. With a bit of thoughtful attention, you’ll refine your own methods to perfect the feel of your music.


