
The Golden Rule
Regarding creative endeavors, I don’t like to make absolute pronouncements, but when it comes to kick and bass, there is one absolute rule that simply cannot be ignored, and it has to do with the arrangement. The kick and bass parts must not conflict with or fight each other. So what does that mean?
Sometimes the kick and bass play together rhythmically, while sometimes they never play at the same time. These scenarios are both fine, but what isn’t okay is the low-frequency elements get in each other’s way and distract from the rest of the song. No mix trick or plug-in can effectively fix this fundamental arranging mistake. The golden rule is, make sure the two complement each other in the arrangement.
Low-frequency instruments, like kick, bass, and 808s often fight each other for space in a mix. This fighting can be a result of overlapping frequencies, sloppy rhythms, or simply volume and balance problems. Additionally, many mixers who feel they can’t produce loud enough mixes are simply not controlling their low-end well enough. Clarity and balance in the low-end are what allow for loud masters.
Acoustic drums fit naturally against bass guitar because their fundamentals and harmonics tend to complement each other. In a clean arrangement, the kick and bass naturally blend to create a full low end. If you are overprocessing with EQ to make things work, you may be focusing on the wrong frequencies for each instrument. The kick drum tone doesn’t change much during a song, while the bass fundamental may vary greatly throughout the songs.
In the table below, you can see that the kick and bass overlap, especially in the low-frequency range. You need to determine what role each plays in your production and then find a way to have them work together to avoid conflict and still fill out the low end of the mix.
Kick Drum Frequencies
30 – 80 Hz – fundamental tone
300 – 600 Hz – boxiness (cut here)
4 – 8 kHz – Click
Above 5 kHz – bleed from cymbals (cut here)
Bass Frequencies
30 – 100 Hz – thickness of synth sub-bass
50 – 150 Hz – thickness of bass guitar
150 – 400 Hz – muddy range of bass
800 – 2 kHz – clarity and presence for bass
All In Good Time
In most pop music genres, it is essential the kick and bass hits that play together are accurate and tight. They don’t need to be perfectly aligned, but shouldn’t be dramatically off. All DAWs provide utilities for making timing adjustments. When by quantizing or a Flex Time operation, subtle tweaking can correct or reduce minor timing imperfections.
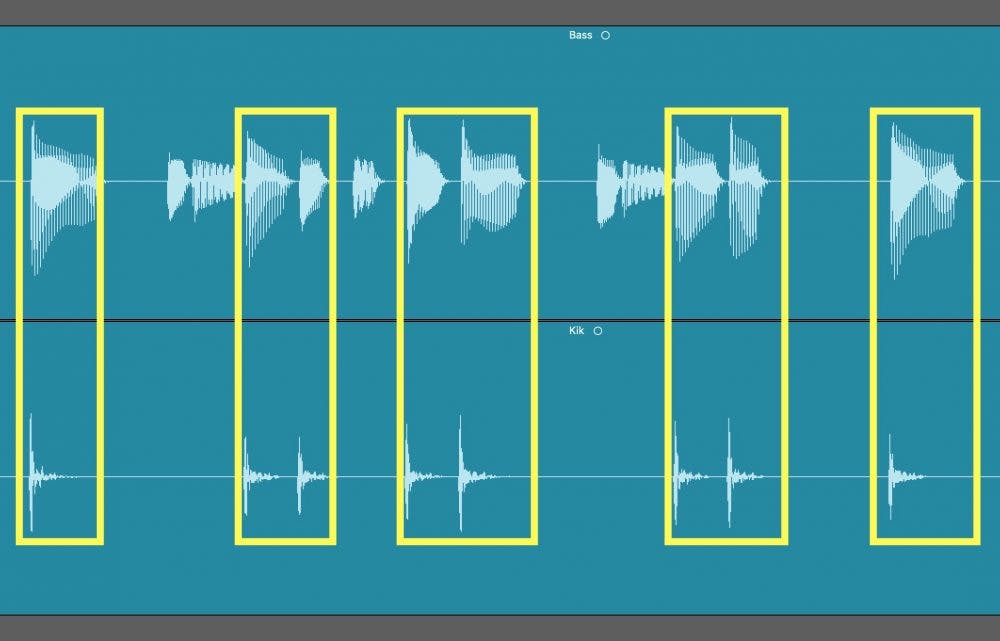
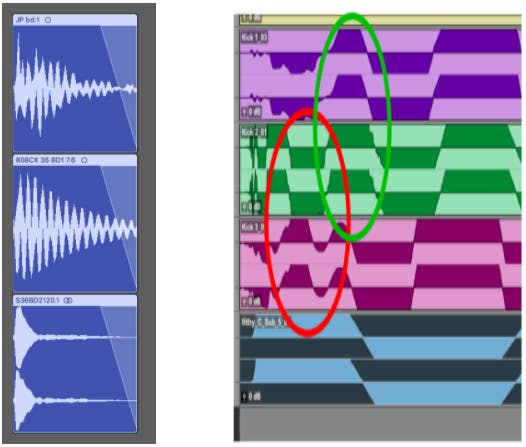
In many styles of music, it is common practice to layer multiple kick drum samples together. One sound may be a deep sub, another punchy low midrange, and possibly a third to emphasize the attack. When layering multiple kicks together, make sure their attacks line up and that their polarities sum well together. This guarantees a tight, punchy kick drum sound rather than a sloppy flabby or weak sound.
The length of bass notes also plays an integral role in establishing the groove. Kick drums are generally short samples, but bass parts consist of notes of varying durations. Depending on the style, often shorter, more staccato notes help the kick/bass groove lock better. Note length is particularly important if the bass part is busy or if the tempo is fast. Busy bass parts with sustained notes can muddy up the low end. Notes can overlap and resonances can build up.
Shortening bass notes is accomplished by the use of fades, or even time compression if necessary. If you are working with MIDI, making simple note length adjustments is easy.
Mono
We think of stereo as being bigger, better, broader, and deeper. Stereo imaging works best, though, if there are other elements in the middle for contrast. Stereo width for bass works nicely as an effect on some synth bass parts, but kick and bass tracks firmly centered give a mix punch and focus. Consider running your kick drum and bass tracks in mono, which may provide the added benefit of making the rest of your mix feel wider.
Tone Control
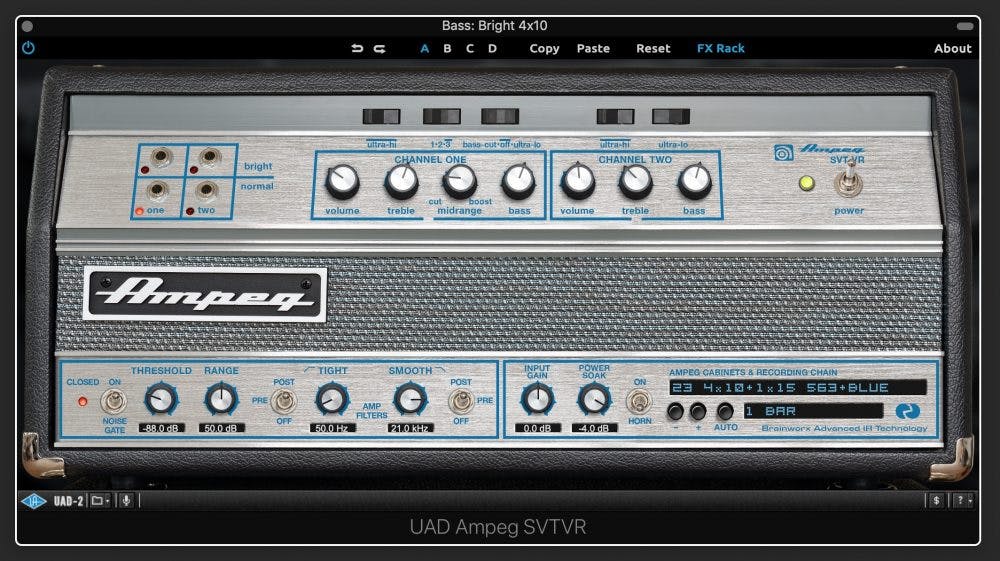
Bass amp simulations are a great way to sculpt the bass tone. Amps create upper harmonics that reinforce the fundamental frequencies without adding extra energy in the low frequencies. Processing bass with an amp can help it cut through a mix, even on small speakers. When recording a live bass, it is common to record the bass direct and also through a guitar amp. A guitar amp provides upper harmonics and midrange presence that compliments the DI signal in a different way than a bass cabinet would. Choose your amp or simulation to produce a bass tone that complements your mix and fits alongside the kick drum without extra mud.
Hammer and Screw Driver
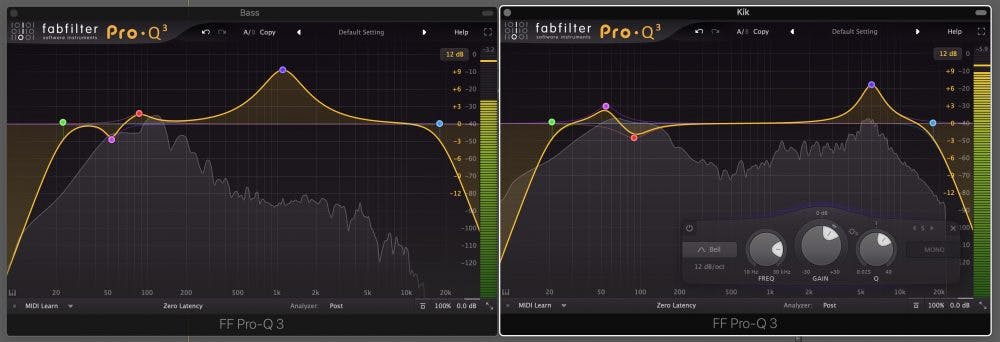
EQ and compression are the principle tools in any mixing situation, and they can be of great help getting kick drums and bass to fit together. The kick and bass together are responsible for the predominant energy in the low end of the frequency spectrum. Depending on the key of your song, it’s a good idea, if possible, to tune the kick drum so the fundamental tone is not in the same frequency range as the root bass notes. This way, you can carve out some space with EQ on each to make room for the other.
For example, the fundamental of an acoustic kick is in the 40 – 80 Hz range, while electric bass fundamentals extend up to almost 400 Hz. You may choose to boost the kick drum EQ with a relatively tight band around 50 Hz, and cut gently in the 100 to 250 Hz range. Do the opposite on the bass channel for a clean bass tone and a solid kick thump. For a jazz song, the bass may occupy the 40 – 100 Hz range and the kick will sit a bit higher, around 100 – 150 Hz. Here the bass provides the bottom while the kick provides a rhythmic pulse, but no low end.
Rock kick drums often benefit from a boost in the 3-5 kHz range to add the click from the beater’s attack. Basses generally don’t have much tonal content this high up in the frequency spectrum but do benefit from a push around 900 to 1.5 kHz to help them cut through, especially in dense arrangements.
Programmed kick drums and synth basses can vary widely in their fundamental frequencies, so choosing the right sounds during the production stage is extremely important. There are some advanced mixing techniques that will help out when the kick and bass need to take up similar frequency ranges, such as in trap music where the 808 acts as a bass line with heavy sub-bass content, often in the 30 – 40 Hz range.
Mixing Techniques
Dynamic EQs and even multiband compressors can often solve the problem of cleaning up intermittent frequency clashes. Dynamic EQs can be set to boost or cut frequency bands based on the amount of energy in that band, while multiband compressors only provide compression, so choose your weapon to suit your need. Set these processors to automatically adjust the signal when a specific note or frequency range is too loud or too soft.
Bass parts often contain some loud notes and some soft notes. Set a dynamic EQ to boost any soft notes so that presence remains consistent. The same idea applies to 808 drums. You can also set a dynamic EQ so that when the fundamental of the bass overlaps the kick drum, the bass is slightly attenuated.
Masking
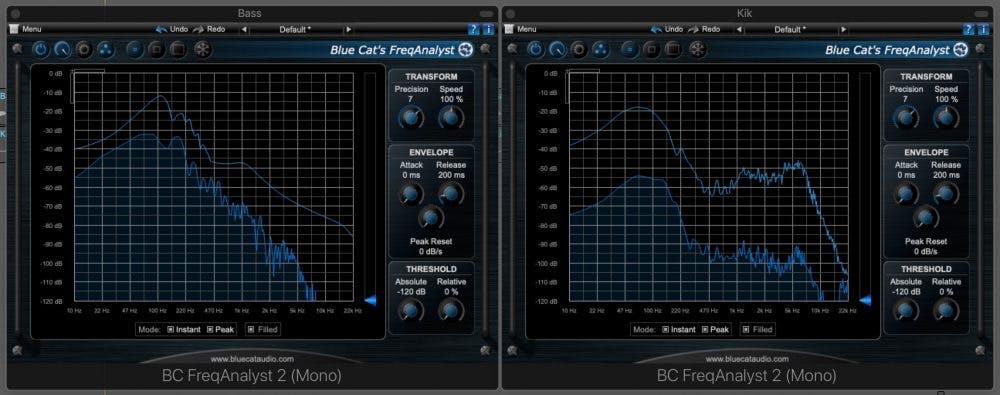
In addition to EQ and compression, many companies provide tools available that can automatically detect and correct frequency conflicts in a mix. For example, insert Izotope’s Neutron on your bass track and choose the kick drum track from the masking sub-menu.
Neutron presents a flashing display in the areas where the frequencies between the source track (bass) and the masking track (kick) are conflicting. You can then see and control the frequency settings of both the main track and the masking track from the one plug-in to correct the conflict.
Even without Neutron, you could insert frequency analyzer plugins on the kick and bass tracks and open them side-by-side. A glance at the two while the track is playing will identify the peaks and valleys in each track.
Compression
Last but not least, let’s not forget our trusty compressor. The trick to compressing basses and kick drums is to set a relatively slow attack (greater than 30msec) so the transients will pass through intact. Squashing the attack of either the bass or the kick results in weak sound. A release that is too fast can cause distortion. The attack of the sound gives the part its groove.
The compressor, set this way, acts upon the sustain portion of the notes. It fattens both kick drum and bass sustain by reducing their dynamic range and allowing you to raise their overall level. The faster the tempo, or the busier the part, the quicker you want to set the compressor’s release, but a very fast release may cause unwanted distortion.
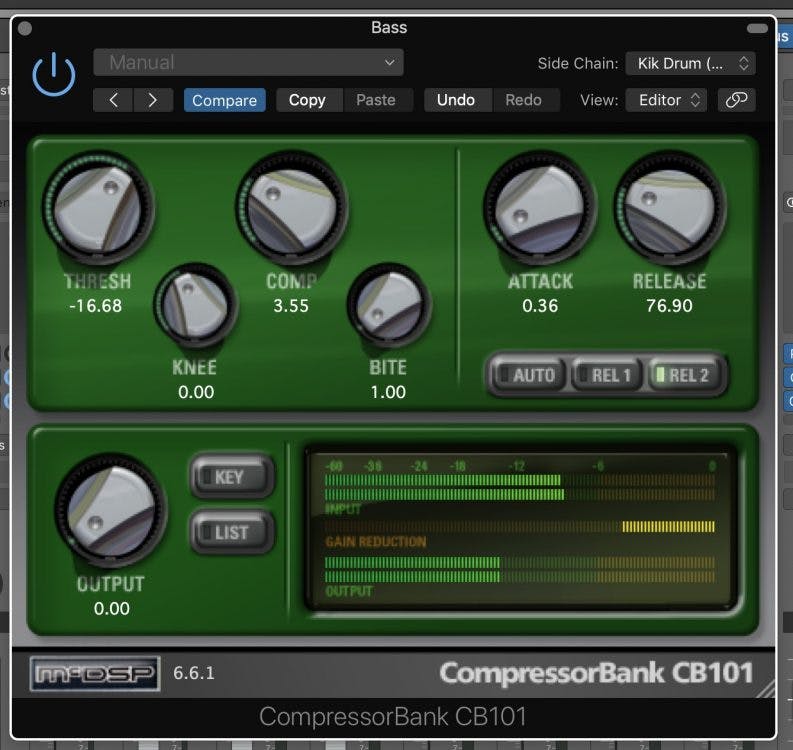
Sidechain
Sidechain compression is another powerful technique for marrying the kick and bass together. Rather than alter the frequency response, as Dynamic EQ does, sidechain compression can duck the level of one sound based on the volume of the other.
The classic sidechain example is to place a compressor on your bass track. Send the kick drum (via an aux) into the bass compressor’s sidechain input. When the kick and bass play at the same time, the bass gets pushed down to make room for the kick drum. The bass is not compressed when the kick is not playing. In this context, faster attack and release times help the bass react and recover quickly in response to the kick drum. This effect can be subtle or exaggerated depending on how apparent you wish the “pumping” effect to be.
In the End
It’s unlikely you’ll need to employ all of these techniques all the time. But some of them will undoubtedly come in handy when faced with a groove that just isn’t working. When mixing, there are two ways to handle the low-end. One is to build your balances so that the main lead and rhythm instruments are well-balanced and then fill in the bottom as much as you can. The second method is to build a solid bottom and then add on top of that as you mix.
Both methods can work, and you may find that certain styles or productions lend themselves to different approaches. Many mixers try to tread lightly on processing low-end instruments while others apply whatever is needed to hammer the bottom into shape. With experience, you will surely develop your own style.
Keep in mind that proper monitoring is key to building a solid bottom. Invest in a good pair of headphones, set up your monitors correctly, and treat your room effectively. Finally, apply some room or headphone correction with Sonarworks Reference 4 to ensure confidence that you can correctly hear and judge the low-end elements of your mix.


