Volume. Level. Gain. Amplitude. We engineers use a lot of different words to talk about loudness—but none of them offer an entirely accurate description. Loudness, a commonly misunderstood term, is as complex as it is important. This article will explain everything you need to know about loudness so you can master your tracks like a pro. Read on to learn about the difference between peak and RMS metering, different ways of measuring sound, and different methods for achieving loudness when mixing and mastering.
What Is Loudness?
Loudness is commonly confused with volume. The two terms, however, are entirely different concepts. Volume is a scientific measurement of the quantity or power of a sound. Loudness, on the other hand, is much more difficult to quantify as it is completely subjective and based entirely on your personal perception of sound. The frequency content, duration, and volume of a sound are all factors in how we perceive its loudness.
We often describe volume using Sound Pressure Level (SPL), which measures the change in air pressure caused by a sound. If you’ve ever stuck your hand in front of a subwoofer and felt those pulsating bursts of air, you understand the concept. We can measure SPL with a meter, but SPL doesn’t gauge how subjectively powerful or how loud a sound will seem to an individual.
The easiest way to understand loudness is to listen to two different frequencies at the same monitor volume level. First, play a 1 kHz sine wave and adjust your monitor controller so the volume is comfortable. Now play a 10 kHz sine wave without adjusting the monitor controller. Hopefully you will notice that the two tones do not have the same loudness, even though the volume level has not changed.
Volume can also be measured in its electrical form using the decibel system. A decibel (dB) measures the ratio between two levels: the level being measured against a fixed reference level. Decibel numbers relate to a specific scale, or reference point, like a voltage level. You can think of it like measuring temperature, where we all know that 75 degrees Fahrenheit is much different than 75 degrees Celsius. It is important that you know the scale, like C° or F°, in order to understand what the temperature measurement means.
Analog and Digital Levels
For analog audio, volume may be measured using the dBu scale on a VU meter, which represents a value referenced to .775 volts. VU meters are calibrated so that a professional audio meter reads 0 VU at a voltage of +4 dBu, or 1.228 volts.
In the digital domain, volume is measured using the dBFS scale, which stands for “decibels relative to full scale.” Digital audio signals become clipped at 0 dBFS, which is the loudest digital signal that can be represented without distortion. While there is no single standard for converting between digital and analog levels, many DAWs define analog +4 dBu, or 0 VU, as -18 dBFS, while some companies use other standards, like 0 VU = -20 dBFS. A reference level or -18 dBFS = 0 VU provides 18 dB of headroom over 0, so the maximum analog level would be +22 dBu, or 18 dB above +4 dBu (0 VU).
Peak Metering vs. RMS Metering
Now that we’ve determined how to accurately measure volume levels, let’s talk about how that information is displayed. Most analog and digital systems use a combination of peak metering and RMS (VU) metering. For instance, Pro Tools meters, when set to display “Digital VU,” show the peak level with a single yellow tick and the RMS level with a solid green bar on the same meter display. The peak floats above the green bar and it is easy to see both values and compare the peak vs. average level as the sound plays.
Peak metering measures the maximum instantaneous level of a signal. Peak metering does not offer an accurate measurement of perceived loudness, but instead indicates how close our signal is to clipping.
Designed to emulate the response of analog VU meters, digital RMS meters react much slower than peak meters and more accurately display the perceived loudness of a signal. Sustained sounds display higher RMS levels than transients signal (like short percussion hits).
To better understand RMS (VU) vs. peak levels, simply create a click track in your DAW and take a look at a meter that displays RMS + Peak. The meter will display the average (RMS) level as a solid bar and the peak level as a single bar or tick. A click track, which has a very high peak level and low average level, will show very different levels for the peak and average levels. Now try the same experiment with a string pad or flute sound. In this example, you will notice that the RMS and peak values are very close to each other. This experiment shows us that percussive sounds have very high peak levels but low average levels, while less percussive sounds have similar peak and average levels. The example in figure 1 shows a Pro Tools meter displaying a plucked acoustic guitar next to a distorted electric guitar and you can see the differences in the peak vs. RMS level on the meters.
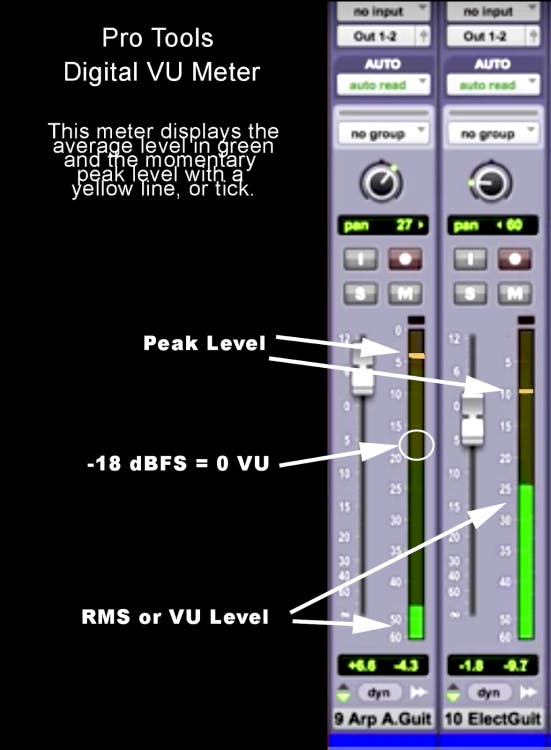
Fig.1 meter example
The K-System Meter
In practice, many engineers use a combination of peak metering, RMS metering, and their ears to determine the true perceived loudness of a track. However, a more sophisticated system for measuring loudness was introduced in by Bob Katz in 2000. According to Katz in the September 2000 issue of the AES Journal article How To Make Better Recordings in the 21st Century – An Integrated Approach to Metering, Monitoring, and Leveling Practices; “The proposed K-System is a metering and monitoring standard that integrates the best concepts of the past with current psychoacoustic knowledge in order to avoid the chaos of the last 20 years.” In other words, he found a way to set meter levels and monitor volumes that makes sense to our ears and eyes.
The idea behind the K-System is that different types of music require different amounts of headroom, but the average level of music should be standardized. Classical music or film scores require about 20 dB of headroom above their average level to allow for loud moments, dynamic pop music requires 14 dB of headroom, and very compressed pop or rock music requires 12 dB of headroom. Bob Katz proposed one meter scale for each musical style and named them K-20, K-14 and K-12. Therefore, a K-20 meter places its 0 dB (0 is the target) at 20 dB below full scale, K-14 places 0 dB at -14 dBFS, and K-12 places 0 dB at -12 dBFS. So we can say “Master this song for K-14” or “Master this for +2 dB over K-14.”
It turns out that most humans enjoy music (or films) at nearly the same loudness level (SPL), which turns out to be right around 83 dB SPL. Therefore every movie theater is calibrated so that pink noise played at -20 dBFS produces a volume level of 83 dB SPL from each speaker in the theater. This allows a film mixer to know that their mix will translate in every theater, all around the world. When working on modern pop music productions, especially in smaller rooms, we often lower that monitor level by 6 dB to 77 dB SPL.
To use the K-System in your studio, play pink noise with a signal generator plugin at a level that reads 0 dB on a K meter in your DAW. Adjust your monitor gain so that an SPL meter set to C weighting and slow response reads 83 dB at your listening position when only one speaker is playing. Then repeat this process for the other speaker. You may want to mark your monitor controller positions for each K scale reference level (K-20, K-14, K-12), and you might find that the -6 (76 dB SPL) is more appropriate for long days of music production. The K-scale you choose as your meter will depend on the style of music you are producing.
LUFS / LKFS
The K-meter has been further refined and a modern standardized approach to measuring perceived loudness is called the LUFS or LKFS system. Originally called Loudness Units relative to Full Scale (LUFS) and renamed to Loudness, K-weighted, relative to Full Scale (LKFS), this loudness standard was created in 2006 as to standardize audio levels for video formats. Most broadcast, film and video game companies have adopted LUFS / LKFS as the standard for measuring loudness and a typical film mix level spec would be stated like: -27 dB LKFS ±2 LU.
In order to represent perceived loudness more accurately than ever before, LKFS/LUFS measures levels over a longer period of time and with a flatter frequency response than a standard VU meter. Even streaming audio services are getting in on the action. Here’s what Spotify recommends regarding loudness levels:
“Target the loudness level of your master at -14 dB integrated LUFS and keep it below -1 dB TP (True Peak) max. This is best for the lossy formats we use (Ogg/Vorbis and AAC) and will ensure no extra distortion is introduced in the transcoding process… Negative gain is applied to louder masters so the loudness level is at ca – 14 dB LUFS. This process only decreases the volume in comparison to the master; no additional distortion occurs.”
All this technical speak means that a song with an average level on a K-meter or -14 dB and a peak level of -1 dBFS will play on their service exactly at the volume it was uploaded at. A louder song will simply have its volume lowered to match this reference level. All streaming services use similar rules so that all the songs play back at a similar volume and the listener does not have readjust their volume for different songs. In practice, most well produced top 40 pop songs have a K level of about -8 dB during their loudest chorus section and an overall K level of about -11 dB. It is also recommended to leave 1 dB of peak headroom on masters so that conversion to mp3 or other lossy formats does not introduce extra distortion.
Achieving Loudness in Mastering
Since most streaming services adjust, or normalize, the level of every track to -14 dB LUFS, mastering engineers can’t simply use a maximizer or limiter to push our masters as loud as possible. Instead, we have to create the correct impression of loudness using mastering tools like equalization, saturation and dynamic range processing to create the intensity and loudness that suits our music.
Tools for Measuring LUFS Levels
While some DAWs like Steinberg’s Cubase and PreSonus Studio One are equipped with LUFS meters, most DAWs only provide basic peak and RMS meters. Don’t worry; there are plenty of highly accurate and surprisingly affordable, or even free, options for LUFS meter plug-ins. Here are a few of our favorites:
- Nugen Audio VisLM or Mastercheck Pro
- iZotope Insight 2
- Waves WLM Plus
- Meter Plugs K-Meter and Dynameter
- Youlean Loudness Meter
- Klanghelm VUMT and VUMT Deluxe
Now that you know what loudness is, how to measure loudness, and what LUFS your mixes should be at, the only thing left to do is put these new skills to use. Calibrating your room for loudness is one important step towards consistent mastering and mixing, and perfecting your monitors’ frequency response with a tool like Sonarworks Reference 4 may be the next logical step. Happy mixing and mastering!
Continue reading our other tips and tricks here.


