
Sidechain compression has been around for decades, but it’s become an increasingly popular technique in the last few years. As track counts continue to grow and mixes become more complex, producers are looking for ways to carve out space and enhance the impact of each track. In this blog, you’ll learn how to set up sidechain compression on any track or bus, and I’ll share some of my favorite tips to help you dial in punchy, detailed, modern mixes.
What Is Sidechain Compression?
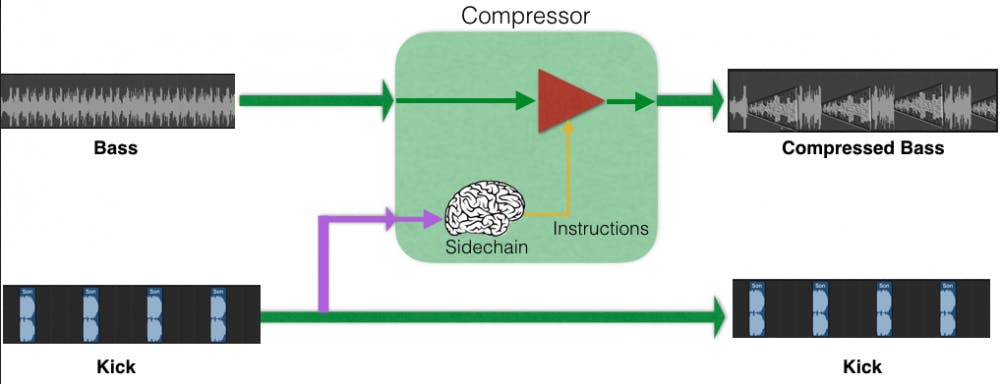
Sidechain compression is a mixing technique that allows a compressor on one track to be controlled by another source in the mix. Unlike traditional compression, which applies gain reduction based on the level of the signal you’re compressing, sidechain compression allows you to trigger gain reduction based on the level of a different source.
The concept of sidechaining can seem complicated at first, but once you master it, sidechain compression will help you achieve better separation and clarity in your mixes. For instance, two or more instruments often compete for attention in the same frequency range, like a kick drum and sub-bass. In this case, we may want the bass sound to dip in level each time the kick plays so that we hear the attack of the kick clearly. The kick drum signal will trigger the compressor on the bass track so the bass dips in level each time the kick hits.
Here’s how to set up sidechain compression.
In this example, we’ll sidechain the bass guitar compressor from the kick drum, but the same setup can be used for any tracks:
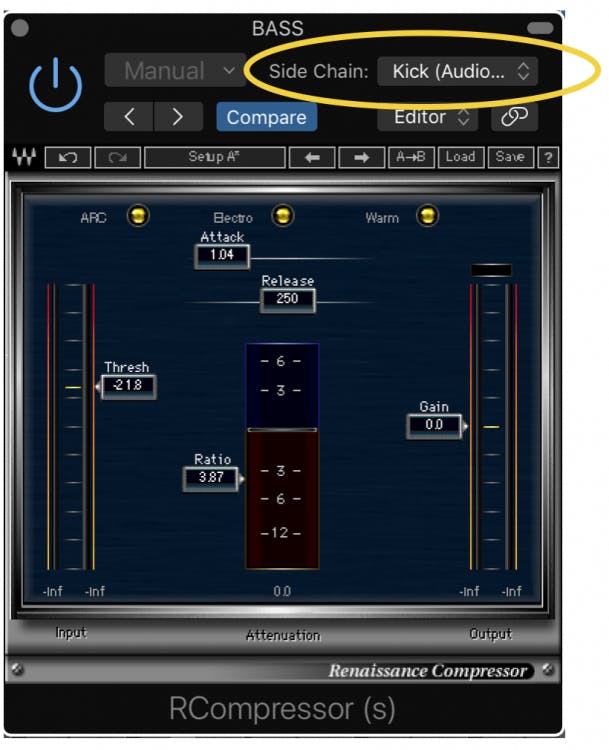
- Insert a compressor onto the bass track (select a compressor with a sidechain or key input).
- Select the kick drum audio as the sidechain input. This signal will control when the compressor engages.
- Depending on your DAW, you may need to create an aux send that routes the kick signal to the bass compressor’s sidechain.
- Some DAWs automatically allow any audio track to be “picked up” by the compressor’s sidechain input.
- Adjust the threshold and ratio controls so that the bass is compressed by the desired amount whenever the kick drum hits.
- Tweak the attack and release times to taste, depending on the specific effect you want to achieve.
- In most cases, you’ll want to use a fast attack time (< 10ms) to quickly duck the audio.
- Short release times (20ms to 75ms) are best for subtle ducking effects, while slower release times that are timed to the tempo of the track are best for obvious pumping effects (more on that later).
Using Sidechains Effectively
Let’s take a look at some practical examples of how to use sidechain compression in a mix.
Kick + Bass in Rock and Pop Music
In the example above, we demonstrated the common practice of sidechaining a bass from a kick. Let’s take a closer look at what this popular technique does to your sound, and what to listen for while tweaking settings.
Kick and bass often occupy the same sonic real estate and getting clarity from the kick drum means that the bass can’t compete with it. Instead of carving out the frequency content of either the kick or bass, sidechain compression can be used to duck the level of the bass to make room for the transient burst of the kick drum. By setting fast attack and release times, you can make the kick stand out over the bass every time it hits—and the listener won’t even notice the compressor kicking in and out.
When compressing a bass guitar, the goal is to create a consistent level and solid tone, so we often use medium attack times (20ms – 40ms), which preserves the punch of the bass. With sidechain compression, our goal is to quickly push down the attack of the bass so we hear the initial attack of the kick drum, then quickly return the bass to its normal level.
One of my favorite tools for this situation is the Universal Audio 1176 compressor, thanks to its lightning-fast reaction times and gritty tone which helps bass tracks cut through the mix. I like to use a relatively high ratio, like 8:1 or 12:1, along with a super-fast attack time. Release times will vary from song to song and the 1176 allows medium to slow release time (50ms – 1.1 seconds). For uptempo performances, use a faster release time, and for tracks with more sustained notes, you can use a slightly slower release—just be careful not to create any unwanted pumping effects from too-long release times.
It’s important to note that not all 1176 plug-in versions have a sidechain input. Look for a model that does, like those from UAD, Native Instruments, Softube, or McDSP. Some manufacturers, like Logic, emulate the 1176’s sound but refer to their plugin simply as an FET compressor.
Dance, EDM, and Pop Music’s Pumping Grooves
In dance and EDM genres, it’s common to use sidechain compression to intentionally create a rhythmic, exaggerated pumping effect. Often used on bass, synths, arpeggios and even the entire mix bus, sidechain compression is a powerful tool for enhancing the groove of a song.
For this technique, I like to use the Waves C6 multi-band compressor, which offers independent sidechain control over each band. This really lets me fine-tune how each frequency range reacts to the pumping effect. I may want the powerful low end to pump while the highs stay consistent, for instance.
Insert the C6 directly on individual tracks or on subgroups of specific sounds, like synth pads. Then assign the track that you want to control the compressor(s) with to the sidechain input of the C6. This sidechain trigger is typically the kick drum—especially with classic four-on-the-floor tracks—but you can also use drum loops, basslines or synth stabs.
You can create a dedicated sidechain trigger signal with a MIDI or audio track. Percussive sounds with short decays, like woodblocks or sidesticks, make good trigger signals for sidechaining. This way, a wide range of attack and release times can be dialed in on the compressor. Remember not to send this trigger signal to your mix bus!
Try a quick attack (1ms – 10ms) on the band you wish to pump and time the release to the tempo of the track. Typically, a quarter note release time works well, but try other note values, like eighth, sixteenth, or even dotted values.
It’s easy to calculate the release time values if you know the tempo of the song. Use a calculator and take 60,000 and divide it by the tempo of the song (BPM). This gives you the millisecond value for a quarter note. Divide that by two for an eighth note and so on.
60,000 ÷ BPM = quarter note duration in milliseconds
For instance, if the tempo of your track is 120BPM, a quarter note would be calculated as 60,000 / 120 = 500 milliseconds. Use this as a starting point for the release time and tweak as needed. A slightly faster release time can give the track a sense of urgency—like you’re pushing the tempo. Slower release times will give your track a chill, laid-back vibe.
Vocals + Reverb
A vocal that is too wet will get lost in a mix, but if it’s too dry it’ll stick out like a sore thumb. For songs that require some reverb on the lead vocal, sidechain compression can be a great way to improve vocal clarity and presence without sacrificing any depth or spaciousness. Oftentimes we high-pass filter the reverb return or add predelay to the revert to avoid muddiness, but add this trick to your arsenal of ways to clean up reverbs that muddy your lead vocal.
For this effect, set up a reverb send from your lead vocal and insert the reverb plugin on an aux channel in your session. Insert a compressor with a sidechain input after the reverb plug-in on the aux channel. Then, assign the vocal to the sidechain input of your compressor. Your vocal should now be sent to the reverb aux and also the sidechain input of the compressor.
This setup allows the compressor to duck the output level of the reverb whenever the dry vocal is playing and between vocal phrases the compressor releases its grip on the reverb, allowing you to hear the long, lush reverb tail without masking the dry vocal.
For this approach, I like to use a versatile compressor like Logic Pro X’s stock compressor, because it allows me to tailor the color and style of compression based on the type of reverb I’m using. For instance, for a dark plate reverb, try a VCA compressor to quickly and cleanly duck the reverb. For a more dramatic pumping effect, you might prefer the slow release of an optical compressor. The Logic Pro X stock compressor provides plenty of options to choose from.
Fast attack and release times produce a subtle and effective sidechained reverb effect, while slow attack times will allow the first few words of each lyric to be swallowed up by the reverb. Long release times can create audible swelling effects, which can make your mix sound like it’s lacking cohesion, but extreme settings may produce a unique effect that adds a new dimension to your mix.
Full Mix Sidechaining
Try putting a compressor on the mix bus and sidechaining it from the lead vocal track. This might seem drastic, but used gently it’s an effective way to make sure the vocal is always on top of the track. This approach works particularly well when tracking or mixing vocals over a premixed two-track beat.
Try compressing your mix bus with the sidechain triggered by the kick drum for really deep pumping effects. You can automate the send to the sidechain to exaggerate the pump during certain sections of the song and stop the pumping during other sections.
Sidechain Alternatives
If setting up sidechain compression seems confusing or you’re having difficulty producing the sounds you desire, there are many plugins that create the sidechain effect for you. Check out Waves OneKnob Pumper, Nicky Romero’s Kickstart, xFer Records LFO Tool, or Infected Mushroom’s Gatekeeper.
Don’t forget about volume automation! Sometimes the simplest solution is best. You can draw in any shape of volume modulation onto your bass, synth buss, reverb track, or anything else that you want to add a unique envelope to. Fine-tune one or two beats and copy/paste for a quick fix.
Try out these tips during your next mixing session to help you achieve better separation and clarity, while still retaining a punchy, cohesive sound.
Continue reading our blog to learn more mixing and production tips & tricks.


