
A major turning point in my production journey occurred years ago when I started treating my sessions as if I was a band. I would start by “jamming” until I found a decent idea—before “songwriting”. Then I’d develop a vision for each “bandmate”, and begin arranging. Arranging usually consisted of “recording” each instrument for each section of the song and then going through fine-tuning, re-recording, etc. before doing a proper mixdown. By this I mean I start a production by performing parts live and recording the parts as audio. In my case, performing refers to playing a virtual or hardware synth or manipulating samples or even applying plugins to an audio track.
Some of you may find this strategy familiar, and if so that’s great. But I believe many electronic music producers don’t initially think this way because they often work completely in the box and are unfamiliar with traditional music production as it relates to producing a band or recording artist. We are a new breed that sound-design, write, produce, arrange, mix, and master our songs all by ourselves. That doesn’t mean, however, that we can’t build upon the previous generation’s methods.
Please excuse my heavy use of air quotes earlier, and let me elaborate. “Jamming” often means just that—noodling on a hardware or VST instrument, though it could also mean combing through loops and samples. Or it could be using plugins for experimental sound design—it’s just the initial discovery phase. I’d define “songwriting” as expanding the initial music motifs as well as developing the supporting parts. The initial idea doesn’t always have to be a lead or hook—maybe it’s a cool bass groove, and then the “supporting parts” could be chordal or melodic elements.
During this songwriting phase, I work with a 16 or 32 bar loop and try to end up with fairly developed drums, a bassline, and at least 4-8 melodic elements. Note: this doesn’t mean 4-8 melodies! It could mean one melody, a backing chord progression, and then 5 different tonal one-shot sounds. The idea here is to create your “band”; put down all of the various elements and sounds that you will later space out throughout the arrangement. It is at this stage where working with audio clips is very useful. I’ll often record a number of takes for each element, ending up with dozens of clips, large and small, ready for arranging.
Arranging begins as a subtractive process where I duplicate the loop for several minutes and then carve away to a basic song structure while using various clips throughout. Once this song structure is in place, I’ll go back and “record” each element. Oftentimes this involves live automation bounced to MIDI and audio, or manual changes to MIDI patterns or manipulation of existing audio. Recording these performances as audio is crucial when working with LFOs or random modulation sources in order to capture a part exactly how it sounded during a given pass. I’ll do several takes of the major elements through the entire journey of the song and splice together the best parts until I’m happy with everything. This is the “comping” mindset used in more traditional production workflows.
During the songwriting phase, it’s important to build out your “band” and record several takes of each element with varying degrees of automation, even if you’re not quite sure if or how it will fit into the song. I create these clips as audio files, which we will get to shortly. Having this pool of audio clips to work with and place within an arrangement is key in this strategy. You may even re-record every single bit once it’s arranged, but that doesn’t mean the prior “placeholder” recordings weren’t useful, since they helped accelerate the arrangement process.
Working In Audio
This production method encourages and almost requires working with audio. Building a pool of clips and takes early on will make the transition from loop to full song much easier and increase the likelihood that all of your parts gel together. After all, you made an effort to build your “band” in the beginning. This mentality of working in audio has a number of benefits, whether more conceptual and practical as mentioned above or at a tactical level relating to arrangement, composition, and sound design.
I believe that quantity leads to quality. To quote Art and Fear (Art & Fear: Observations on the Perils (and Rewards) of Artmaking, by David Bayles and Ted Orland), one of my favorite books on the creative process: “The function of the overwhelming majority of your artwork is simply to teach you how to make the small fraction of your artwork that soars.” While this topic is substantial enough for its own article, my point here is that finishing tracks is important, and anything you can do to speed up the process is valuable.
So how can adopting this mentality help speed up your workflow? Let’s start with three examples.
First, working in audio forces you to commit to ideas and move on, preventing the endless tinkering that we are all so familiar with. Second, it leaves you with a ton of audio clips that—if not used in that track—can be stored in your personal sample pack and used in a future project. More often than not, a jam on my Eurorack synth intended for one project gets binned and then used in a new project weeks or months later. When inspiration strikes, it’s incredibly useful to have a folder full of great homemade sonic ideas ready to fill out your new project. You can build your personal sample pack relatively quickly if you adopt the strategy of “picking your instruments” during composition but before arranging. Referring back to similar sounds across multiple projects can also help develop your signature style.
Finally, by auditioning sounds, patterns, melodies, progressions, etc. through the entire journey of a song, you can more easily decide if that idea or element is strong enough and worth using before you’ve invested too much time into it. Put another way, without jamming on a riff and manipulating different envelopes, filters, and modulation parameters, you may not realize its limited potential until you’ve already made it the focal point of your track in a full arrangement.
Manipulating Audio
Now that I’ve covered the more conceptual and practical advantages, I should mention some other benefits, which lie in the realm of sound design. Working in audio can add some new techniques to your toolkit, including trimming tails, creating fades, reversing, warping, chopping, slicing, transposing, and resampling. Using audio clips also allows you to more precisely place your sounds in an arrangement—I find this especially helpful with long attack sounds like strings or SFX when lining up can be difficult without the visual aid of a waveform. These tips are based on my experience in Ableton Live, though these tips work in any DAW.
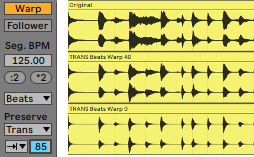
Besides the obvious uses of reversing, chopping, and time-warping audio, one of my favorite audio manipulations involves using Ableton’s Beats warp mode to create a gating effect on loops or samples. (See image at right) Select the forward arrow and Preserve Transients (“Trans”) and adjust the depth from 0 to 100 to gate the sound at every transient. The depth is essentially the decay/release of the sound at each transient point. You can also switch the Preserve mode to a synchronized beat division for gating on the grid. I find this technique very useful for tightening up slushy drums, removing reverb or noise from a loop, and unearthing minimal-techno-esque sounds out of unsuspecting drum loops.
Since you can manually delete existing transients or add them (cmd+shift+i) at any point in the audio clip, you can effectively create custom patterns out of any source. Try making a rhythmic pattern out of a long ambient loop for an effect reminiscent of the haunting staccato synth in the 2009 masterpiece, Moth by Burial and Four Tet.
using the Beats warp mode set to preserve transients at 25.
Resampling is something you should definitely be experimenting with if you aren’t already. It’s pretty well covered across the internet, so I’ll just mention that one common production technique is to resample a reverb or delay tail to create ambience and then reverse it for an FX sweep.
Workflow Tips
Before sending you on your way to explore the magic of working in audio, I’ll leave you with a few workflow tips to help smooth the transition and get the most out of it.
When working with VST synths, you can get many of these aforementioned benefits while still retaining the control that MIDI offers. Try creating an audio track to which you route your MIDI instrument track’s output. If you record enable both the MIDI and audio tracks, you can capture both the MIDI and audio recording simultaneously. Now you can save your original MIDI track while experimenting with the audio. I like to apply effects to the audio channel rather than the MIDI instrument when I do this, so I’m not permanently printing any effects. This also allows you to freeze the VST instrument on the MIDI track to save CPU while still keeping any effects chains fully modifiable. There are exceptions to this, like if you want to print a reverbed or delayed sound as audio to further manipulate it.
Try mapping various VST instrument parameters to the knobs of your MIDI keyboard or controller and then record MIDI control automation in realtime. No amount of careful curve-drawing can replace the vibe and emotion captured by the physical turning of a knob. You’re also more likely to stumble upon a happy accident when working this way. Don’t limit yourself to just VST synth parameters either; try automating different parameters of delays, panning, frequency shifters, or whatever else you’ve got going on. While the “magic” of analog synths usually refers to the sound coming out of them, I think there’s something to be said for the inspiration and creative potential that comes from performing on real knobs in front of you.
Additionally, don’t be afraid to automate multiple parameters at once, even if it requires overdubbing multiple automation passes. And if you want to leave some things to chance, experiment with LFOs—definitely whip out the Max for Live LFO if you haven’t already. There is a point at which you’ll overdo it, but I think that ceiling is worth approaching before backing off; sometimes the point of all this modulation is to reveal a new sound or idea, rather than to include the entire performance in your track.
Utilize Ableton’s Clip View as a virtual storage locker for unused takes, without cluttering up the arrangement view. Just cut and paste a recording from one view to the other.
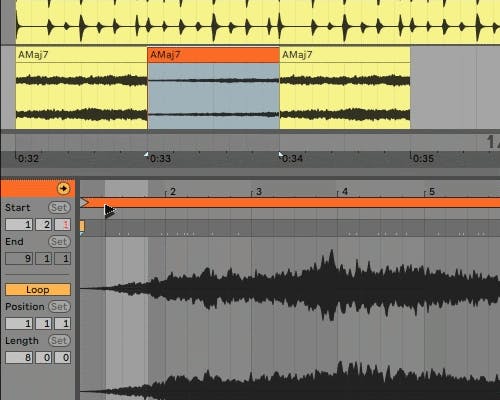
Once you’re working inside of an arranged track, a nifty trick for scanning through a long take is to set the clip as a loop with the loop length as long as the entire recording and then move the start point around to scan through it. This way you can audition different parts of the recording inside your arrangement without having to enlarge the loop to its full length. (see image)
Hopefully, these tips and tricks will encourage and enable your journey into the world of audio. For the record I have nothing against MIDI—I still use it constantly. I just know that experimenting with audio was a major turning point in my journey and I believe everyone can benefit from the possibilities it provides. Feel free to reach out to me at hello@enamourmusic.com with any thoughts or questions.
You can follow me on socials here, check out my music here, and production tutorials here. If this article was helpful, I’d encourage you to check out the 5-day masterclass I recorded last month–It’s the most in-depth and jam-packed course I’ve ever taught.