
Modern musical productions tend to be much much more complicated than a 4-piece band performing live in the studio. Because productions wind up with so many layers of sounds, we may not know how our drums will fit into the mix until we get pretty far along into the production. It would be great to be able to re-record drums after most of the production is complete, but because of time and money constraints, this isn’t usually possible. For this reason, drum samples have become an essential part of modern music production in everything from ripping rock records to EDM bangers to country jams.
In this blog, we’ll share some of our favorite tips for layering drum samples to help you make the most out of your next project. You shouldn’t feel like you’re cheating by adding drum samples to a production. Just make sure the samples compliment the original sounds and contribute to realizing the original intention of the production. These tips relate not only to augmenting or replacing live drum recordings but apply just as well to programming realistic-sounding drum performances.
Find Samples that Complement Your Tracks
Perhaps the biggest mistake most people make when working with drum samples is trying to make one sample do all of the heavy lifting. Drum samples are best used to augment and improve the existing recorded sounds. The trick is to blend the samples with your recording for a cohesive sound. With almost an unlimited number of samples available to us, it can still be difficult to find the exact sounds we need. Layering samples on top of your existing tracks can help augment the punch, low-end, attack, or ambience of the recorded sounds. See the list at the end of this article for information on where to find great samples.
Drum replacement, rather than layering, completely replaces the sound of a live recording with samples, and should only be used when absolutely necessary, as it almost always sounds sterile and unnatural. With that in mind, analyze your drum recording and decide what you do and don’t like about it. Is the kick too boomy? Is it lacking low-end? Does the snare have enough snap, crackle, and thump? Or does it sound like you’re hitting a wet cardboard box? Only then look for samples that provide the elements that are lacking in your original tracks.
For instance, if a kick drum is bright and snappy but needs more low-end, find a kick drum sample with a solid bottom and dull top-end. Utilize the high-end of the recorded track with the bottom-end of the sample to create a balanced sound. The same goes for the snare and toms.
You can also find samples that complement the timbre, as well as the tone of the drums. For instance, if your snare drum recording sounds tight and dead, you might look for a sample with a longer sustain or more room tone. Alternatively, if your toms are dull but ring too long, you could look for samples with a pronounced attack to add clarity to the tom hits.

Try layering multiple samples to get the right sound. One kick sample may provide the bottom, one the mid-punch, and another the click. The goal is to find a blend that enhances what you like about your current drum recording and compensate for anything you don’t like. The samples shouldn’t replace or overpower your existing tracks.
Tune Your Drum Samples
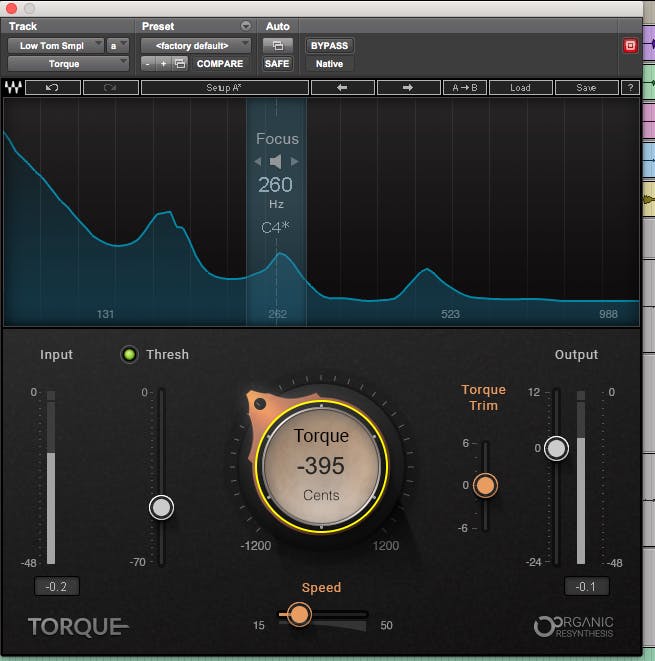
Even after locating what sounds like the perfect sample, you find that it doesn’t sit quite right in the mix. You might not be able to put your finger on it, but something sounds off. In many cases, this occurs because the drum sample isn’t in tune with the rest of the drums or the key of the song. This idea may be new to you, but tuning drums to the key of a song is very important.
Even though most people don’t consider drums to be “melodic” instruments like a piano or guitar, many musicians feel that the tuning of each drum, especially the snare and toms, should relate to the key of a song. Improperly tuned drum samples can cause the song to sound dissonant or confusing. You may not even notice the issue until you correct it, but when you finally get the drums in tune everything will lock into place and the song will feel more cohesive.
While recording, the drummer and producer need to ensure that the drum kit is appropriately tuned for the song. If you have to mix a song with improperly tuned drums, you can use standard pitch correction tools like Autotune or Melodyne, or specialized drum tuning plug-ins like Waves Torque to help dial in the appropriate drum tones. As an engineer, you should familiarize yourself with how to tune and dampen drums—it might just save a session.
Retuning drums with plugins can work with close-miked recordings, but it’s difficult to tune drums tracks that contain a lot of bleed. It’s also impossible to tune individual drums captured by room or overhead mics. Adding properly tuned samples can “steer” the drums to the correct tonality while retaining the dynamics and atmosphere of the original live kit.
CHECK FOR PHASE ISSUES
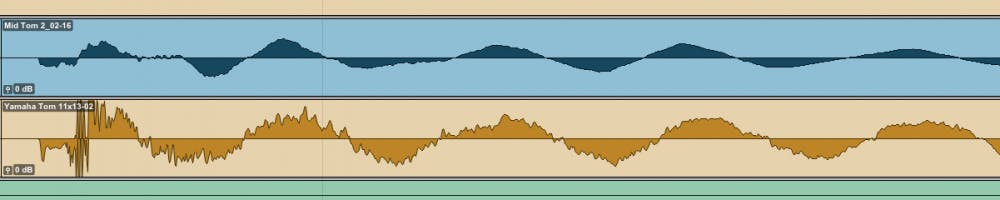
Phase issues that cause comb-filtering leading to weak sounds can arise during recording and also when layering samples with live recordings. If your samples don’t line up properly with the original tracks, even by as little as a few samples, it can throw the whole recording out of whack. Hopefully, the drums were recorded with proper microphone technique and attention to phase, and you should continue to be aware of phase issues as you add samples.
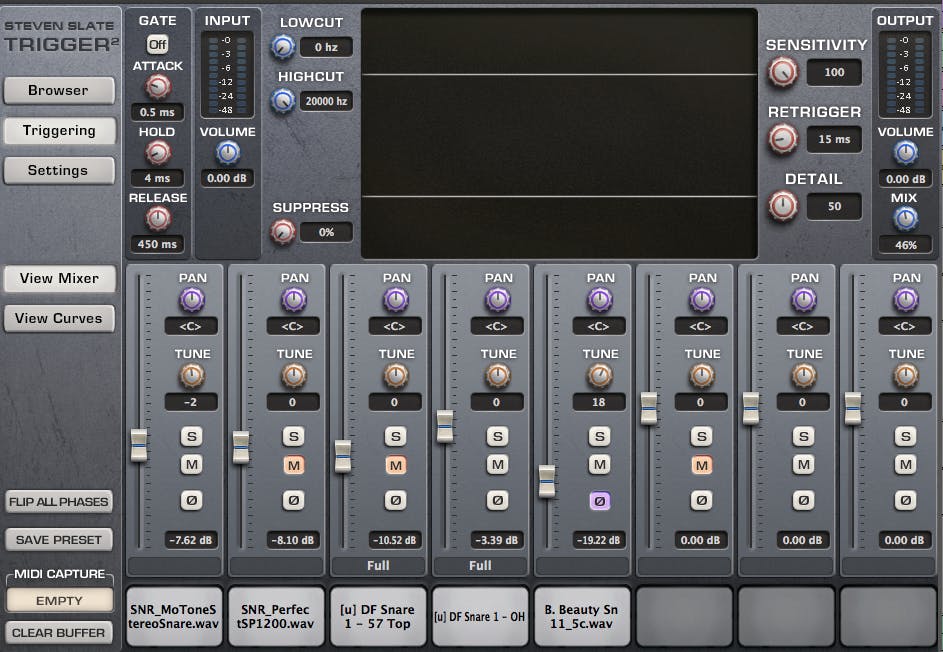
If you’re using a dedicated drum replacement software like EZ Drummer, Drumagog, or Steven Slate Trigger, the samples will automatically trigger based on the transient of the original sound. In the plugin, you can also tweak the timing, polarity, and in some cases the envelope of the samples to ensure there are no timing or phase issues. After you have dialed in the triggered samples, you should print the samples as audio to verify and adjust the samples’ timing and phase relationship against the original tracks. I’ll often find one or two hits during a song that didn’t trigger the same way as all the other hits.
If you’re manually inserting drum samples, you’ll need to adjust the timing of the samples by hand. Plug-ins like UAD’s Little Labs IBP (In-Between-Phase), Sound Radix’s Auto-Align, and Waves’ InPhase can be useful tools for identifying and correcting phase issues between multiple tracks. If you’re looking for a free solution, you can manually zoom in and visually align each transient by nudging the waveform in your DAW. Keep in mind that a typical song contains a couple of hundred kick drum hits, so manually aligning samples can be quite tedious.
Fit Sounds Together with EQ
After selecting samples that complement your original drum recordings, use EQ to carve out space for each sound to help create a more cohesive sound. For instance, in the previous example of a bright, snappy kick drum recording with the bass-heavy sample, you could use a high-pass filter to roll-off the low-end on the live kick track to make room for the sample. Similarly, you could use a low-pass filter the sample track. This will help ensure that the tracks compliment each other without masking one another. When using high-pass or low-pass filters, you’ll need to re-check the best polarity of the sounds, as steep filters wreak havoc on the phase relationship of a sound. You should also try linear phase EQs in this case.
It’s also important to consider any overhead mics, room mics, and any other tracks with a significant amount of drum bleed. You may need to EQ these tracks to allow room for the samples. Just be careful not to carve these tracks up so much that they sound unnatural. You won’t need to cut as drastically as you did on the close-miked tracks—just use those frequencies as a starting point and cut as needed. Check out our blog post on drum EQ techniques for more info.
Bus Compression for Glue
Most drum samples come heavily processed to make them sound radio-ready out of the box. Because of this, they tend to require less EQ and compression. However, mild bus compression can be a great way to glue samples together with the recorded tracks. A little bus compression will force the samples to pump, breathe, and blend more naturally with the original tracks.
Route all of your tracks to a drum bus and use a “gluey” compressor like the SSL G-Series, API 2500, or Fairchild 670 to apply 2-4 dB of compression. Use a gentle ratio, like 2:1 or 4:1 to keep from over-compressing the samples. Use a slower attack time (> 20 ms) for more impact or a faster attack time (< 20 ms) to help tighten up the sound. Time the release to the tempo of the song for a punchy sound, or use the auto release setting for a smooth response. Review our blog on drum compression for more tips.
Parallel drum bus compression and multi-band compression are powerful tools for creating powerful and controlled drum mixes. Use your favorite multi-band compressor, like FabFilter Pro-MB, Waves C6, or TDR Nova to compress each frequency range with unique settings. Boz Digital Labs’ Manic Compressor provides parallel compression ideally suited for drum busses.
Create A Space With Reverb
One of the reasons that drum samples tend to stick out in mixes is because they are typically dry, close-miked sounds. When we listen to a live drummer, we don’t listen with our ears six inches from the kick drum—at least not more than once!
Hearing the sound of the drums reflecting off the walls is part of how your brain makes sense of what it’s hearing. That’s why it’s important to add a little bit of reverb to all of your samples. Yes, even the kick and toms. I know, I know—one of the golden rules of mixing is to never use reverb on the kick or the bass. But your kick sample will stick out like a sore thumb if it doesn’t sound like it’s in the same room as the other instruments. Be tasteful—too much reverb on a kick drum can sound like a basketball bouncing! Many sample libraries and drum instruments provide samples with varying amounts of reverb or real room ambience baked in.
To achieve a convincing drum ambience, send each of your drum samples to an aux track with a reverb that sounds similar to the tone of the drum room in your recording. I typically use either an ambience or small room preset, with the reverb time between 200 and 500 milliseconds to create the effect of the drums reflecting off the walls. I may also add an additional medium-to-long plate or room reverb to give the drums a natural sustain. Applying the same reverb(s) to the samples and original drums tracks will help create a cohesive, natural drum sound.
If a reverb adds too much low-end mud to your mix, place an EQ before the reverb plugin and roll-off everything below 200 Hz or even higher. Blending short, punchy reverbs with longer reverbs or even mono reverbs can help create a convincing sense of ambience around your drum mix. For more tips on reverbs, review our reverb blog post.
Summary
Don’t be afraid to beef up your drum tracks with layered samples. Just follow these suggestions and develop your own techniques and style to create the best drum tracks you can. Be sure to review our articles about processing drums. These tips apply to live, programmed, or layered drum tracks:
Creating Ambience and Depth with Reverb
There are many amazing libraries out there, but here are a few to get you started:
Drumforge Drumshotz produces drum libraries used by top producers and mixers
Steven Slate Drums is a great source for drum packs and drum replacement plugins
GetGoodDrums.com produces plugins and live drum libraries as well as groove packs.
FXpansion’s BFD3 provides software and samples for many genres.
XLN Audio’s Addictive Drums 2 provides software and ADpacks for live drums.


