
We all strive for not only great sounding mixes, but also consistency among our work. We never want a client to say “Your last mix was great, but this one doesn’t feel as good.” It may be easy to tell them that their previous production was better/different/whatever and this new mix came out great, despite their ‘challenged’ production, but we can do better!
In this guest blog, Tom Frampton, from Mastering the Mix, explains two plugins that he has developed which assist you in maintaining consistency and analyzing your mixes, masters, and raw tracks. REFERENCE is a sophisticated plugin that allows you to compare your full mix to other reference mixes, comparing loudness, eq, and dynamics throughout the mix or in specific frequency bands. MIXROOM compares individual tracks, subgroups, or stems to reference tracks to see how you may better treat elements inside your mix.
Over the years, I have built up a pretty effective arsenal of tools and methods to provide similar analysis, but Mastering the Mix has boiled these cumbersome methods down to a pair of ingenious plugins. Let’s let Tom explain how to take advantage of these powerful mixing tools. – Adam Kagan, editor
Picture a new fan who finds your music on Spotify. They get pulled in by one of your awesome songs and decide to check out more of your material. This is the moment where you can make a new fan fall in love with your sound. But, to achieve a distinctive sound that characterizes your productions, there needs to be a level of consistency.
This can be particularly difficult when you’re using different recording spaces/equipment, different synth patches, different vocalists, etc. It’s great to have elements of variation in your productions, but glaring changes can throw your listener off. In this post, I’ll explain a bulletproof way of maintaining consistency between your releases.
Know Your Playback Environment
Getting to know the quirks of your monitoring system is crucial to effective decision making. You’ll experience your songs differently through monitors, through headphones, in the car, and in a club.
If your monitors and studio space are bass-heavy, you might dial back the bass in your mix or master too much to compensate. When you play the track in the car, the mix will feel weak.
Establish a consistent playback environment when you’re making music and understand how your mix will translate when heard on different systems. I use Sonarworks Reference 4 to give me a neutral listening experience in my studio in order to minimize the difference in sound between my various playback systems. This allows me to make subjectively good mixing decisions that I can trust.
Use Your Previous Releases As Reference Tracks
Using your best sounding previous releases as reference tracks is a great way to set the balance between the various elements in your mix. It might sound simple, but the loudness of the kick, snare, vocals, synths, etc in the context of the whole mix is the foundation of consistency (and geat sounding mixes!).
Fire up an instance of the REFERENCE plugin by Mastering The Mix, load up your three of your best sounding previous releases, set the mode to ‘FREE’, and loop the choruses of your reference tracks by clicking and dragging on the waveform, then Control+Click on the loop to select it.
Now loop the chorus of the track you’re working on and hear how it compares to your existing songs by clicking the central Original/Reference button. Monitor the full mix, but try to listen to how the individual elements are balanced in the context of the other instruments. Is the kick too loud? Are the vocals too bright?
The white level lines at the bottom of the display will show you the difference in the overall tonal balance between the track you’re working on and previous releases. If the white line drops below the central 0dB line, that frequency range is quieter in your track than your reference, and you may decide to turn it up to keep the sound consistent.
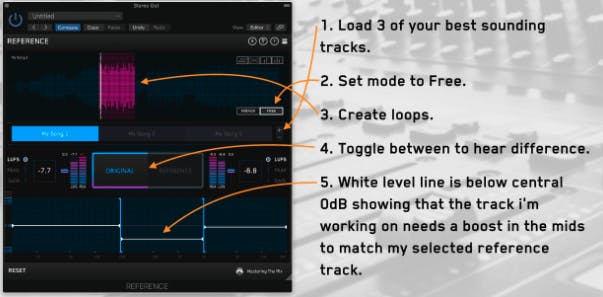
Note: if you’re working on a mix, but comparing your track to released final masters, be sure to use the instant level match feature in REFERENCE. This will ensure that the difference in loudness doesn’t make you believe that the released reference tracks have a fuller low-end and more clarity in the high-end. This can lead to very poor mixing decisions that can take a long time to fix.
EQ Matching Based On How The Human Ear Perceives Tonal Balance
REFERENCE is perfect for an overview of balancing your overall sound, but what about individual channels? Let’s say you released a track with an awesome female vocalist and loved how it sounded. Now, you’ve got a new track with a different female vocalist and you want to try and get a similar brightness, body, bite, and clarity.
Trying to match how the ‘peaks’ look in an EQ is a fruitless endeavor as they don’t correspond well to how humans experience the balance of frequencies.
With MIXROOM, by Mastering The Mix, you can analyze a file (such as that awesome vocal stem from a previous release) then preview your new vocal to generate a target EQ curve. This target EQ curve guides you to what EQ is needed to get your new vocal sounding more like that existing vocal stem.
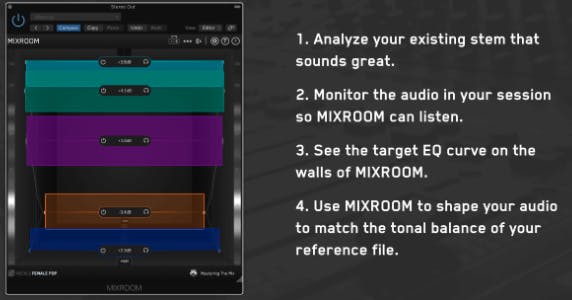
This is a methodical and reliable way to keep you sound consistent, and it works great whether you’re working on a vocal, instruments, buses, or even mastering your song. Check out the video below for a 2-minute instruction video of how to set this up.
Conclusion
Help your audience recognize your sound by keeping it consistent across your releases. Try the techniques explained in this post to help you establish your sonic branding.


