
In this article, we’ll focus on workflows that will organize your tracking sessions so that you are more efficient and have more time to spend on the creative process. Templates provide a great foundation for an efficient workflow and we also have some valuable tips to save even more time as you track and get ready for editing and mixing.
Why use templates?
Some engineers love to hate on templates. They argue that having tracks, routing, processing, and effects set up ahead of time stifles creativity, and is a sign of being a lazy engineer. Using the same reverb and delay plugins, and the same settings, make for a lot of mixes that sound the same. My opinion is that they couldn’t be more wrong. If anything, using templates allows you to be even more creative by making your tools available to you for when inspiration strikes.
What’s the point of re-creating the same session over and over again? Surely, having tracks in the same order and labeled and colored the same in every session makes it much easier to keep track of what’s going on. And why not have your favorite delay or reverb plugins ready to go all the time, so you don’t have to worry about setting them up for every new session? The same goes for any of your routing preferences, including parallel processing or drum trigger setups.
Templates speed up the workflow for tracking, mixing, and even songwriting. While this article is specific to tracking in REAPER, take a look at our previous article on how to effectively use templates in every situation.
Our friend and superstar mixer Billy Decker recently published a book called “Template Mixing and Mastering” in which he delves deep into his universal mixing template and his thought process. Billy is very strict about his track layout, plugin selection, and in certain cases, even having the waveforms be of a certain height is essential to his sound and workflow.
This gentleman of mixing has an amazing portfolio; his mixes are alive, they’re exciting, they’re dynamic, they’re modern, and they emphasize what’s cool in every song he’s mixing. Does the fact that he uses an extremely strict template hinder his work or his creativity? Clearly not. As a bonus, he can mix a few songs each day. The speed is impressive (and profitable) but more importantly, Billy’s templates speed up the setup time and allow him to spend his time on balances and the feel of the song.
“Templates are… Good… Great”
Recording template
Recording templates are just as valuable as mixing templates, especially if you track in your own studio. In fact, since tracking is often done in (expensive) commercial studios and artists don’t want to be slowed down by technical considerations, a time-saving, vibe-stimulating tracking template can be invaluable. You’ll probably want to create one all-encompassing tracking template that covers most situations you’ll face.
I generally track bands that play instruments and sing in various genres. Accordingly, I use a fairly classic layout: drums, bass, acoustic and electric guitars, keys, vocals. My template contains a few plugins to help the performances feel polished even during tracking, such as EQ, compressors, reverb, and delay.
Color your tracks. The same applies to tracking templates as mixing templates. Colors help us to quickly locate and identify specific instruments. My drums and percussion tracks are always red, the bass is blue, acoustic guitars are a weird lime, electric guitars are yellow, keys are green, strings are cyan, sound effects are a washed-out green. Lead vocals are purple, backing vocals are pink, and effects channels are orange.
Warning: During tracking, if you are not using a beefy computer or don’t have a low-latency monitoring setup (a feature of certain interfaces, like those from Avid, RME, PreSonus, and UA), you may need to turn off any latency-inducing plugins from your master fader or monitoring chain, especially linear phase EQs and any processors that use oversampling. Any latency in the artist’s monitors will ruin their ability to record.
Markers in REAPER
I’ll be short: make life easier for yourself and the artist. During setup, listen to the song and create markers at the start of each section. Markers also make it a breeze when the artist wants to punch-in a line or two. Drop a marker (default Shift + M) at the punch-in location and then just click on the marker and press record. Remember to enable pre-roll before recording in the Metronome options.
REAPER Metronome
A very small number of users encountered issues with Reaper’s built-in metronome. This led a few power users to create a more advanced, more customizable way of creating a click track.
If you’re one of the few people that have problems with the built-in metronome, or if you want to do more with it (EQ and compression, anyone?), follow along with me:
- Turn off the built-in Metronome. Go to Options > Metronome Enabled (uncheck)
- Create a new track and create a time selection for the length of your song.
- In the top menu bar, go to Insert, then click on Click Source.
If you want to have access to both accented and unaccented click tracks, I’ve added my click track template here
Once you’ve downloaded the file, open REAPER, go to Options in the top bar, click on Show REAPER resource path. In the newly opened folder, go to the TrackTemplates folder. Copy-paste the file you just downloaded to this folder.
Restart Reaper and you should be able to insert the click track from its template. Right-click in the Tracks area, under any of your tracks. Go to Insert track from template and choose Click Tracks from the menu.
You can even change the samples used for the click sources. Right-click them and go to Source Properties. The Primary beat sample and the Secondary beat fields are where you browse for the replacement sound sources.
After you’ve changed the samples, select the CLICK folder, as well as all the children tracks, right-click and choose Save tracks as track templates. Tick the box next to Include track items in template so the click source items are saved as well. Click on “click tracks.RTrackTemplate” and press Save. Finally, click on Yes/Ok when asked if you want to overwrite the file.
Now that the metronome is a track just like any other, you can process the click however you want to. Is it too pokey? Use a transient designer to soften it. Too harsh? EQ it.
Create The Mix While You Track
While recording, you should try to make the monitor mix and headphone mixes sound like a finished record. This will make the players feel great when recording and create a great vibe for the session. As soon as you know the style and feel of the song, start getting balances and panning and think about what effects and processing will enhance the production. Err on the dry side with time-based effects as the performers may lose their center of pitch and groove if there is too much reverb or delay.
Some engineers prefer to record clean, unprocessed sounds and monitor with insert compression and EQ while some prefer to apply compression and EQ while recording. REAPER provides insert effects and input effects to achieve either method. Be careful about printing with too much compression or EQ as you can’t undo it later and you may not make accurate decisions during the heat of a busy tracking session. You can always add more processing later.
REAPER Input FX
Occasionally, I record with Input FX while tracking. While any plugin can be used as an Input FX, the processing is done by your CPU, so you might run into some latency issues. Depending on your system, you may get away with some colorful plugins, such as preamp or tape emulations. For Input FX, I like Slate’s Virtual Mix Rack, whose preamp emulations are not CPU hungry.

REAPER’s built-in ReaEQ is super light on resources and works great for processing sounds while recording. If you are making aggressive EQ changes, you may consider simultaneously recording to a second track without input fx processing. During mixing, you may decide the unprocessed recording to be the better fit for the song.
Don’t overcomplicate your session, but a safety track may save you at some point.
Get a Head Start on Editing
Here’s another great reason to record on two tracks at once. If you record an electric guitar through an amp, you should also record a clean/DI signal to a second track. Not only does this allow for later reamping, but this will also help you tremendously when editing. Overdriven guitar waveforms look like bricks, which makes finding the start of hits difficult to see in the waveform. The clean track is much easier to view and we can edit the tracks based on the clean guitar’s waveform if we just group the tracks. Here is a quick and easy way to fix timing issues in dirty electric guitars.
- Select both guitar tracks (select the audio files, not the track names), right-click on an audio clip, go to Group, and click Group Items (G). (You may have to enable item grouping in the top bar menu options.)
- On one of the toolbars above the arrange window or above your track panels, right-click on the chain-looking icon. Click on Selecting one item selects group.
(The location depends on where you moved it; the icon depends on whether you’re using a custom template or not) - Now you can make edits based on the DI track waveform, and all the changes you make to it will also apply to the amped track.
Track Drums the Smart Way
More often than not, I record drums using the same number of microphones and the same track layout in REAPER. I love using track folders as busses since folders
Having all the relevant instrument tracks in folders that also act like subgroups lets me do a couple of things:
- I can hide or show the tracks at will, according to what I need to see at any given moment.
- I can process the whole instrument group as a whole, such as using Airwindows’ PurestDrive to clip the drum transients so I can bring the whole drum kit up in level.
- I can easily route the entire subgroup to a mix bus or effect.
- I can record-enable/disable all the drum tracks at once.
Nesting audio tracks into a Folder Track is simple.
- Create a new track above your drum tracks and click the folder icon below its track number to make it a folder.
- On the lowest track in the drum group, double-click on its folder icon. The tracks should now be nested under the folder.
I even created a custom Action to create a Folder Track. To create this Action, you’ll first need to download and install the SWS/S&M Extension for REAPER.
- Open the Actions window by pressing SHIFT + / (just like when you type a question mark).
- In the lower right corner, next to Custom Action, click New…
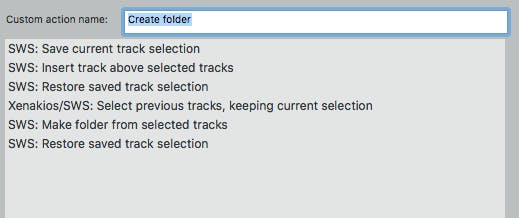
- Select the actions you see in the screenshot below.
- Tick the box next to Consolidate undo points. This option makes it so REAPER treats the custom action as one step when undoing. If you leave the box unticked, you’ll have to press undo six times to bring your session back to where it was before creating the folder.
- Select all the tracks you want to add to the folder, then use the newly-created custom action.
A useful Folder Track shortcut is arming all the drum tracks with a single click and here is how to enable that shortcut.
- In the Actions menu. Select Track: Set track grouping parameters (Shift + G)
- Select the Drums folder track, but not the drum tracks.
- Tick the box next to Record Arm Master/Lead.
- Select all the individual drum tracks.
- Tick the box next to Record Arm Slave/Follow.
- Rename the group to something relevant, such as “drums tracking”.
Now, whenever you click the arm button on the Drums Folder Track, all the nested tracks will jump to the same state. It’s much faster than clicking or even swiping across the individual tracks.
Fun tip: is the drummer hitting the cymbals too hard? Give him/her more overheads in the headphones. This will force the drummer to hit the brass less hard, making it easier to mix, but, more importantly, whatever they play will be groovier. Yes, how hard they hit the cymbals, even the hi-hats, affects how much a groove grooves. Word.
Vocal Recording Process
When it comes to recording vocals, you generally want to monitor them with some compression and maybe even a little EQ so the artist hears a great-sounding vocal while they are performing. Depending on the genre you’re tracking, Autotune, distortion, or other specific effects might be used as well. Bear in mind that these effects are generally applied as inserted Track FX, not as Input FX. I don’t want to risk messing up the vocal by overprocessing it during tracking. Vocals takes are precious, unique gems that may be impossible to re-record with the same delivery.
Vocals are almost always recorded separately from the band. In my tracking template, I have one vocal record track and several additional tracks for arranging the vocal. All these tracks are in a VOX Folder Track, so I can manipulate all vocals easily. During tracking, I record a couple of lines until the vocalist stops and then move the audio clip from the record track to the LD 1 track. The next line goes to the LD 2 track and so on. This way, comping and assembling the final vocal track is easy.
In REAPER, an audio clip moved from one track to the next should maintain its timing, provided Lock is activated. Right-click on the Lock icon in the main toolbar. Tick only the box next to “Items: prevent left/right movement”. This will let you drag items vertically, without changing their position in time.
You can also use 2 or 8 (numpad) to move an audio clip up or down vertically.
When tracking a singer or rapper against an instrumental mix, I sometimes EQ the instrumental so the vocal sits better inside the music. It helps the singer feel like they’re part of the production, as opposed to floating over the music, even during tracking. Generally, a medium-wide, 2-3dB cut at 500-1000 Hz removes just enough energy in the track to give the vocal more room inside the track. The ReaEQ is fine for this job during tracking, but I apply a less-invasive, but CPU-hungry dynamic EQ for this effect when mixing.
Headphone Mixes In REAPER
This particular way of setting up the headphone mix relies on using the Cue Buss generator, which comes with the SWS/S&M Extension, which you can download and install into REAPER.
- Select all the tracks you want to be sent out to the secondary/headphone outputs. This depends on what the artist wants to be able to have control over.
- Go to the Extensions menu, located in the top menu bar.
- Click on Cue Buss generator.
- Under Receives type, select Pre-Fader (Post-FX). This means the performer can have separate mix levels than the control room monitor mix.
- In the Buss name field, type “Headphones”, “Cue”, or whatever you want to call it.
- Under HW output 1, select the interface outputs that you will use for your headphones mix.
- Uncheck Master/parent send, so you’re not hearing this buss on your speakers. This setting ensures that only the musician hears the tracks that are sent to the Cue Buss.
- Check Solo defeat, which means that if you solo any of the tracks in the control room mix, you won’t disrupt the headphones output.
- Finally, click Create cue buss.

This makes a new track labeled “Headphones” (or whatever name you chose for it). All the individual tracks you initially selected now have sends to the Headphones track. All the panning you set up is also copied over, so the musician will hear the overheads hard-panned and so on. You can even insert FX, like compression or EQ on the Cue Buss Track to lightly master the headphone mix.
One GREAT thing you can do now is turn off the metronome in the control room mix, so you can focus on the performance without muting it for the musicians. Simply lower the fader for the Click track.
Artist Controlled Headphone Mix
Here is the promised session-changing tip. You’ll find this tip especially useful if your studio doesn’t have a sophisticated cue mix system such as the Hear Technologies Hearback or AVIOM systems. Even without a dedicated headphone mixer station for the artist, you can still allow the artist to set their own headphone mix levels using their phone or tablet, as long as the phone/tablet is connected to the same network as the computer running REAPER.
- Open REAPER’s Preferences (cmd+, for macOS and ctrl+P for Windows).
- Go to Control/OSC/web.
- Click Add.
- Under Control surface mode, choose Web browser interface.
- Click on the Default interface dropdown menu and choose more_me.html.
- Check the box next to Use rc.reaper.fm.
- Set the ID to be whatever you want, ie “TonyCue”.
- Click Apply Settings.
Now for the fun part that the artist will love you for:
- On any phone or tablet that is connected to the same network as the computer running REAPER, go to rc.reaper.fm/TonyCue (or whatever ID you set up earlier).
- Tap on Select your monitor track… and choose the track you created earlier.
To make sure this is working as intended, open the routing window for the monitoring track. - Move any channel fader on the phone and you’ll see that the corresponding fader moves in the routing window.
Let me reiterate that this is incredible. Each performer can control their own Cue mix, as long as you set up a Cue Buss Track for each headphone station. You’re eliminating the need to buy an expensive headphone system!
Reaper’s monitoring chain
Whether you’re tracking or mixing, you have to make sure that what you’re hearing through your monitors or headphones is accurate. You don’t want to be wondering if the muddiness in the snare comes from the recording or is only in your ‘phones. Likewise, you want to be sure that the sibilance you’re hearing on the chorus lead vocal is actually in the recording.
I remember my student days, when I was renting a room in a student house…the landlords didn’t care that I needed to put up acoustic treatment in my room to be able to work well. This situation is what pushed me to get SoundID Reference and a pair of Sennheiser HD650 headphones. I was blown away by what I could now hear!
I still do most of my work on that setup, it’s that reliable. I have next to no issues with my mixes and masters translating to other listening environments, and SoundID Reference’s new Translation Check feature makes it easy to audition how my work sounds in cars, on earbuds, smartphones, TVs, and so on.
The coolest thing about Reaper’s monitoring chain is that it’s a separate path from the render/export path, meaning you don’t have to worry about bypassing Reference when rendering your work.
Conclusion
Templates are indispensable if you want to work efficiently, at a professional level. You can’t spend 30-60 minutes just setting up every time you have to record or mix a song. Think about how much that setup time costs you. Also, take advantage of the cool features that REAPER offers. Even if you’re not techy, REAPER makes custom programming easy!
Have fun and treat your clients right. They’re working with you to have a great experience, not just to have their songs recorded.


